There are three statuses you should make note of at the top of the "Form 5500 - Year" screen that are described below. In addition, you may find options to invite users to the portal to sign or review/edit/upload attachments, depending upon the status of the plan and the settings selected under Work with Signers/Portal Users.
- Edit Status There are two possible statuses:
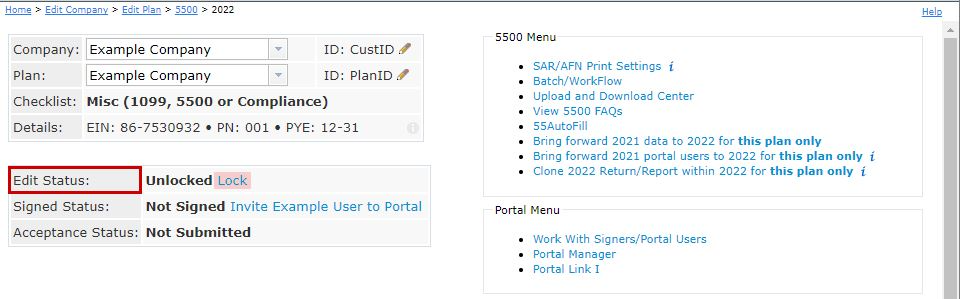
- Unlocked: You have not yet selected the option to "Lock" the filing. You may still make changes on the forms and schedules and you will not be given the option to invite your client to sign the filing or to sign locally on behalf of your client.
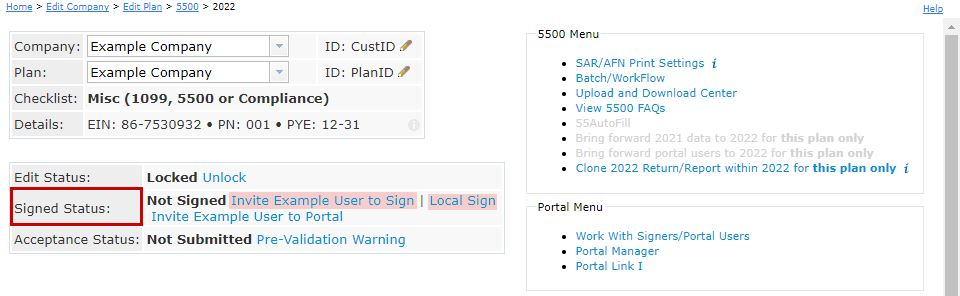
- Locked: Your plan is ready to be signed and you will be given the options to invite users to sign the filing or to sign locally (explained in more detail below).
 You and any other users (if applicable) will no longer be able to make changes to the filing unless you select the option to "Unlock" the filing. If a user has been invited to sign, unlocking the filing will cause the user to lose the option to sign the filing in the portal window (if they do not have any other permissions to view/edit or upload, then their portal window will contain no options).
If there is more than one signer and one of the signers has already signed the filing, you will lose the ability to unlock the filing. You will need to contact us at support@ftwilliam.com to enable changes to a filing once it has been partially signed but has not yet been submitted to the DOL. Note that once all signatures have been obtained, the filing will automatically be transmitted to the DOL.
- Unlocked: You have not yet selected the option to "Lock" the filing. You may still make changes on the forms and schedules and you will not be given the option to invite your client to sign the filing or to sign locally on behalf of your client.
- Signed Status: There are three possible statuses:
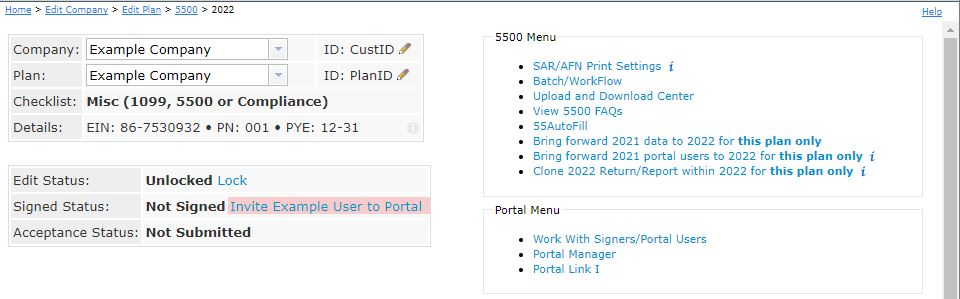
- Not Signed: If your filing has not been locked and there are users with permissions to review/edit/upload information, then you should see a link called, "Invite [Portal User's Name] to Portal." If your plan has been locked, you should see a link called, "Invite [Portal User's Name] to Sign," which is where you may start the process of inviting your clients to the web-portal. See below for more information about sending invitations to the portal.
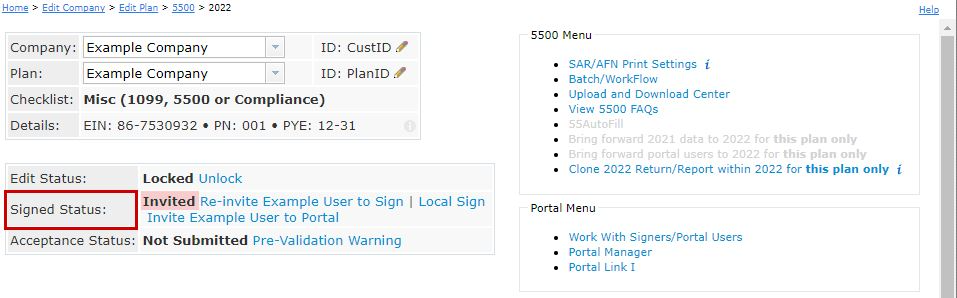
- Invited: At least one signer has been invited to sign the filing via the portal. After sending the Invitation Email to your client(s), you will want to select the option to "Mark 5500 as Invited." This will change the "Signed Status" line from "Not Signed" to "Invited."
- Signed: You have already invited your client(s) and they have signed (and submitted) the filing to the DOL.
- Not Signed: If your filing has not been locked and there are users with permissions to review/edit/upload information, then you should see a link called, "Invite [Portal User's Name] to Portal." If your plan has been locked, you should see a link called, "Invite [Portal User's Name] to Sign," which is where you may start the process of inviting your clients to the web-portal. See below for more information about sending invitations to the portal.
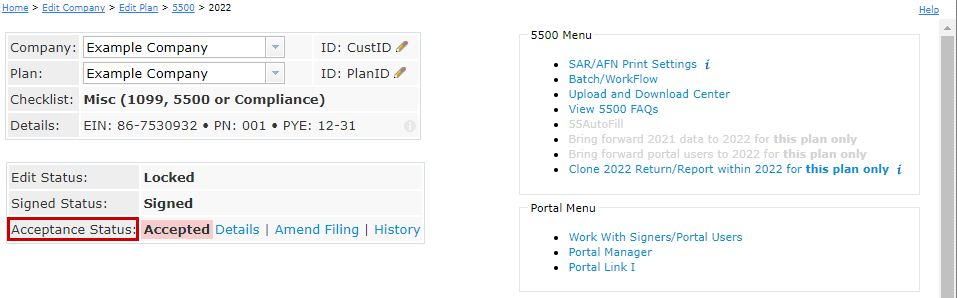
- Acceptance Status: This status comes from the DOL. There are five possible statuses:
- Not Submitted: Your filing has not yet been signed/submitted. Once signed, the filing status should be changed to "Submitted" as all filings are automatically submitted once the proper e-signatures have been obtained.
- Submitted (rare): Your filing has been submitted to the DOL, but it has not been processed yet. Next to a "Submitted" status you will be given the option to "Check Status" which may be clicked on in order to check the status of your plans.
- Accepted: The DOL has accepted the filing.
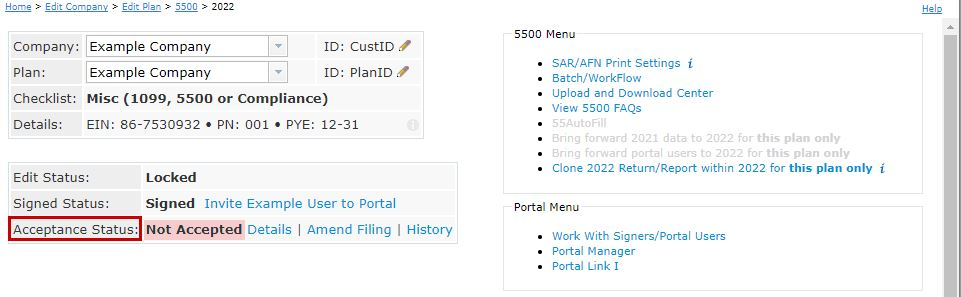
- Not Accepted: The DOL has not accepted the filing due to the plan not meeting DOL required edit checks. The software should provide you with a list of the DOL errors and/or warnings. (These errors and/or warnings are also included in the edit checks on the ftwilliam.com system, so if your plan has no errors before filing, your filing should generally be accepted). The filing is still considered filed but you will likely need to amend the filing (Click on "Amend Filing," update the filing, and re-sign).
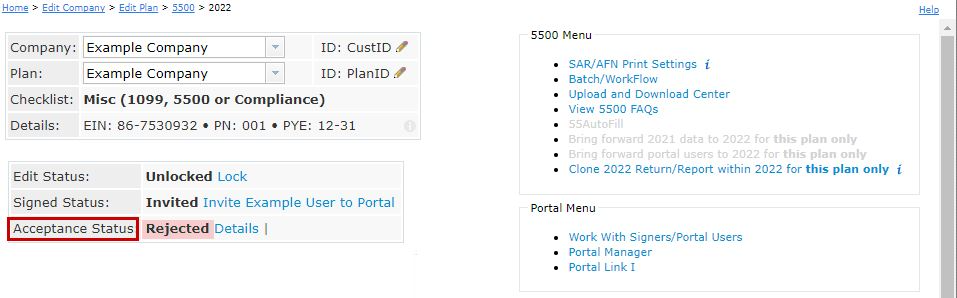
- Rejected: If certain fields are missing, your filing will be rejected. The fields are: plan year end/begin dates, EIN, plan number, and plan name. You will not have the option to amend the filing since the filing was never filed according to the DOL. You will need to unlock, modify and re-submit/sign the filing to the DOL.

 You and any other users (if applicable) will no longer be able to make changes to the filing unless you select the option to "Unlock" the filing. If a user has been invited to sign, unlocking the filing will cause the user to lose the option to sign the filing in the portal window (if they do not have any other permissions to view/edit or upload, then their portal window will contain no options).


As you complete each task, your status will reflect any and all changes. The "5500 Workflow Grid" will also reflect all actions that have taken place for each specific plan.
Once you would like to invite users to the Portal, you should first lock the filing and add signers under the Work with Signers/Portal Users link from the "Form 5500 - Year" screen. Once the form is locked and signers have been added for the plan, you will then have links available from the "Form 5500 - Year" screen next to the "Signed Status" indicator near the top of the screen. The link to invite will appear as "Invite [Portal User's Name] to Sign".
Click on the link to "Invite [User name] to Sign" and the "Invite Signers/Portal Users" screen will appear with summaries of the user(s) name, username and email.
Depending on your email settings, you will have different options to send and review the email:
- "Click to open email" (using Preparer's Email option - shown above)
Click on "Click to open email" and an email will be generated on your desktop from your personal email program (Outlook, Thunderbird, etc.). The email body will be composed from the default templates you created for the "Invite Signers Email" under Global Email Settings and the custom language (if any) provided for that user. Please note: if you are using a web-based email program (gmail or yahoo) that does not use software loaded onto your computer, this selection will not automatically open a default email. You may copy and paste the text provided into an email message when inviting.
Once you have reviewed the email one last time, you may then click the "Send" button in your email program to invite the user to the portal.
In order for the batch/workflow and the "Signed Status" to record the email being sent, you must click on the button "Mark 5500 As Invited" on the email summary screen. - "Invite Signers" (server was specified on the "Global Email Settings" screen)
A link is provided to preview the email body by clicking on "Preview." The email body will be composed from the default templates you created for the "Invite Signers Email" under Global Email Settings and the custom language (if any) provided for that user. Click on "Invite Signers" to send the Invitation Email to your signer(s).
The Portal Signing Experience.
Once a filing is locked and a signer is invited to sign, they access the portal via the link you send them with their username and password.
When your client logs in to the Portal for the first time, he/she will be prompted to answer three challenge questions and then will be prompted to enter a new password. The password your client enters will be used by your client going forward, for as many years as he/she is logging in and signing filings as your client.

You provide a password for your client for the first time he/she logs into the Portal (this is done on the screen where a new portal user is added). Once the portal user has logged in and responded to security questions, the portal password data entry will be replaced with a link to reset the user's password via an email to the user (under "Work with Signers/Portal Users").
Clicking on "Reset Password" will send an e-mail to your client containing a link for him/her to follow. Following this link will automatically log your client into the Portal and he/she will be prompted to enter a new password. Your client also has the option to click on "Forgot Password" on the Portal log in screen to answer his/her challenge questions and create a new password in the instance where he/she no longer remembers his/her password. The "Reset Password" email is sent from a "donotreply@ftwilliam.com" address. Your client should receive the "Reset Password" email within a few minutes of the button being selected, but we do suggest having your client check his/her Junk or Spam folder to verify the "Reset Password" email has not been re-directed to either of those folders.
After clicking on the link to "E-Sign 5500," signers will be taken to the "Sign 5500 - Year" screen shown below.
The signer must first click the link to "Print 5500" before he/she will be permitted to enter his/her DOL User ID and PIN to electronically sign the filing. There are also instructions to sign the paper version of the filing with a wet signature and a suggestion to save the pdf file to the user's hard-drive.
If you are using portal branding and you would like users to send you a copy of the wet signature page, you may want to indicate this or any other specific instructions within your portal branding.
The DOL User ID and PIN fields will not become editable until after "Print 5500" has been selected. If your client logs into the portal to print a copy of the filing, then logs back out without signing, he/she will need to click on "Print 5500" again after logging back into the portal to enable the DOL User ID and PIN fields.

The "Sign 5500 - Year" page reads as follows:
Step 1: Print Paper Copy of Form 5500You must print your 5500 before you will be allowed to sign. Print a hard copy of your 5500 by clicking on "Print 5500" below: Note: If you have logged out and back in, you must print the 5500 again to unlock Step 3.
[Print 5500 Button]If you do not have your signing credentials you will need to obtain them by going to EFAST2 Registration and clicking on 'Sign in with LOGIN.GOV. Click here for detailed instructions on how to obtain signing credentials.
If you have lost your User ID or PIN contact DOL EFAST2 support at 866-463-3278 or visit EFAST2 Login (click on "Forgot UserID" or "Forgot Password").
Step 2: Review and Sign Paper Copy before Filing
Once you have read through the filing and find it acceptable, sign the printed copy with a "wet" signature. Keep your signed copy in a safe place. A paper copy will not be sent to the Department of Labor but an electronic version will be sent once you electronically sign below.
Step 3: Enter/Review EFAST Credentials
Verify that Name, User ID, and PIN exactly match (including punctuation and spacing) what you entered/received from the DOL registration process. If it does not exactly match click the button "Change Name" below to change the name on this 5500.
Administrator/Sponsor Name: [Change Name Button]
Administrator/Sponsor User ID:
Administrator/Sponsor PIN:
Step 4: Sign and File Electronically
Under penalties of perjury and other penalties set forth in the instructions, I declare that I have examined this return/report, including accompanying schedules, statements and attachments, as well as electronic version of this return/report, and to the best of my knowledge and belief, it is true, correct and complete.[Sign Button]
If your client receive the below message while attempting to sign, he/she will need to verify his/her User ID and/or PIN are being entered correctly: Your client will need to log into his/her profile on the DOL's website at http:www.efast.dol.gov/ and verify the User ID and/or PIN that he/she is using are correct. Once your client has verified his/her DOL User ID and PIN, he/she will need to return to the "Signing Screen," enter his/her DOL User ID and PIN and click "Sign 5500."
Populating Signing Page with Prior Year Accepted Filing UserID and PIN. 
If the portal user has not submitted a filing to the DOL via ftwilliam.com in a previous year, he/she will not see the option to "Click here to use prior year ID and PIN" on the signing screen. Additionally, if the portal user has submitted a filing to the DOL in a prior year via ftwilliam.com, but the spelling of his/her name or his/her username has changed from the prior year, he/she will not see the option to "Click here to use prior year ID and PIN." You will need to ensure your client's username and name exactly match what was used in the prior year in order for him/her to see the "Click here to use prior year ID and PIN" option on the signing screen. If he/she clicks on the link, a window will open that reads:
Under penalties of perjury and other penalties set for in the instructions to the Form 5500, I declare that I am [Signer Name] and my DOL UserID is [User ID]. I would like my Administrator/Sponsor PIN to be populated below with the same four-digit number I entered in the prior year filing submitted to the Department of Labor.
To accept, click "OK," otherwise click "Cancel" and the User ID and PIN will not appear.
To enable or disable this feature, the Master User for the account will need to log into ftwilliam.com, click on the "Wolters Kluwer" logo, select "Administrative Tasks" and from the list, click on "Account Profile." Within the "Portal Options box," he/she will see "Allow 5500 Portal users to auto-populate DOL User ID and PIN from prior year." If this option is changed to "Yes," portal users will see the "Use prior year ID and PIN" feature on the portal signing screen. If the option is changed to "No," portal users will not see this feature on the portal signing screen. After selecting either "Yes" or "No," please be sure to click "Update" below the "Portal Options" box to save the changes that have been made.
Once the signer electronically signs the filing (enters his/her User ID, PIN and clicks on "Sign 5500"), he/she will be taken to a status screen. The status screen, shown below, is an example of a plan that was "Not-Accepted" and will need to be amended to make the corrections. The statuses portal users/signers see are the same as those displayed on the "5500 > [Year]" screen within "Details".
The signer may always log back into the portal to check the status of the filing. The user will see a button as shown below to "Check 5500 Status:"
Once your client clicks on "Check 5500 Status," he/she will see the "Details" of the filing. Portal users may also click on "View as a PDF" to save a copy of the details to his/her hard drive.
Portal users will also have access to a "Portal User Help" guide by clicking on "Help" at the top of the portal screen. You can view the guide by clicking here. Note that the link to the user guide can also be removed by branding the portal if you wish.
To amend a filing, you will need to select "Amend Filing" next to the "Details" link on the "Acceptance Status" line.
 Once you have clicked on "Amend Filing," a screen to confirm your selection will appear with the following warning:
Confirm
Click "Amend 5500" below to amend this Form 5500. Amending a 5500 will unlock the filing and allow changes to be made to all forms and schedules. Status checks will not be allowed until the amended filing has been submitted and you will no longer be able to check the status of the initial filing.
To continue, select "Amend 5500."
Before amending a filing, we would suggest ensuring you have a printed version of the prior filing for your records (there should already be a signed copy of the filing with your client). We would also suggest that you print a copy of the "Details," as once you click on "Amend Filing," you will lose the "Details" link.
Once you have clicked on "Amend Filing," the filing will be unlocked and you will be able to make any necessary changes.
If the filing was not submitted to the DOL originally through ftwilliam.com, you will prepare the filing as if you were preparing a new filing, but you will want to ensure you select the "Amended Return/Report" box on the Form 5500 and make any necessary changes to the filing. After running your edit checks, adding any attachments that are needed and adding your signer to the filing under "Work with Signers/Portal Users," you will lock the filing and invite your client to sign. If you have the original DOL ACKID for the filing, prior to inviting your client to sign, you may provide ftwilliam.com with the ACKID and we will insert the ACKID into the schema of the filing so the amended filing will replace the original filing on the DOL's website. If you do not have the original ACKID this will not cause issues, there will just be two records for this filing on the DOL's website.
If the filing was not submitted to the DOL originally through ftwilliam.com, you may use "55-Autofill" to bring in the filing information from the DOL. After you have brought in the filing from the DOL, you will prepare the filing as if you were preparing a new filing, but you will want to ensure you select the "Amended Return/Report" box on the Form 5500 and make any necessary changes. Note: all schedules and attachments from the original filing must be included with the amended filing; you will not only file the items that were amended. Therefore, all items from the original filing, including the amended items, will be submitted to the DOL with the amended filing. Please see EFAST2 FAQ #Q4 for additional information.
After running your edit checks, adding any attachments that are needed and adding your signer to the filing under "Work with Signers/Portal Users," you will lock the filing and invite your client to sign.
If you have the original DOL ACKID for the filing, prior to inviting your client to sign, you may provide ftwilliam.com with the ACKID and we will insert the ACKID into the schema of the filing so the amended filing will replace the original filing on the DOL's website. If you do not have the original ACKID this will not cause issues, there will just be two records for this filing on the DOL's website.
Please click here to view a demonstration of this process or click here to review our 5500 FAQ on this topic for additional information.
This article covers how to add a new or existing signer to a 5500 plan.
If this is the first year you are completing a 5500 for this client and you need to add a signer to the system as a new portal user.

Go to the 5500 page and click on ‘Work with Signers/Portal Users’
To ensure you do not create a duplicate record for an already existing portal user, click on ‘Add Existing’.
(if you do not have full portal subscription) (if you do have full portal subscription)

If the person you are adding is listed on the existing list, select them and click the button to add them.
If the person you are adding is not on the existing list, click on ‘Add’/’Create New User’ to add them
(if you do not have full portal subscription) (if you do have full portal subscription)

Enter all of the portal user’s information and click ‘Create New Contact’.
Please note: Portal usernames must be unique system-wide, over all ftwilliam.com customers. If you receive the message that the username already exists and the user is not present in your list of existing users, this indicates another customer within ftwilliam.com is already using that username. You will need to alter the username or make it more unique in order to add him/her to the system as a user. We suggest trying one of the following options to make a username more unique: JDoe123, JohnD123, DoeJohn, DoeJohn123, etc.

Adjust the portal user’s permissions as needed.
Please note: if you have one signer for the plan they MUST be set with Signing As: Administrator/Sponsor or Admin Only. If you have multiple signers for a plan you would set one up as the Sponsor and the other up as the Administrator.

If this is not the first year you are filing for this plan and the signer is the same as it was last year.
You would click on the link on the 5500 screen to ‘Bring forward 20XX signers to 20XX for this plan only’.

You can also complete this task for all of your plans together by clicking on ‘Batch/Workflow’ in the 5500 Menu box and then on ‘Bring forward 20XX signers to 20XX for all plans’.
Please note: you must be a designated admin to access this feature.

