Click here for more information on adding historical data
This section will take you through some special steps you should complete for the first year the plan is on the ftwilliam.com Compliance system. In general, once these set up steps are completed, you should not have to repeat them for future years unless plan specifications change or you choose to capture different census data for a plan.
If it is not the first plan year a plan is in existence, the system will not have a history of service, compensation and other information that may be necessary for testing. There are therefore a few extra steps to take when setting up an existing plan for testing on the ftwilliam.com Compliance system. These steps will also be explained below.
New plan
If it is actually the first year for a given plan, you must select this in the Plan Specifications menu under "General Features/Accounts and Sources" you will find the question "Indicate if this is the first Plan Year for a new plan" in the first section (General Plan Features). For the first plan year, most of the information necessary to do calculations and make determinations will be provided in the census and plan specifications. There may be a few extra pieces of information that you will want to include through the Other Import/Export/Reports Menu, depending on how extensive your census spreadsheet is (ownership information, etc.).
If you enter information into the Other Import/Export/Reports Menu necessary for the census data scrub, you must first upload census data information, second upload/enter "Other Import/Export/Reports" data and finally, run the data scrub. This is because uploading a new census will clear out any current year testing data (fields marked with an "R") that may be entered on the "Other Import/Export/Reports" menu.
Existing plan
If it is not the first plan year for a plan but only the first year the plan is on the ftwilliam.com Compliance system, then there are at least a few extra data fields and/or spreadsheets that we suggest uploading to the system for proper testing (e.g. beginning balances and a variety of census data like earliest date of hire, cumulative years of service for vesting purposes, prior year compensation, etc.). Some different options are discussed below:
- Census Data Supplemental. The system has a default grid "Census Data Supplemental" that is set-up with a number of fields that are useful for a plan with multiple years of history. You can view/change the fields that are in the Census Data Supplemental grid under the Work With Data Entry Grids menu.
To upload or enter data into the Census Data Supplemental grid, you should first upload your census data for the plan. After that information is uploaded, you can go to the Other Import/Export/Reports Menu. You will need to select the Census Data Supplemental grid from the drop down box in one of the grids provided (you may want to select this for a User Defined Grid "UD Grid") and click on "Select Grids" towards the bottom of the page. Once the grid is selected you will have options to Edit data (where you can manually enter the information directly in the system), download a blank spreadsheet, upload a spreadsheet and print the grid. Once the census data and supplemental data have been entered into the system, you can do a Census Data Scrub to process the information.
The order you enter information is important because uploading a new census will clear out any current year testing data (fields marked with an "R") that may be entered on the "Other Import/Export/Reports" menu. Review the errors and census data reports carefully to ensure you have provided sufficient information to properly test the plan.
- First year census. As an alternative to the supplemental census, you could set-up a "first-year" census to use for plans new to the ftwilliam.com Compliance system that combines the normal census information, plus supplemental census data under the Work With Data Entry Grids menu. Under this scenario, little to no data would need to be uploaded via the Other Import/Export/Report Menu before a census data scrub is run.
- Prior year end. If possible, we also suggest adding plan year end data for at least the prior plan year to assist in providing a more full history for the system to use (including ownership and family relationship information; ending balances in the transaction menu; for example).
Depending on the amount of information you enter in the prior year-end, you will have more testing power in the current testing year. For example, if you would like to test top-heavy status for the current testing year (2009, for example) then it is necessary to know the balance of participants” accounts in the plan (ending balances under the transactions menu) as of the determination date for the testing year (12/31/08 for a calendar year plan).
For the first year on the system, you will need to enter an earliest date of hire at a minimum to account for service history. Some service history defaults that may apply in the first testing year depending on the extent of prior year data loaded on the system (each of these defaults will appear as an error after a census data scrub if applicable):
- If service is not known, the system will assume full-time work but will actually show "9999" as hours earned in the Eligibility history link. You can view the eligibility history link in the Service history grid under the Other Import/Export/Report Menu (more specifically, here).
For example, if it is the 2009 plan year end and you have a 2001 hire date without any hours of service provided before 2009, the system will decide that this person has 8 years of eligibility service history. In the Eligibility history link, the 2001 hire date will appear; and eligibility for each contribution type will appear with 9 years of service earned and hours of "9999".
- If a person has a hire date before the first day of the plan year, the person is eligible for the contribution and the entry date is not known, the system will use the day before the plan year as the entry date.
- Date met will default to the first day of prior plan year if a participant is found eligible and specific entry date is not known (not in the plan year end being tested, prior plan year ends on the system and not in the supplementary/first testing year census). Exception: if no service required, date met will be the same as the earliest date of hire.
Closing out the Previous Year
- Make sure the old year is clean & complete on the testing side. Whether this was the first year on the system or not, before closing out the year you should make sure that the data is correct since it will provide a basis for the next year. You should not see any warnings or error messages on the home page or any other screen. In particular:
- The data scrub should be run.
- The top heavy test should be run, unless this year was the conversion year from the prior record keeper.
- Add an ending balance batch on the transaction menu and post it – this will allow you to add a pre-populated beginning balances batch when you go to the new year.
Adding the New Year
- Add the new year end by clicking the link “Add New Year End” at the top of the home page; the date will default to the end of the current year so be sure to change it to the correct year end. If the plan is on an ftwilliam.com document, you’ll get an option to copy plan specifications from the document, or from the prior year on Compliance. Plan specifications only copy from the plan document when you add a new year-end, so if you made any mid-year changes to the document, these would not automatically copy to Compliance. If copying from the document, review general features, date formats and accounts & sources.
- Review your census grid. If the previous year was a conversion year from your prior vendor, you will need to switch to a standard grid – we suggest one of our “core” grids as follows:
- * ftw Primary 1 Census (comp and comp after elig) (c1eb549) - for plans using entry date compensation for plan purposes
- * ftw Primary 2 Census Statutory Comp Only (f0e744e) - for plans using full year compensation for plan purposes
- * ftw Primary 3 Census Fiscal Plan Year (efb0e0a) - for non calendar year plans
- * ftw Primary 4 Census exclude certain comp(414s comp test) (d915e5d) - for plans using a non 414(s) compensation definition
- Download the census grid – the “Download prior” link will produce a spreadsheet pre-populated with last year’s data that you can forward to the client. They will need to add any new employees as well as hours, compensation and deferrals for the new year, and any termination dates that occurred in the new year. They will also need to confirm officers, ownership, and family coding.
- If processing the new year as a subsequent year on the system, overrides should not be necessary for eligibility, years of service or HCE/key determinations; the software will do these calculations.
- If you are uploading an employer contribution on the census, remember to set the appropriate overrides on the Set Allocation Parameters screen before running the data scrub.
- On the Transactions menu screen, add the beginning balances batch and post. Note that provided you added the ending balances batch in the prior year you will have an option to “Create Beginning balance from Prior Year’s Ending Balance”.
The system will calculate eligibility based on the plan specifications (age, service and entry dates) set in the Compliance system. For the first year on the system, you will need to enter an earliest date of hire at a minimum to account for service history.
Defaults (each of these defaults will appear as an error after a census data scrub if applicable):
- If the system does not have a hire date for an employee, it will set the hire date to the first day of the plan year.
- If service is not known, the system will assume full-time work but will actually show "9999" as hours earned in the Eligibility history link. You can view the eligibility history link in the Service history grid under the Other Import/Export/Report Menu (more specifically, here).
For example, if it is the 2009 plan year end and you have a 2001 hire date without any hours of service provided before 2009, the system will decide that this person has 8 years of eligibility service history. In the Eligibility history link, the 2001 hire date will appear; and eligibility for each contribution type will appear with 9 years of service earned and hours of "9999".
- If a person has a hire date before the first day of the plan year, the person is eligible for the contribution and the entry date is not known, the system will use the day before the plan year as the entry date.
- Date met will default to the first day of prior plan year if a participant is found eligible and specific entry date is not known (not in the plan year end being tested, prior plan year ends on the system and not in the supplementary/first testing year census). Exception: if no service required, date met will be the same as the earliest date of hire.
In the first plan year of the system, to have the system recalculate initial eligibility on a global basis, simply reupload the census, setting "Reset Entry Dates" to yes from within the Census Upload box. Then run the data scrub. Review the "Eligibility Status Report" to confirm that eligibility is correct.

Eligibility should always be correct in the first year of the system so that subsequent years are also correct. There are cases where, in subsequent years in the system, eligibility may need to be recalculated; such as when an amendment has changed eligibility requirements. In these cases, initial eligibility can be recalculated on a global or individual basis by using the "Initial Elig - Recalculate (Yes/No) Upload" tool that is found in Tools/Settings from within the Compliance Menu.


To have the system recalculate all sources for all participants in the census, click the 'Set all to "Yes"' link. This will automatically update every source for every participant to "Yes", recalculate. Close the box, then rerun the data scrub.
To have the system recalculate initial eligibility for only certain sources and/or certain participants, click the "Get Current Participants' Toggle Settings" link, and save this file to your computer. Open the file and change the individual sources/participants to "Yes" for those sources/participants for which you wish the system to recalculate eligibility. Note that leaving these fields blank will have the same effect as entering "No". Upload this file by clicking the "Browse" button from within the "Initial Elig - Recalculate (Yes/No) Upload" window. Close the box, then rerun the data scrub.
When the data scrub is now run, eligibility, dates met and entry dates will be recalculated for applicable participants/sources that were selected to be recalculated.
Please note that running the data scrub automatically resets all participant's recalculation fields to "No". Users can also click on the "Set all to 'No'" link to change the recalc field for all sources and all participants to "No".
The plan aggregation option will take separate plans either within a single company or from multiple companies, combine certain data in a master plan and permit the user to run compliance tests and print reports using that combined data. The following steps assume that the user has already created each of the individual plans within the aggregation group. Additionally, for each of the individual plans, the user must have already setup the plan specifications, allocation formulas and imported/entered the census and transaction data as they normally would for a non-aggregated plan.
Set-up General Aggregation Specs
In order to aggregate multiple plans, the user must first setup the aggregation options in each individual plan. To do so, open the first plan in the aggregation group and click on “Set Combined Test Parameters” in the Compliance Menu. In the Aggregation/Disaggregation menu box, change the drop-down box next to “Testing Aggregation used:” to “Yes”. In the next box, enter a unique Testing Aggregation group ID. FT William suggests that the group ID be descriptive of the plans you are combining. Then set the “Plan containing combined census:” field to “Other Plan”.
Return to the Compliance Menu once the general aggregation set-up is complete. Run “Do Data Scrub/Elig Calc” and “Do Allocations”.
Repeat these steps for each of the individual plans in an aggregation group.

Set up Master Plan
Next the user will need to add a “Master Plan” to the system. The master plan is where certain census data will be combined and compliance tests run for a specific aggregation group. To add a new plan simply return to the Select Plan screen and click “Add Plan”.
The user must now setup the census grid, sources, and any plan specifications applicable to testing. Allocation parameters must be setup prior to setting up the aggregation option. First, set the match and non-elective overrides to “Yes”. Since the allocations are either uploaded or calculated in the individual plans, this will have no effect on the contributions brought in from the individual plans. Rather, if corrections are required, such as a QNEC for a failed ADP test, the override will prevent the combined contributions from being overwritten. Next, if an ACP test will be run and all of the plans in the aggregation group use the same match formula, enter the match formula into the Match allocation parameters. If a match formula is not entered any Associated Match Forfeitures will not calculate correctly. If the general test will be run, the user must enter the non-elective allocation percentages by group. If these percentages are not entered the auto correct options will not calculate correctly.
Once the new plan has been setup, click on "Set Combined Test Parameters", in the Compliance Menu to setup aggregation settings. In the Aggregation/Disaggregation menu box, change the drop-down box next to “Testing Aggregation used:” to “Yes”. In the next box, enter the Testing Aggregation group ID that was decided upon in setting up the general aggregation specs. To make this plan the master plan, set the “Plan containing combined census:” field to “This Plan”. “Combine selected data for duplicate Participants” gives the user the option of combining compensation for duplicate participants. If this box is set to “No”, the user will instead have the option of selecting the plan from which the compensation will be copied, disregarding compensation in the other plan(s). If it is set to “Yes”, compensation from all plans will be combined.
Caution: To be very clear, the master plan should be a new plan that never contained individual records. Clicking on “Combine Census in This Plan” will delete all master file and current participant records in this plan and replace them with records from aggregated plans. You MUST NOT click this button if the Plan was tested as an individual (non-combined) plan for any other Year End.

Combine Census for Aggregation Group
Upon returning to the Compliance Menu, the user will see that the “Select Task” menu box no longer contains the options to run “Do Data Scrub/Elig Calc” and “Do Allocations”. Instead there is a new option to “Combine Census for Group: Group ID”.

Pressing “Combine Census for Group: Group ID”, will take the user to a new screen to view the list of plans in the aggregation group, scrub and allocation status and plan specifications for those plans. Any warnings or errors will be listed here as well. Also in this screen will be a list of duplicate participants from any of the plans in the aggregation group. In this box the user will choose which plan to take the eligibility status, Key status, HCE status and (if not combining) compensation from.
Once the user has reviewed the plan specifications, any warnings or errors and selected which plan duplicate participant data should transfer from, the user should press “Combine Census in This Plan” and review any errors on the results page. When the “Combine Census in This Plan” button is pressed, contributions from all plans are combined, compensation from all plans is combined if the option in the setup screen was selected to do so, and all transactions from the Transactions Menu from each plan are brought to this plan.

Compliance Tests and Reports
The user may now run the applicable compliance tests and corrections as normal and print the reports.
Miscellaneous Tasks
The RMD Menu, 1099-R Menu and 8955-SSA Menu are not available in the Master Plan. These tasks may only be run in the individual plans.
Overview
Users may combine non-ftwilliam.com (non-ftw) summary testing data with plans in ftwilliam.com (FTW) by entering the applicable non-ftw data in either the Combined Test Parameters page and/or ADP/ACP Test Parameters screen, so that those entered amounts can be aggregated with the amounts in the current plan for 410b, deduction and ADP/ACP testing. The following steps assume the plan specifications, source data and census data are already set up in the FTW plan.
Setup
To identify a plan in FTW as an aggregated plan, go to " Set Combined Test Parameters". The aggregation options are in the “Aggregation/Disaggregation” box and can be changed using the options for “Testing Aggregation Used”. The options for "Testing Aggregation used:" are:
- "Yes" (aggregate data at the participant level – plans on Ft. William),
- "No" (no aggregation) and
- "Yes - Non ftw plan" to indicate that aggregation will be performed using summary testing data from other Plans.
To aggregate a plan with a non-ftw plan, set “Testing Aggregation used:” to “Yes – Non ftw plan”, then press “Refresh”.

Enter Combined Test Data
Once the aggregation is set to “Yes – Non ftw plan” and the user has pressed the “Refresh” link, the “Review/Edit Non-ftw Data” link will appear.

Clicking the “Review/Edit Non-ftw Data” link will take the user to the Combined Test Non-ftw Data screen. In this screen, users can enter data for the 410(b) Ratio Percentage Test (Coverage Test) and the Deduction Limit Test. The data entered here will be aggregated with the FTW plan data to produce aggregated test results.

Enter ADP/ACP Test Data
To enter ADP/ACP test results for a non-ftw plan, click “Set ADP/ACP Testing Parameters”. In the second box of options, users will see “Plan Aggregation” set to “Yes – Non ftw plan” and a link to “Review/Edit Non-ftw Data”.

Clicking this link will take users to the ADP/ACP Non-ftw Data screen, where participant counts and total ADRs from Non-ftw plans can be entered.
- In the NHCE Cnt columns, the total number of NHCEs in the ADP/ACP test should be entered here.
- In the Total NHCE ADR/ACR columns, the total ADR for all NHCEs in the ADP test should be entered here.
- Similarly, in the HCE Cnt columns, the total number of HCEs in the ADP/ACP test should be entered here.
- In the Total HCE ADR/ACR columns, the total ADR for all HCEs in the ADP test should be entered here.
If the Non-ftw plan has collective bargaining agreement (Union) employees, click the “Add rows for CBA employees” button and complete the extra grid rows. Please note that clicking this button will appear to delete the data that was previously entered in this screen. The data has not been deleted. After completing all applicable boxes, press the “Update” button at the bottom of the screen.

Now that all of the non-ftw plan data has been entered, users may run the data scrub, allocations, and tests as they normally would.
The system has several fields that will display whether a person has met the minimum age and service requirements of Code section 410(a)(1)(A) (age 21 and 1 year of service) before the first day of the seventh month of the Plan Year. As provided in Treas. Reg. sections 1.410(b)-6(b)(3) and 1.410(b)-7(c)(3), a plan may treat a plan benefiting otherwise excludable employees (those not yet meeting age 21 and 1 year of service) as two separate plans for testing purposes.
The fields coded "disagg" will provide information about whether the Participant has met the minimum age and service requirements of Code section 410(a)(1)(A) before the first day of the seventh month of the Plan Year ("Eligible_Disagg", "Eligible_DisaggEligMet" and "Eligible_DisaggEntryDate" for example).
Eligible_Disagg will be "Yes" if a person is less than age 21 or has less than 1 year of service before the first day of the seventh month of the Plan Year. This means the participant will be in the disaggregated group for testing purposes.
Eligible_DisaggEntryDate will always be at the beginning of the year (1/1 for a calendar year plan). This is because Treas. Reg. sections 1.410(b)-6(b)(3) and 1.410(b)-7(c)(3) do not allow for "splitting participants" between different testing groups (i.e. if the disaggregation test allowed for semi-annual entry dates, a participant with a 7/1 entry date in a calendar year plan would be in the disaggregated group for the first six months of the year and in the other testing group for the second half of the year). In addition, informal conversation with the IRS has confirmed that disaggregated plans must use entry dates as of the first of the plan year.
HCE determinations are done at the time a census data scrub is run for a plan testing year. The system will not use top paid group determinations as a default. If you select top paid group determinations, you should ensure that this is selected for each year the plan is on the system.
The field "HCE" will display whether an employee is an HCE for current plan year testing purposes and "HCE Reason" will display a reason for the employee’s selection as an HCE. HCE determinations are made based on 1) ownership at any time during the current or preceding year and/or 2) the compensation in the preceding year.
For more information about how an HCE determination was made, select to "edit" the "HCE Data" grid under the "Other Import/Export/Report Menu". Here, you will see all the fields relevant to HCE determinations.
- For ownership determinations, "Percentage_Ownership", "Family_Group" and "Family_Group_Relation" are relevant fields.
- For prior year compensation, the field "Prior_Yr_Comp" is used.
Top paid group determinations
The field "HCE_TopPaidGrpPrior" is used to determine HCE status for current plan year testing purposes. The top paid group determination is entirely determined based on compensation rank in the prior year (HCE_TopPaidGrpPrior the first year a plan is on the system should not be used). The system will use the regular rules of math (rounding up if 0.5 or higher) to determine the number of employees that make up 20% of the workforce and sort the top paid group by compensation (those with highest compensation will be placed in the top paid group). In case of any employees with identical compensation, the system will select the employee with the highest ownership as the top paid group employee.
The field "HCE_TopPaidGrpCurr" will display the top paid group determination based on compensation in the current plan year (it is therefore not used for testing purposes until the next plan year). When the census is run for the next year, the system copies the HCE_TopPaidGrpCurr field from the prior year record and places it in the HCE_TopPaidGrpPrior field.
If selected as an option in the plan specifications, HCE_TopPaidExclCount is set to Yes when an employee is excluded in determining the total number of employees when doing the top paid group election (due to not reaching age 21, not completing 6 months of service, etc. in the preceding plan year).
Employee_Type (Full time, Part time more than 17.5, Part time less than 17.5 or Less than 6 months/yr) and Employee_Class (Normal, Union, Self Employed, Leased, Non Res Alien, Opt-out or Other) are both relevant to the HCE_TopPaidExclCount determination, if applicable.
The system will calculate the top heavy status of the plan for the following plan year. In order to determine top heavy status, the system needs to calculate who is a key employee and know the value of such key employees” accounts as of the applicable determination date (typically the last day of the plan year). Key employee determinations and account balances will be discussed below - as well as some strategies to test top heavy status for the first testing year of an existing plan.
- Key employee determinations
Key determinations are done at the time a census data scrub is run for a plan testing year. For more information about how an Key determination was made, select to "edit" the "Key Data" grid under the "Other Import/Export/Report Menu". Here, you will see all the fields relevant to Key determinations.
"KEY_Employee_DetermDate" is the field used for the current plan year top heavy testing purposes. Key employees are determined based on ownership, officer status and compensation generally as of the last day of the preceding plan year.
If a field does not end in DetermDate, then it is an indicator based on current year data (generally, last day of the current plan year) and will generally be applicable in the next testing year.
For example: If you are testing the 2009 plan year, the Key fields marked with the "DetermDate" indicator are indicators for the 2009 testing year determination date (for a calendar year plan, this will typically refer to data as of 12/31/08). The key fields NOT marked with "DetermDate" indicator are indicators for the 2010 testing plan year (for a calendar year plan, this will typically refer to data as of 12/31/09).
If selected as an option in the plan specifications, "KEY_EmployeeOfficerExclCount" and "KEY_EmployeeOfficerExclCount_DetermDate" both indicate whether an employee is excluded for determining the number of officers that should be included as key employees. Under Code section 416(i)(1)(A), no more than 50 officers or the greater of 3 employees or 10% of employees will be considered key employees. 10% of employees will be determined by rounding to the next integer if the calculation results in a number that is not a whole number.
KEY_EmployeeOfficerGrp = Employee is in top officer group in current year
- Account balances
The Top heavy test will use the total account balances of participants” accounts as found in the Transaction Menu. You therefore must complete the transactions menu items and have correct balances as of the determination date to do an accurate top heavy test. The system will use the transactions that were posted with a contribution date that is on or before the determination date to calculate the value of key and non-key account balances. See the Transaction Menu for more information on how to set up and post transactions.
- Top heavy testing the first testing year for an existing plan.
For the first year a plan is on the system, Key employee determinations and top heavy tests cannot be performed for the determination date without additional information. The simplest way to accomplish this is to load a prior year census, update the transactions menu in the prior year to reflect ending balances as of the determination date and run the top heavy test in that year. The data will then be copied to the current year when the current plan year end is added.
NOTE: the top heavy test results displayed after clicking on the "Run” button next to the Top Heavy Test from the "Task" page are the results for the current testing year. If the plan year end being tested is 12/31/09 (and it is not the first year of the plan), the top heavy test results will display for the 12/31/08 determination date.
Adjusted Compensation
The system is set up so that compensation on the census will be entered as statutory compensation (compensation as used for 415 limits and other testing).
All employees will be assigned a compensation amount adjusted for the 401(a)(17) limit ("Compensation_Statutory_Adj") once the census data scrub is run.
Self Employed Individuals” adjusted compensation will generally be further adjusted for their share of employer contributions to the plan (based on ownership, "Compensation_NonElective_DeductShare"), their half of the deduction for the self-employment tax as determined on line 6 of Schedule SE (shown in Compensation_NonElective_SEDeduction") and their personal contributions to the plan (elective deferrals, match and/or nonelective contributions) once "Do Allocations" is run. (Self-employed individuals must be marked as "Self Employed" in the "Employee_Class" field.)
If the plan provides for nonelective and/or matching contributions and the self-employed individual is eligible for those contributions, their employer contributions generally need to be determined based on the self-employed person’s compensation adjusted for employer contributions to the plan. Since the data is inter-related, when "Do Allocations" is run for a self-employed individual, the system will run a series of iterations to determine the proper employer contribution and adjusted compensation for the self-employed individual.
Compensation for Allocations
Each contribution type has a corresponding compensation field that will be used when determining allocations ("Compensation_XXX", where XXX is the type of contribution and could be "Matching", "NonElective" or "ElectiveDeferral"). As a default, these will all be mapped to "Compensation_Statutory" but these can be collected on the census grid or custom calculated under the Plan Set Up - Work With Data Entry Grids menu.
The compensation fields used for allocations may also need to be adjusted for 401(a)(17). The field "Compensation_XXX_Adj" (where XXX is the type of contribution and could be "Matching", "NonElective" or "ElectiveDeferral") will be the same as the "Compensation_XXX" field but adjusted for 401(a)(17) if applicable.
Note that self-employed individuals” compensation for allocation purposes will be mapped from "Compensation_Statutory_Adj" and this definition of compensation will always be used to determine self-employed individuals” allocations under the plan (this is required under Code section 401(c)(2)).
414(s) compensation test
We suggest using the “Sample Census exclude certain comp(414s comp test) (6642cbb)” grid to upload the census data. There are three compensation columns in the grid: Statutory Compensation, Statutory Compensation from Entry Date and Plan Compensation. Enter full year statutory compensation in the Statutory Compensation column. Enter compensation earned from the entry date to the end of the plan year in the Compensation from Entry Date column. Enter compensation to be tested in the Plan Compensation column. Please note that all three columns MUST be completed. If your plan does not use compensation from entry date just complete the compensation from entry date column with the statutory compensation. If the plan does use compensation from entry date, please be sure the plan specifications permit excluding compensation before entry. To verify, go to Plan Specifications, click General Features/Sources and Inv Accounts, scroll all the way to the bottom of the screen and confirm that “Exclude pay earned before participation in Plan from definition of Compensation:” is set to yes and the following questions regarding match and nonelective are also set to yes (as applicable). Below is some information regarding the fields the compensation test uses and how the mapping works.
- Using full year compensation only – The compensation test will use the "Compensation_Statutory_Adj" field. Any comp field that ends in _Adj is ALWAYS computed in the scrub from the field without the _Adj. The field that ends in _Adj is the same as the field without the _Adj with a max of the 401(a)(17) limit. Compensation_Statutory will either be on the grid or mapped from another field – see Work with Data Entry Grids to determine.
- If plan excludes compensation before entry - The compensation test will use Compensation_Statutory_FromEntry_Adj. Any comp field that ends in _Adj is ALWAYS computed in the scrub from the field without the _Adj. The field that ends in _Adj is the same as the field without the _Adj with a max of the 401(a)(17) limit. Compensation_Statutory_FromEntry field will either be on the grid or mapped from another field – see Work with Data Entry Grids to determine.
The field "Compensation_Deduction" (and "Compensation_Deduction_Adj" if over the 401(a)(17) limit) is used for the 404 test (mapped from "Compensation_Statutory" as a default).
Top Heavy Testing. The field "Compensation_TopHeavy" will be used for determine whether the top heavy minimum allocation is met. This must be full year compensation and will be mapped from "Compensation_Statutory" as a default.
Nearly every calculated field on the system has an option to "override" the way a field/data element is handled in the system. The "override" function may have different results in different circumstances. Some examples of how an override option will work are provided below:
- If the option "Override automatic determination of HCEs and Keys" (under the "General Features/Accounts and Sources" option of the "Plan Specifications") is set to "Yes", the system will not attempt to calculate HCE/Key status (as it normally does). Instead, you may enter HCE/Key information into the system and the data you enter will be used by the system and not be over-written.
- If the option "Override calculation of prior year eligibility service" (under the "Eligibility" option of the "Plan Specifications") is set to "Yes", the system will calculate years of eligibility service based on the earliest date of hire. The system normally relies on user-provided information for years of eligibility service and will not calculate it. This option will get updated to "Yes" during a census data scrub typically during the first year a plan is tested on the ftwilliam.com system where prior years of service have not been provided.
Some overrides can be done at a participant level and some can be done at a plan-wide level. Overrides will automatically be set to "No" unless you see an error indicating it was changed to "Yes" or a user changed the override to "Yes". Overrides will all be set to "No" when a new plan year end is added.
If the plan document provides for excluding a particular class of employee you can follow the steps below to code your census:
- From the Compliance Menu click “Plan Specifications”. Expand the Eligibility section and under “Exclusions - Other” select “Yes” for “Exclude other Employees from definition of Eligible Employee (any exclusion must satisfy Code section 401(a)).
- Enter the code you plan to use to identify those who are excluded, e.g. if you want to exclude interns from all participation in the plan, enter “Intern” for each contribution type. If you want to exclude temporary workers from employer contributions but allow them to defer, enter “Temp” for each employer contribution type but leave deferrals blank.
- Add the following column to your primary census grid: R:EmployeeClassOther; alternatively you can add a supplemental grid under “Other Imports/Exports/Reports” with the following columns:
- M:LastName
- M:FirstName
- M:SSN
- R:EmployeeClass
- R:EmployeeClassOther
- Select “Other” in the Employee Class column on your main census for these excluded individuals.
- Enter the name of the excluded class that the person is in the Employee Class Other column; e.g. “Intern” or “Temp” in the examples above.
- Select “Other” in the Employee Class column on your main census for these excluded individuals.
Vesting Service Calculation
Vesting service is calculated when the scrub is run and is determined by the system as follows:
- Active Employees: If an employee is on the current year census “in the grid”, the system will first calculate vesting service for the current plan year based on plan specifications for vesting (current year will either be a 1 or 0). The software then adds this value to the “prior years of cumulative service for vesting” field to determine the total number of years of vesting service.
- Terminated Employees: Employees who terminate in a prior year will not be on the current year census. In this case, the system will first look in the service history file to see if there is any stored vesting history. If there are vesting history records in the system, the years of vesting service will be pulled from the “service earned column”. If there aren’t any records in service history file the system will show zero years of service.
Vesting Percentage Calculation
The vesting percent is calculated based on the years of vesting service and applicable vesting schedule. The system calculates the vesting percentage when either a transaction menu report or the Vesting Export report is run.
Vested Balance Calculation
For sources that are not 100% vested the system calculates the vested balance as follows:
- Vested balance = [(End bal + prior dist+ current yr dist + prior yr forfs + current yr forfs) * vesting percent] - prior dist - current yr dist
- Distribution history will now also include forfeitures. Distributions and forfeitures will appear in history after any transaction menu report is run.
To view the vesting balance review one of the report options in the “Transactions/Statements Menu.”
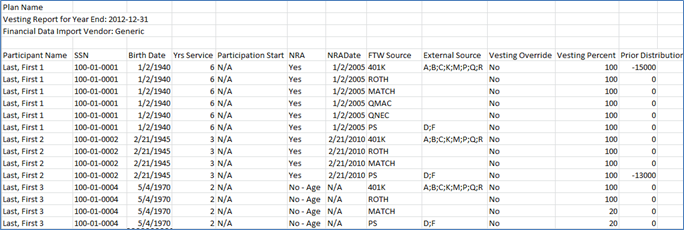
To view prior distributions review the Vesting Export report.
Vesting Overrides
- Active Employees:
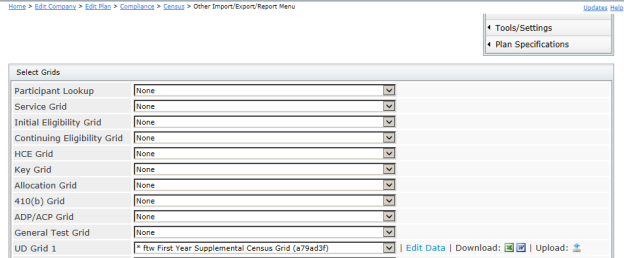
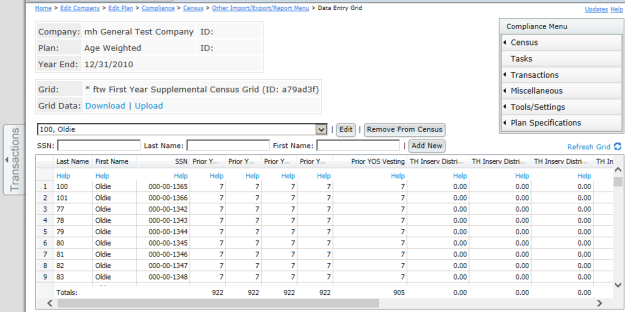
- To override vesting service for active employees in the first plan year on the system: Click on “Other Import/Export/Reports and select the “*ftw First Year Supplemental Census Grid” grid under one of the user defined fields. Then press “Edit Data” and edit the “Prior_yos_vesting” column with the applicable number of years of service earned in years prior to the current plan year. Last, run the data scrub. The vesting percentage will calculate based on the new vesting service.


- Prior Year Terminated Employees (that are on your census upload):
- To override and hardcode the vesting percentage for an employee who will not accrue any additional vesting: click on “Census” from the Compliance Menu -> Select the participant from the drop-down box and press “Edit”. Click “Vesting Override” link -> Set override to “Yes” for each source you wish to override -> Enter the vesting percent for each source -> Press update.
- Note: The percent that is entered here will not change in future years under any circumstances until the percentage is again changed or the override is set back to “No”.


- Prior Year Terminated Employees (that are not on your census upload):
- To override vesting service for an employee terminated in a prior year the user will simply upload the vesting history via the “Service” upload history option and run the data scrub. For additional instructions for uploading vesting history, click here.
- The system will calculate the vesting service based on the history uploaded.
Subsequent Plan Years on the System
- Active Employees: To override individual vesting service override for active employees in subsequent years on the system: Edit Census -> Select Participant -> Eligibility -> First, set “Override calculation of prior year cumulative service for vesting purposes” to “Yes”. Then change the “Prior years of cumulative service for vesting” to the appropriate number of vesting years of service (prior to the current year). Last, run the data scrub.


- Prior Year Terminated Employees (that are on your census upload):
- To hardcode the vesting percentage for an employee who will not accrue any additional vesting: click on “Edit Census” from the main Compliance Menu screen -> Select the participant from the drop-down box -> click “Vesting Override” link -> Set override to “Yes” for each source you wish to override -> Enter the vesting percent for each source -> Press update.
- Note: The percent that is entered here will not change in future years under any circumstances until the percentage is again changed or the override is set back to “No”.


- Prior Year Terminated Employees (that are not on your census upload):
- To override vesting service for an employee terminated in a prior year the user will simply upload the vesting history via the “Service” upload history and run the data scrub. For additional instructions for uploading vesting history, click here.
- The system will calculate the vesting service based on the history uploaded.
Vesting FAQ's
- FAQ: Why are my prior terms shown as being 0% vested? Check your current year census. No prior year terms should be on the census. To remove prior year terms from the census grid click “Edit Census” -> Select the participant from the drop-down box -> Press “Delete Participant”. These employees will now appear above the census grid.

The total company contribution shall be allocated to each Participant such that the equivalent benefit accrual rate (EBAR or EAR) for each Participant is identical. The actual calculation is that a participant will receive an allocation based on the ratio of his/her points to total points of all participants.
Points for each participant are equal to: Compensation * 1/(1 + interest rate)^years to retirement * annuity factor.
In Allocation Parameters, the “Allocation Type” should be set to “Dollar” the total dollar amount to be allocated entered in “Nonelective contribution in total dollars to be allocated:” in order to have the system calculate the age weighted allocation. The factor is calculated by the system. The user can enter the interest rate and actuarial table that should be used in the calculation.
Setting “Provide decrement for participants past NRA” to “Yes” means that any participants who have attained an age beyond the stated normal retirement age (NRA) will use the retirement age in the calculation rather than the participant’s actual attained age. This results in a lower allocation than would be allocated if actual age beyond NRA was used.

Setup Plan Specifications
- Compliance Menu à Plan Specifications à Sources and Inv Accounts
- Set “Financial data import vendor” to “JH RoR”
- Enter “Financial data import ID code:”
- Click the “Work with Sources” link
- Verify all sources to be used in the plan are listed
- Press update

Setup ADP/ACP Test Parameters
- Expand “ADP/ACP Test” to view/edit parameters
- Set ADP/ACP Refund income calculation to “Percent”

Upload JH RoR
- Go to the Transactions Menu
- Click “Map John Hancock Sources” and set the JH sources for the applicable FTW sources.
- Click “Upload JH RoR Transaction File”
- Press “Browse” to search computer for upload file
Hint: Press “Click here for sample file” to review JH RoR transaction file format
Non-elective Davis Bacon Contributions
Plan Specifications
First, we need to verify that the plan is setup properly to permit Nonelective Davis Bacon contributions. From the main Compliance Menu, go to Plan Specifications and expand Contribution parameters bar. Scroll down to the Nonelective section. Under Nonelective - Contribution, "Nonelective Davis Bacon" determines if the plan is set to permit Nonelective Davis Bacon contributions. If changes are needed to be made to this setting, press the radio button next to the applicable setting. Pressing the radio button to the left of "Yes" indicates that Nonelective Davis Bacon contributions are permitted by the plan. Pressing the radio button to the left of "No" indicates that Nonelective Davis Bacon contributions are not permitted by the plan.
If the plan document permits Nonelective Davis Bacon contributions to offset regular Nonelective contributions, set the Nonelective Davis Bacon offset to "Yes". Note: “Profit Sharing Davis Bacon offset” will not be available until “Profit Sharing Davis Bacon” is set to “Yes”.

Work with Sources/Inv Accounts
The Nonelective Davis Bacon source should be in the list of sources in Work with Sources/Inv Accounts, for transactional/financial purposes.

If the Nonelective Davis Bacon source (SourceID: PSDAVBAC) is not displayed in the list of sources upon your arrival to this screen, click the "Add Default Sources" link to have the system automatically add the missing source(s).

Set Davis Bacon Eligibility and Enter Davis Bacon Contributions
Eligibility for Davis Bacon contributions and Davis Bacon contributions themselves, must be explicitly entered into the ftwilliam.com system. From the Compliance Menu, hover over Census and Select Other Import/Export/Reports. Using the drop down box next to any of the user defined grids spots, select the "*ftw Davis Bacon" grid.
The NE Davis Bacon Eligibility column will be used in compliance tests such as the 410(b) Test, 415 Test, Deduction Test, etc. For example, if a participant's NE Davis Bacon Eligibility is set to Yes or No, they will be classified as a nonexcludable employee in the 410(b) Coverage test. Assuming that the NE Davis Bacon is the only type of non-elective source in the plan, if a participant's NE Davis Bacon Eligibility is set to No-Excl, they will be classified as an excludable employee in the 410(b) Coverage test. If a nonexcludable employee has an allocation amount entered in the NE Davis Bacon Contribution column, that person will be classified as benefiting within the 410(b) Coverage Test.

Creating Davis Bacon Allocations from Transaction Batches
As an alternative to manually entering Davis Bacon contributions, if Davis Bacon contributions have been entered or uploaded into the ftwilliam.com software and have been posted in the Transactions screen, users can use the "Create $x.xx Allocations" link to push the amounts from the Transactions screen to the Compliance testing area (contributions will then appear in the ftw Davis Bacon grid).

Allocation Parameters for Nonelective Davis Bacon Offset
In order for regular nonelective contributions to be calculated and offset, “Nonelective allocation manual override” must be set to “No”. “Nonelective allocation manual override” is located under Allocation parameters in the main Compliance screen.

Additionally, a nonelective formula needs to be entered. This tells the system what percentage or dollar amounts should be allocated for each eligible participant. For example, in the screenshot below, I have set the pro rata formula for the regular profit sharing to 5%. When the allocation "Run" button is pressed, the system will calculate a 5% profit sharing allocation for all eligible employees, then reduce those amounts by the Nonelective Davis Bacon amounts previously entered, as applicable for each participant. The allocation report will display the combined allocations for all nonelective amounts in the "Allocate NonElec column".

QNEC Davis Bacon Contributions
Plan Specifications
First, we need to verify that the plan is setup properly to permit QNEC Davis Bacon contributions. From the main Compliance Menu, go to Plan Specifications and expand Contribution parameters bar. Scroll down to the QNEC section. "QNEC Davis Bacon" determines if the plan is set to permit QNEC Davis Bacon contributions. If changes are needed to be made to this setting, press the radio button next to the applicable setting. Pressing the radio button to the left of "Yes" indicates that QNEC Davis Bacon contributions are permitted by the plan. Pressing the radio button to the left of "No" indicates that QNEC Davis Bacon contributions are not permitted by the plan.
If the plan document permits QNEC Davis Bacon contributions to offset regular QNEC contributions, set the QNEC Davis Bacon offset to "Yes".

Work with Sources/Inv Accounts
The QNEC Davis Bacon source should be in the list of sources in Work with Sources/Inv Accounts, for transactional/financial purposes.

If the QNEC Davis Bacon source (SourceID: QNECDAVBAC) is not displayed in the list of sources upon your arrival to this screen, click the "Add Default Sources" link to have the system automatically add the missing source(s).

Allocation Parameters for QNEC Davis Bacon
Return to the main Compliance screen and expand the Allocation Parameters. Scroll down to the bottom of the screen to QNEC Allocation. The "Allocation Type" must be set to either "Dollar" or "Specified" if you will be uploading QNEC Davis Bacon contributions.

Set QNEC Davis Bacon Eligibility and Enter QNEC Davis Bacon Contributions
Eligibility for Davis Bacon contributions and Davis Bacon contributions themselves, must be explicitly entered into the ftwilliam.com system. From the Compliance Menu, hover over Census and Select Other Import/Export/Reports. Using the drop down box next to any of the user defined grids spots, select the "*ftw Davis Bacon" grid.
The QNEC Davis Bacon Eligibility column will be used in compliance tests such as the 410(b) Test, 415 Test, Deduction Test, etc. For example, if a participant's QNEC Davis Bacon Eligibility is set to Yes or No, they will be classified as a nonexcludable employee in the 410(b) Coverage test. Assuming that the QNEC Davis Bacon is the only type of non-elective source in the plan, if a participant's QNEC Davis Bacon Eligibility is set to No-Excl, they will be classified as an excludable employee in the 410(b) Coverage test. If a nonexcludable employee has an allocation amount entered in the QNEC Davis Bacon Contribution column, that person will be classified as benefiting within the 410(b) Coverage Test.

Creating Allocations from Transaction Batches
As an alternative to manually entering Davis Bacon contributions, if Davis Bacon contributions have been entered or uploaded into the ftwilliam.com software and have been posted in the Transactions screen, users can use the "Create $x.xx Allocations" link to push the amounts from the Transactions screen to the Compliance testing area (contributions will then appear in the ftw Davis Bacon grid).

Allocation Parameters for QNEC Davis Bacon Offset
In order for regular QNEC contributions to be calculated and offset, “QNEC allocation manual override” must be set to “No”. “QNEC allocation manual override” is located under Allocation parameters in the main Compliance screen.

Additionally, a QNEC formula needs to be entered. This tells the system what percentage or dollar amounts should be allocated for each eligible participant. For example, in the screenshot below, I have set the pro rata formula for the regular profit sharing to 5%. When the Allocation "Run" button is pressed, the system will calculate a 5% QNEC allocation for all eligible employees, then reduce those amounts by the QNEC Davis Bacon amounts previously entered, as applicable for each participant.

