If you are setting up a new plan, the first step on this page is to select the census grid for the participant data that you will be uploading. Click on the “Change” link to select, edit, copy, or change the Current Census Grid. From the drop-down box, select the grid you want and click the “Set Census Grid” button. You will see that each of the grids available has a unique code - a combination of letters and numbers - that the software uses to identify it. You will see this code when you download the grid as described below.

We’ve created several sample “primary census grids” that we suggest you use to upload your census data. Appendix I displays a chart to help you choose the grid that is right for your plan.
In addition to the individual characteristics shown in Appendix I, all of the sample grids contain the following recommended fields:
- Last Name
- First Name
- Social Security Number
- Date of Birth
- Date of Hire 1
- Date of Termination 1
- Termination Reason 1
- Date of Hire 2
- Date of Termination 2
- Termination Reason 2
- Hours
- Statutory Compensation
- Elective Deferral Contribution
- Roth Contribution
- Match Contribution
- Safe Harbor Non-Elective Contribution
- Non-Elective Contribution
- Officer Status
- Ownership Percentage
- Family Group (for ownership attribution)
- Family Group Relationship
- New Comparability Group
If additional columns are needed or you would like to delete columns that you will not be using, it is a best practice that you copy the primary census grid that most closely matches your needs, rename that grid then make the necessary edits.
To view what fields are available in a particular grid or to custom-design your own census grid, see the "Edit Data Entry Grids" article. Note: only grids that contain the SSN (Social Security Number), Employee Number field, or both will be available as an option to select as a data entry grid. Users can elect to use either field but it must match the unique identifier specified in the ID for Participant Upload/Download field in that plan's Plan Specifications Menu>General Features>General Information.
To edit a grid, click on the “Change” link next to current Census Grid or from the Compliance Menu, hover over Census and select the Create/Edit Grids option. This will open the Compliance Grids pop-up box. From here, select the grid you wish to edit (or copy, then edit) from the drop-down box, then press either the “Edit” or “Copy” button, as applicable. Users can also create their own grids from scratch by pressing the “Add New” button or delete existing grids by pressing the “Delete” button.

When the user selects the “Edit”, “Copy” or “Add New” option, the selected grid (or a blank grid if adding new) is opened.

To change the name of the grid, edit the text in the Short Description. We recommend keeping this relatively short and don't recommend the use of apostrophes.
To change an existing field, use the drop-down box under the “Field” column to select a different field, then modify the heading and help text as applicable. Be sure to press the “Update” button to save changes.
To delete a column, select “None” in the “Field” column and click “Update”.
To add a column, enter a new sequence number designed to place the new column where you want it located, e.g. if you want the new column between items with sequence numbers 180 and 190, you would give it a sequence number from 181 to 189. When you click the “Update” button, the fields will be in your desired order and the numbers will be sequenced to 10 units apart. Select the field from the Field drop-down box; the Heading and HelpText boxes will auto-populate. If you add a new field and leave the Seq ("sequence") information blank, the system will default the new field to have a Seq of 100 and place the new field at the top of the grid. Note that although the Heading and HelpText boxes do auto-populate they are editable and you can enter your own descriptions. These descriptions will be included in the instructions section of the census download accessed by going to Census>Download.
Notes:
-If you modify an existing grid or create a new grid, the first two lines (sequence numbers 100 and 110) must be last name and first name. These equate to the first two columns on the actual grid.
-When you modify a grid, it will have a different unique identifier (Grid ID) that is automatically assigned.
-Grids are global. Changes made to existing grids will effect any plan that is currently using the grid.
To get to the mapping information for a field, select the census grid that will be used for the plan from the "Data Entry Grids" page. When you select a census grid to edit/copy, you are brought to the "Edit Data Entry Grid" page. Click "Update and Edit Mapping" to access the "Update and Edit Mapping" screen. Here, you will see most fields available in the system (under "System Field") and you will be shown any default field mapping, if any. For example, as a default most compensation fields are mapped to the "Compensation_Statutory" field.
When you run the Scrub task, the mapping is based on the mapping of the census on the Census screen. Mapping is not based on the census grids on the Other Import/Export/Report Menu.
When mapping on the “Update and Edit Mapping” screen, the only data fields available for mapping in the “Grid Field” drop-down are those fields that are listed on the “Edit Data Entry Grid” screen. For example, in the screenshot shown, the “Service_EligibilityHours” is a column that’s on the census grid. The drop-down boxes below indicate other fields that are being mapped from it, i.e. “Service_EligibilityHoursInitial”, “Service_VestingHours” and “Service_ParticipationHours” are all fields that are being mapped from “Service_EligibilityHours”. To remove this mapping, select “None” from the Grid Fields drop-down box. There is a “Custom Calculation” option, but it is not operational.

Having selected the format for uploading/viewing your participant census data, you are ready to load your data.
Edit Census
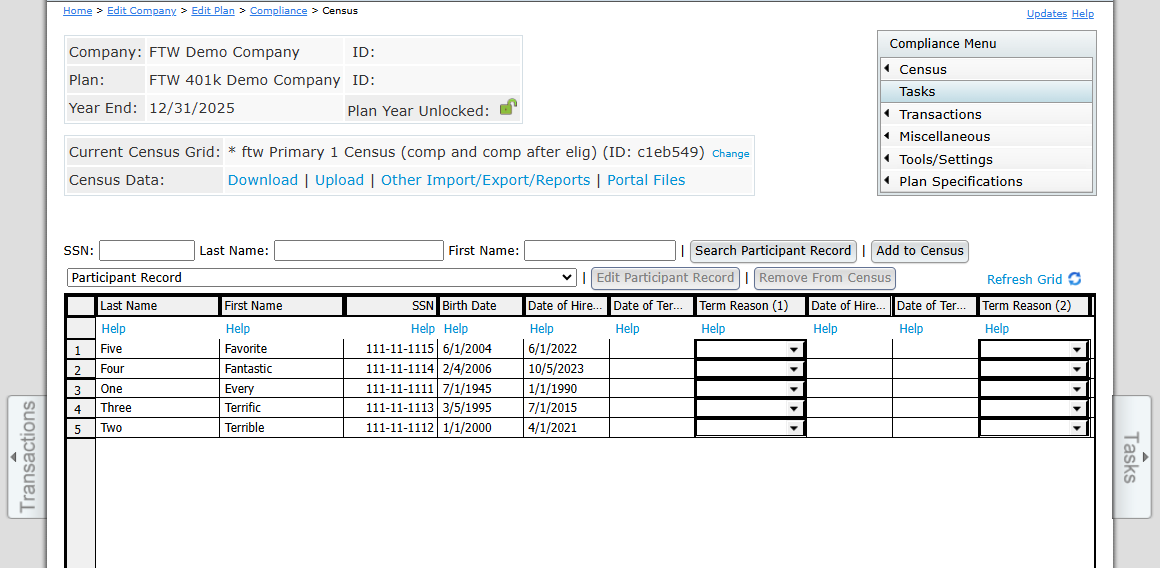
Data can be edited directly within the census grid. To update a field, simply double-click on it and enter the new information. The system automatically saves your edits. To add a participant, enter the SSN or Employee ID number in the box above the grid and click on "Add New". You will then be able to enter remaining data (first name, last name, etc.) in the applicable fields for the new participant. Generally, however, you will want to upload data into the grid using a census upload. The system will try to ensure the formatting is within certain limits for certain fields. If you enter data with incorrect formatting you may see the error "Not Valid" and the field will not be updated. For example, if you enter a date as "1/1/01", the system will update the date to the correct formatting ("1/1/2001").
Download Census
There are two ways to access the Download option. You can press the “Download” link from the census screen or hover over Census in the Compliance Menu.


The Census Downloads pop-up box will appear with three download options:
Current Census
Generally, before uploading a census, you will need to download the blank census template so that your spreadsheet will have the correct formatting. The field names must match those on our system and be in the same order. The ID number of the selected census grid also must match the number in the first column of the third row of the spreadsheet (cell A3) that will appear in the downloaded file. This means that if you add, remove, or move a column from the selected data entry grid you generally must download a new Excel file for your census. In addition, in order for the file to be re-uploaded into the system, it must be saved in .csv format.
Another use for downloading the current census would be to review any changes made after the Scrub/Eligibility task is run, changes entered via the portal, or if the "Edit Census" link was used. Items in the census may be updated by the system (during a data scrub - you will be shown errors if a census item is updated) or by the user. You can download the latest version of the census by clicking on "Download Census>Current".
Download Prior Census
Clicking on the "Prior" link will generate a copy of the prior year's census. Depending on the Global Report Options, the "Prior" option may include employees who were listed with a termination date on the prior year's census.
Last File Uploaded
The system saves the most recent census uploaded. Even if changes are made to the census on the system (via a data scrub or user entry), you can download a copy of the census as it was last uploaded.
Upload Census
When initially adding census data to the software it is generally easier to upload it via .csv file. It is a best practice to download the grid to Microsoft Excel .csv format, enter your data on the file, then upload the spreadsheet.
Prior to uploading the census, it is highly recommended that the data you receive from your client is reviewed for completeness and accuracy. For example, if the census has both statutory compensation and statutory from plan entry compensation, both fields must be completed for all participants.
To upload the census click the “Upload” link, select the file to upload, then press “Upload”.

Upon uploading the census, the Upload Results screen popup will:
- Show the total number of records to be added
- If applicable, will list any invalid or duplicated SSNs or Employee IDs
Reset entry dates
If this is the first plan year on the FT William system, you will have the option to have the system clear out all of the status fields that the system calculated after the census was previously uploaded and the data scrub was run. This is a handy tool to use if invalid data, such as an incorrect termination date or hire date was previously uploaded.

Retain prior year codes
Subsequent to the first plan year on the system, users have the option to either copy the following status fields from the prior year or upload from the census upload file:
- Ownership percentage
- Family code
- Family relationship
- Officer status
- New comparability group number
- Employee class
- Employee class other
Note: The system defaults to “Yes” to have the prior year data pulled instead of the census data. If “Yes” is selected, data for the seven fields from the prior year will overwrite data for those seven fields even if that data is in the current census being uploaded. To have the system use the data in the census, simply set the override to “No”.

Upload file name
Click the browse button to search your computer for the census file you wish to upload. Please note that the census file must have been saved as a .csv file. Also note that the format must match the format in the grid selected from the Work with Data Entry Grids screen.
Number of rows to ignore
The number of rows to ignore defaults to 5 indicating that the participant data starts on Row 6; if you have made any changes to the first five rows of the spreadsheet, you need to adjust this number accordingly. Please note that the census template ID number in the third row must not be removed or changed. This number tells our system what data will be in each column.
Submitting the file and reviewing results
After clicking "Upload", the "Upload Results" pop-up window will appear. If your upload was successful, the system will display the number of records added. If your upload was not successful, you will see an error message. The most common error involves not having the correct census ID number in cell A3 of the spreadsheet (see the section "Download Census" above for more information).
For some fields only certain entries will be valid. These fields appear as drop-down boxes in data entry grids on the system. Upon upload, the system will try to match the text in a particular field to the correct field value. For example: the field "Officer" has two possible values: "Yes" or "No". If you upload a census with "yes" (all lower case) or even simply "y", the system should identify that the value of that field is "Yes". Of course, if there are multiple values that begin with the same letter, you will have to enter more of the beginning letters of the field to have the system recognize the correct value.
You can effectively start over for a plan year by uploading a new census. This will clear out all the "R" (regular) field types on the system for the applicable plan year end. Master file data will not be cleared by uploading a new census unless you are directly uploading master file information (i.e. participant’s address or earliest date of hire).
Other Import/Export/Reports can be accessed from the Compliance Menu by hovering over Census and selecting Other Import/Export/Reports or from within the Census screen, by clicking the Other Import/Export/Report link.
 Most plans will need other information entered into the system beyond the census data, at least in the first plan year. For example, if you are running the Top Heavy test you will need to add information about prior year in-service distributions using a supplemental grid in the Other Import/Export/Reports menu. There are several * ftw grids that we suggest you use to view or edit supplemental data. You can import or directly enter data that does not appear in your census. You should first upload a census for the plan year, then enter other information under the Other Import/Export/Reports menu prior to running the Scrub/Eligibility task.
Note: "Upload" will not be an option if the selected grid does not have SSN or employee ID information and you will instead see "N/A - no SSN" where "Upload" would normally appear. If you have a data grid that you would like to use for upload and need to add a SSN or employee ID field, you can edit the grid by going to Census>Create/Edit. See Edit Data Entry Grids for more info on editing census grids.
If you wish to add additional historical data to your census, a useful grid to add for a first year plan is “*ftw First Year Supplemental Census Grid”. This grid allows you to enter supplemental data for prior years of service and in-service distribution amounts for Top Heavy testing.
When uploading a grid in the Other Import/Export/Reports menu, there is a "With Map" option. This option allows you to direct the software to use the mapping on the census you are uploading instead of the data and mapping that was included on the grid currently in the Census screen. If No is selected, the system will use the data fields uploaded with no mapping. Selecting Yes will direct the software to use the mapping from the file that you are uploading instead of the grid on the Census screen. Using the * ftw Supplemental Census Grids as an example since it is often used, these additional grids are not setup for mapping of compensation and hours as the software is built around the concept of the compensation and hours mapping occurring from the census grid that is selected on the Census screen. Unless directed otherwise by our support team, leave "With Map" set to No because the mapping should be based on the census grid that you have in place on the Census screen.

User-Defined Reports
The UD Grid spaces on the Other Import/Export/Report menu allow you to select User Defined Reports to generate in Word or Excel format. UD Grid fields 1-5 are able to be included in the selected reports for the Client Package. If you want to include a custom report, you would first need to create the custom grid.
Several sample grids are supplied with the Compliance software. The grid names being with *ftw and cannot be edited, but you can use the Copy function to create a copy of that grid and customize as needed. All grids for your company code’s log-in (and division, if applicable) will be available for selection. After selecting a grid from the drop-down, click on "Save Selections" to add the grid to the UD Grid field.
NOTE: We strongly suggest that you make a copy of any grid you wish to change (select the grid, click "Copy" and give the new grid a custom name) because changes made to grids are global and will effect any plan using the grid in any existing plan years.
Appendix I contains suggestions for supplemental grids that are available for extracting additional data on the Other Import/Exports/Reports menu.
Participant Record
From the Census screen, you can access the individual participant's data by selecting their name from the Participant Record dropdown or by clicking their name below the census grid in the "Active/Inactive Employees not on current year census".

You will be taken to the "Participant Menu" screen where you can access the View History and Vesting Override windows, as well as the Participant Data section.
View History

Clicking “View History” will take you to the Participant History grids. The Eligibility, Vesting, and Benefit History grids all work in a similar manner. The grid shows the years of service and hours of service earned for each computation period year in the system as well as status change dates. The following example will illustrate how these grids operate:
A sample Eligibility history link is shown below for the 2024 testing year. The first field shown is the "Comp Period year End" which shows the computation period year end for which the status was calculated.
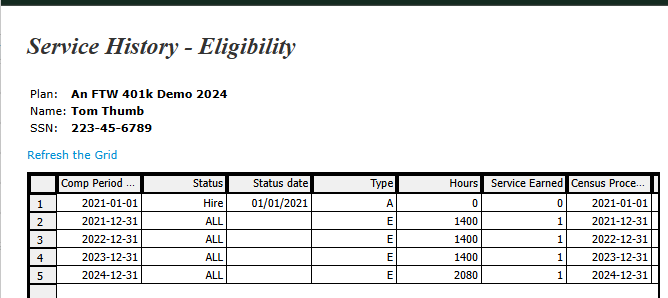
The next three columns taken together show the status, status date and type of record shown. The field "Type" indicates the type of status. There are two main categories of status types:
- A: General status change with a status of hire or term. "A" status types will not have corresponding hours of service.
- E, V or B: "E" = Eligibility; "V" = Vesting; and "B" = Benefit. These status types will have corresponding Statuses to indicate what type of contribution they pertain to ("ED" - elective deferrals, "MT" - Matching, "NE" - nonelective, or "ALL" - all contribution types).
The Hours column typically displays the hours from the census grid. The Service Earned column will indicate the years of service earned for the computation period.
The Compensation and Contribution/Distribution History grids include the Compensation History from previously uploaded census files in the Statutory and Nonelective Testing fields.

The Contribution/Distribution History grid has the same fields as the Compensation History grid but the contribution and distribution data is based on posted transactions in the Transactions module.
Vesting Override
The Vesting Override link allows you to override the source vesting percentage for a participant. Once the vesting percentage is overridden, the software will no longer calculate the vesting percentage for that employee.
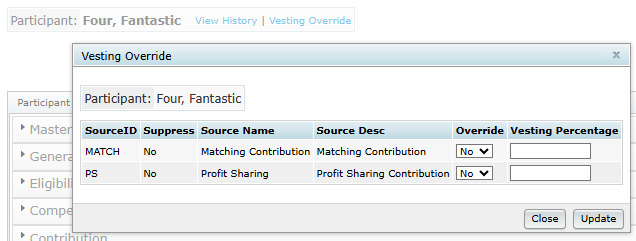
Unless you are making an employee 100% vested, we recommend doing a years of service override using one of the *ftw grids in the Other Import/Export/Report menu instead of overriding vesting percentage.
