As of the 2024 filing year, Form 5558 can be e-filed through the EFAST2 system. This feature is not available for prior years or off-calendar plans using the 2023 Forms.
Please Note: The filing of form 5558 is a separate filing feature included in the 5500 Module. The form 5558 will not be included when filing 5500 Forms and Schedules.
Once Form 5558 has been added to the Draft forms the 5558 Edit Status and 5558 Filing Status details will appear. *If the Form 5558 is removed, the 5558 status sections will also be removed.

5558 Edit Status: There are two possible statuses.
- Unlocked: indicates the draft Form 5558 is editable and not ready for e-file.
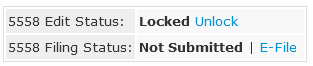
- Locked: indicates the draft Form 5558 has an 'OK' edit check status, is no longer editable, and is ready to be e-filed.
- This link is disabled until the Form 5558 is passing edit checks and no critical errors are present.
- If a Form 5500/SF/EZ is added after the Form 5558, and the filing has not been submitted, users will be required to re-run edit checks and re-lock the form before submitting.
5558 Filing Status: There are three possible statuses.
- Not Submitted
- Not Submitted: indicates the Form 5558 is unlocked and has not been e-filed.

- Not Submitted | E-File: indicated the Form 5558 is locked and enabled for E-file.
- Not Submitted: indicates the Form 5558 is unlocked and has not been e-filed.


- Submitted: indicates the Form 5558 has been successfully submitted to the EFAST2 system for the IRS to review and determine eligibility of extension. Once the 5558 is submitted and accepted, it may not be amended, unlocked, or altered.
 The Check Status link allows users to view the filing details including status, Date submitted and the AckID.
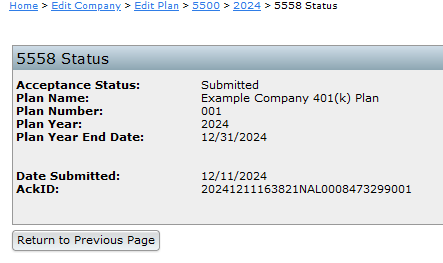
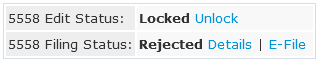
- Rejected: EFAST2 rejected the filing and the form data needs to be reviewed and updated if applicable. Selecting the 'Details' link next to the Rejected status will indicate what issues were present that caused the rejection. When a rejection occurs the form is automatically unlocked for edits to be made.

- When the Rejected Filing is relocked, the link to 'E-File' will populate once more
- When the Rejected Filing is relocked, the link to 'E-File' will populate once more
 The Check Status link allows users to view the filing details including status, Date submitted and the AckID.


Please Note: Processed Form 5558 will not be accessible after submission on EFAST2 nor is it available by phone with EFAST2. Contact the IRS for any questions about the Form 5558.
As of the 2024 filing year, users are now able to upload the Form 5558 in mass.
Note: This feature is only available for 2024 filing years forward and will not populate in prior years.
To access this feature:
- Navigate to the 5500 Menu Upload and Download Center from within any plan:

- From the Upload Menu, select the Upload Form 5558 (csv).

Bulk import:
Using the Sample Form 5558 (csv) provided on the upload screen, users may mass import Form 5558. The import must include information in the one of the data sets outlined below:
Note: only enter information into one pair of data sets when using this upload feature.
- CustomerID
- PlanID
OR
- CompanyEmployerID
- PlanNumber
OR
- FTWCustomerID
- FTWPlanID
Uploaded data will replace existing data, and create a new 5558 filing for plans if one doesn't already exist.
The file must be in comma-delimited format (e.g., "Filename.csv"). The system will not perform data integrity edits on uploaded data. Be sure you run all appropriate edit checks after performing the import.
Once the sample file has been completed, return to the upload page and select the Choose File option and Submit.
Note: Users may enter one of the above identifying methods Per Plan but each plan listing can use a different identifier. For example, the following Sample Form 5558 upload has 3 plans listed, with each plan uses a different identifying method and will still successfully import.

As of the 2024 filing year, Form 5558 can be e-filed through the EFAST2 system. This feature is not available for prior years or off-calendar plans using 2023 Forms.
Please Note: The filing of form 5558 is a separate filing feature included in the 5500 Module. The form 5558 will not be included when filing 5500 Forms and Schedules. A form 5500/5500SF/5500EZ does not need to be present to file the Form 5558.
To e-file, select Form 5558 from the "Add Schedules" box. This will add the form to the Draft Edit Section of the 5500 Module.
Once added, the "5558 Edit Status" and "5558 Filing Status" details will appear.
Note: if the Form 5558 is removed, the 5558 status sections will also be removed.
Once the Form 5558 has been completed and passes edit checks, it is ready for e-file. The filing will need to be locked by selecting the Lock link from the 5558 Edit Status line. Locking the filing will disable any further edits to the Form 5558 and enable the E-File option on the 5558 Filing Status line.
Note: The Lock link is enabled once the edit check status shows OK, if the edit checks are Not-OK there is an error present with the filing that needs to be corrected prior to e-filing. Please see Form 5558 Edit Status and Filing Status for additional details on the Lock and E-file options and definitions.

Once the E-File option is selected a warning will populate on the screen confirming you wish to submit the form.
Only select "OK" if the filing is ready to be sent to the IRS. Once the 5558 is submitted it may not be amended, unlocked, or altered.

If the filing is received by EFAST2, the 5558 Filing Status will update to Submitted.
Selecting the Details link will provide the date of e-filing and Acknowledgement ID provided by EFAST2. If the filing is Rejected the form will need to be unlocked, and any errors corrected before resubmitting.

Note: Processed Form 5558 will not be accessible after submission on EFAST2 nor is it available by phone with EFAST2. Contact the IRS for any questions about Form 5558.
Starting with filing year 2024, the 5558 Report is now available in the 5500 Batch/Workflow menu. This report provides a comprehensive overview to help users track and manage Form 5558 submissions effectively. Selecting the 5558 Report link will automatically download a .csv file.
There are two ways to access the 5558 Report:
Option 1: From the Main Menu Wolters Kluwer Logo> Batches>5500 Batch Workflow
- Go to Wolters Kluwer Logo> Batches>5500 Batch Workflow
- Select the filing year (2024 or later)
- Click the 5558 Report Link to download the .csv file.
Note: The 5558 Report is only available for filing years 2024 and beyond, as e-filing was not available before 2024.


Option 2: From a plans 5500 Module
- Navigate to 5500 Module>5500 Menu>Batch/Workflow
- Click the 5558 Report Link to download the .csv file.
Note: The 5558 Report is only available for filing years 2024 and beyond, as e-filing was not available before 2024.


5558 Report Contents
Selecting the 5558 Report will download a .csv file that contains the following details for active Form 5558s for the filing year.
- ftwID/ ftwPlanID
- These are ftwilliam.com assigned fields
- Customer ID/ Customer Plan ID
- User defined fields as entered on the Edit Company/Edit Plan screen
- Admin
- Administrator assigned to the plan, as listed on the Edit Plan screen. If this column is blank and Administrator has not been assigned.
- Company Name
- Plan Name
- EIN
- Plan Number
- Plan Year End
- Extension Date
- The 15th day of the 3rd month after the return/report's normal due date. (10/15 for calendar year end plans.)
- Edit Check Status
- ???- indicates the Edit checks have not been run
- OK- the Edit checks are clear and the form is in good order
- Not-OK- there are errors that will prevent the form from being filed.
- Filing Status
- Blank entry- indicates the form has not been e-filed
- Submitted-the form has been e-filed and has received and Acknowledgement ID
- Date Submitted
- Date the form was e-filed.
- AckID
- 30 character Acknowledgement ID of receipt provided by EFAST2 as confirmation of filing.
Batching Form 5558 enables efficient processing by grouping selected plans into a single batch. This approach streamlines submission and printing, saving time and ensuring consistency across multiple filings.
Accessing the 5558 Batch Feature:
There are two paths to accessing the Batch 5558 feature:
Option 1:
On the Home screen, choose the Wolters KluwerLogo> Batches> 5500 Batch/Workflow.

Select the desired Plan Year and click Batch 5558.

Option 2:
Select a Company/Plan and open the 5500 Module.
From the 5500 Menu, select Batch/Workflow and click Batch 5558.


The main Batch 5558 screen provides a quick view of batch statuses. From the Select a Batch screen, the following features are available:

Batch Name- All existing batches will populate with a hyperlink to select and view individual batch details.
Batch ID- Is an FTW assigned id number for easy referencing.
Count- Displays the number of plans in the batch.
Edit Check Status- Shows the overall edit checks status of the plans within the batch.
- Status icons indicate:
- ⚠️ Yellow triangle – Edit checks have not been performed.
- Green check – Plans are clearing all edit checks
-
❌ Red X – One or more plans have errors
- Errors must be corrected before e-filing
Lock- Displays the Locked or Unlocked status of all forms in the batch.
- If users hover over the padlock icon, a timestamp of when the batch was locked will populate.
- Locked filings cannot be edited unless unlocked.
E-file Status- Indicates if the batch has been e-filed with EFAST2
- Blank- the column will remain blank until it has been sent to EFAST2.
- Submitted - the forms within the batch have been sent to EFAST2. Once submitted the batch may not be unlocked.
Printed- This is a user selected field that indicates if the forms have been printed to PDF with a date and timestamp.
Completed- This is a user selected field that means all work for this batch has been completed.
- This option is only enabled if users have either printed or e-filed the batch.
- If selected on a batch that has been e-filed the action may not be undone.
Do with Selected
From below the grid on the left-hand side there is a Do with Selected menu option. From here users are able to:
Delete selected batches
- Batches that have been locked may not be removed unless they are unlocked.
- Plans in a deleted batch may be added to a new batch.
Change Lock Status: batches may be altered to Lock or Unlock in mass.
- Batches may not be locked unless all plans within the batch are passing edit checks and reflect a green check mark ( ).
- Batches that have been e-filed may not be unlocked.
Change Completed Status: batches may be altered to Completed in mass
- This option is only enabled if users have either printed or e-filed the batch.
- If selected on a batch that has been e-filed the action may not be undone.
Batching Form 5558 enables efficient processing by grouping selected plans into a single batch. This approach streamlines submission and printing, saving time and ensuring consistency across multiple filings.
The following walks through the steps necessary to:
Add Plans Run Edit Checks, Lock, and E-file Do with selectedCreating a Batch
From the Batch 5558 Select a Batch Dashboard, click Create New Batch and enter a name for the batch.
NOTE: Use a descriptive name, such as the plan year-end (e.g., 12/31/2024 or 12/31 PYE).

Once a batch is created, users are redirected to the individual batch screen where plans can be added.

Add Plans (Return to Top)
Plans may be added in the following ways:
- Manual Selection: by selecting individual plans using check boxes.
- Upload: by importing a file containing plan details.
- Combination: by using both manual selection and file upload.
NOTE: For optimal performance, FTW recommends keeping e-filing batches to 300 plans or fewer.
A batch of 300 plans typically takes approximately 3 minutes to compile, transmit to EFAST2, and receive a response.
During peak filing seasons, processing times may increase.
Manually Adding Plans (Top)
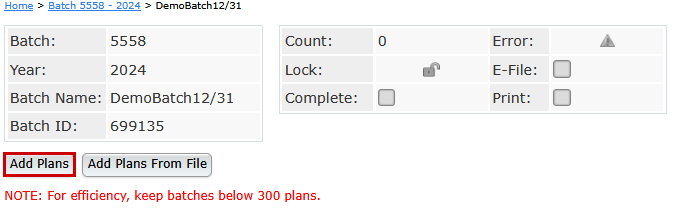

Click Add Plans to view a list of all available plans.
- Are not already included in another batch will populate in the Add Plans window.
- Plans that have already been submitted may be added but will be silently skipped for e-filing. (This allows for users to still be able to select the check extension indicator explained later)
Filter or sort the list using any of the following fields:
| Company Name | Year-End Date (MM/DD) |
| Company ID | Admin |
| Plan Name | Plan Type |
| Plan ID | Signed Status (of 5500/EZ/SF) |
| EIN | Division |
| Plan Number |
|
Select plans by either:
- Checking the box next to each individual plan, or
- Using the Select All checkbox in the header row.
Once the selections are made, click Add Plans to proceed.

Uploading Plans (Top)

Click Add Plans From File to access the upload template needed to import plans directly into a batch.

When completing the upload template, only one set of identifying columns should be completed. Do not complete all columns. Choose one of the following combinations:
- CustomerID and PlanID,
- CompanyEmployerID and PlanNumber, or
- FTWCustomerID and FTWPlanID
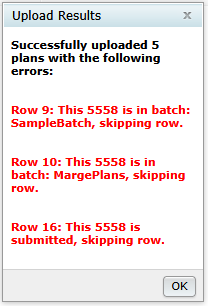
After uploading the file, a results window will appear.
- If any of the uploaded plans are already included in another batch or have been submitted, they will be flagged in the results window and excluded from the import.

When multiple uploads are performed on the same batch—or when a combination of manual and upload methods is used—the newly added plans will be appended to the existing batch.
To fully replace the plans in a batch using an upload, the existing plans must first be removed using the Do with Selected features described below.
NOTE: Adding plans to a batch also adds the Form 5558 at the plan level. If a Form 5500/EZ/SF is present, the 5558 extension box is automatically selected when the Form 5558 is added.
Batch Options (Return to Top)
Once plans been added to a batch, additional Batch Options are enabled.
Run Edit Checks, Lock, and E-file ( Top)
Count: Identifies the number of plans in the batch.
Error: Displays the overall edit checks status of the plans within the batch.
- When selected the system will run checks on all of the forms within the batch and provide an overall result at the top.
- If the batch populates with anything other than a green check mark ( ), review the results screen to see what alterations need to be made.
- The edit checks will also populate on each plan line within the grid.
- Status icons indicate:
- ⚠️ Yellow triangle – Edit checks have not been performed.
- Green check – Plans are clearing all edit checks
- ❌ Red X – One or more plans have errors
- Errors must be corrected before e-filing
- Status icons indicate:

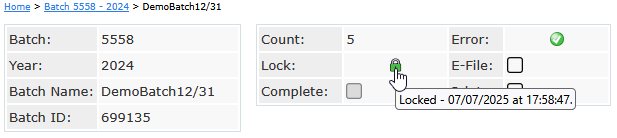
Lock: Once a batch is passing all edit checks, the padlock is enabled.
- Selecting the padlock with lock all forms within the batch. The forms will also be locked on the plan level.
- If users hover over the padlock icon, a timestamp of when the batch was locked will populate.
- Locked forms cannot be edited unless unlocked.

E-File: Once all forms are passing edit checks, and the batch has been locked, the E-file checkbox is enabled.
- Selecting the checkbox will result in a popup window ensuring the batch should be e-filed.
- Once The batch is sent for e-filing the forms may not be unlocked or amended.
- If confirmation e-mails are enabled in the global email settings, admins associated with the 5500 module on the edit plan screen (or the master user) will receive a confirmation e-mail for each plan in the batch.


Print: When selected users are directed to the following print option:
- Print Single 5558 File: Generate one PDF file containing all plans within the batch for quick printing.
- Print 5558s (ZIP): Download a ZIP file containing individual PDF files for each plan in the batch.
- Address Labels: Download a CSV file with plan sponsor names and addresses. Useful for mailing paper copies.
When making this selection, users are also able to indicate if the batch should be marked as printed, which will add a timestamp to the print section above the grid.
Complete: This is a user selected field that means all work for this batch has been completed. This option is only enabled if users have either printed or e-filed the batch. If selected on a batch that has been e-filed the action may not be undone.
Do with Selected (Top)
Remove Plans: removes any plan that has the checkbox selected.
Print 5558: prints any plan that has the checkbox selected. Print features include:
- Print Single 5558 File: Generate one PDF file containing all plans for quick printing.
- Print 5558s (ZIP): Download a ZIP file containing individual PDF files for each plan in the batch.
- Address Labels: Download a CSV file with plan sponsor names and addresses. Useful for mailing paper copies.
Check 5000 Extension Indicator: selecting this option with mark the 5558 extension indicator on the Form 5500. This includes updating forms that have already been locked and invited, but not yet e-filed, avoiding the need to unlock the filing..
- Based on the selection and presence of a form, the grid will update to one of the following:
- Y: the 5500 extension has been updated.
- N: the 5500 extension has not been updated.
- N/A:a form 5500/SF/EZ is not present at the time of selection.
Check 8955 Extension Indicator: selecting this option with mark the 5558 extension indicator on the Form 8955-SSA. This includes updating forms that have already been locked and ad in a batch, but not yet been sent for processing, avoiding the need to unlock the filing..
- Based on the selection and presence of a form, the grid will update to one of the following:
- Y: the 8955-SSA extension has been updated.
- N: the 8955-SSA extension has not been updated.
- N/A: a form 8955-SSA is not present at the time of selection.
Below the Grid (Return to Top)
Export Current View to CVS – Save a CSV file of the details provided on the batch grid. This includes:
| Company Name | If the 8955-SSA Extension Indicator was selected |
| Customer ID | Errors (if any) |
| Plan Name | Locked Status |
| Customer Plan ID | E-Filing Status (Not Submitted/Submitted) |
| EIN | Date Submitted |
| Plan Number | Plan Administrator |
| Plan Year End | Acknowledgment ID |
| Extension Date | FTW Customer ID |
| If the 5500 Extension Indicator was selected | FTW Plan ID |
