Quick Links:
Manual Entry
Add a Form or Schedule
- Select the appropriate form from the Add Schedules box.
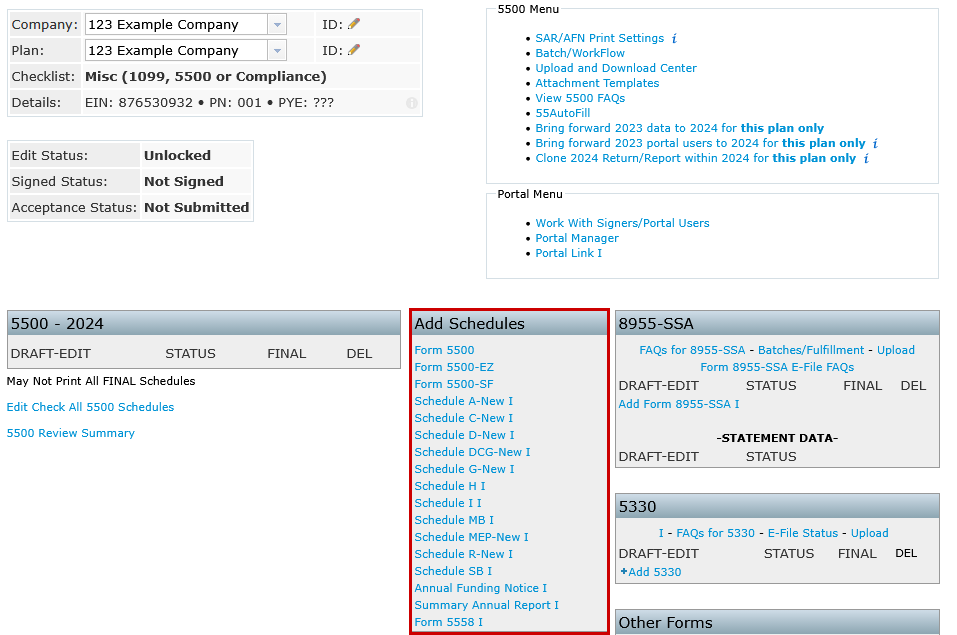

- The form will appear under the DRAFT-EDIT column on the left.
- If the form exists for a prior year, the system will copy the most recent data.
- If no prior data exists, a blank version will be added.

Adding Additional Schedule
Additional schedules can also be added from the draft-edit screen of any form using the link options on the left. (See more information pertaining to Adding Pages and Additional Schedules, later.)- Navigation between forms is available within the data entry screen.

55Autofill (Return to top)
Step 1: Import DOL Data
Click the 55Autofill link at the top-right of the screen from within the 5500 Menu box.- This imports Department of Labor (DOL) data from prior Form 5500 filings using the plan’s EIN and Plan Number.
- 55Autofill will not import:
- 5500-EZ filing
- Any filing that received a status other than Accepted
- Filings older than 4 years (Example in 2025 only forms 2021-2024 are available.)
Important: Importing DOL data will overwrite any existing 5500 data for that year in ftwilliam.com.
Step 2: Bring Forward Imported Data
After importing, data must be brought forward into the account to complete setup. (See Bring Forward Prior Year Data, later.)
Please see the below video of the individual 55Autofill process.
Batch 55Autofill
Batch 55Autofill enables the automatic import of Department of Labor (DOL) data for multiple plans at once. This process can be used to populate all available forms and schedules for when adding new plans to the software or to add 5500s to existing plans already set up in ftwilliam.com.Add New Plans:
This option will create new plan listings within the software for each EIN provided and import all available Form 5500 data from the Department of Labor (DOL).- Submit a list of EINs to support@ftwilliam.com to autofill all available forms and schedules for each EIN.
- Support will connect you with our conversion specialist to provide you with a timeline for completion.
Update Existing Plans:
If plans are already configured in ftwilliam.com and need additional 5500s, users may request batch autofill for those plans.
- Submit a list of EINs and Plan Numbers to support@ftwilliam.com to autofill all available forms and schedules for each plan specified.
- Support will connect you with our conversion specialist to provide you with a timeline for completion.
NOTE: This service is available at no additional charge.
Bring Forward Prior Year Data (Return to top)
The Bring Forward feature allows Form 5500 data from the previous year to be carried into the current year, streamlining the setup process for recurring plans. This option is available for individual plans or in batch for all plans on the system.Options:
Bring Forward for Individual Plans:
Found within the 5500 Menu at the top right hand side of the screen, this option copies prior year data for a specific plan, assuming the plan exists in ftwilliam.com for the previous year.- Data will be brought forward from the prior year to the current year, and only updated fields will need to be modified.
- Available to all users with access to the plan and 5500 module.

NOTE: Form and schedule structures may change year to year. Review all brought-forward data to ensure accuracy and completeness.
Batch Bring Forward for All Plans:
Found within the 5500 Menu, and selecting the Batch/Workflow link, this option copies prior year data for ALL 5500 plans on the account.- Available only to Designated Admins and the Master User.
- Automatically brings forward data from the prior year to the current year for all eligible plans in the system.

NOTE: Form and schedule structures may change year to year. Review all brought-forward data to ensure accuracy and completeness.
Adding Pages and Additional Schedules (Return to top)
Additional pages and entries may be required for certain schedules, including Schedules C, D, DCG, G, MEP and Schedule A. These can be added and customized to support multiple entries and improve clarity across filings.Schedules C, D, DCG, G and MEP
These schedules may require multiple pages to report all necessary information.- Add Pages
Click the schedule name in the Add Schedules box to insert a new page. Each new page will be labeled New by default.

- Rename Page Descriptions
Click the schedule under DRAFT-EDIT in the 5500 - Year box. Hover over the word New at the top of the page to access the editable field. Enter a custom 5-character description to identify and differentiate the page. *Schedule DCG and MEP allow for an 8-character description.

Schedule A
Schedule A filings support multiple entries and additional pages to accommodate multiple insurance providers or contracts.- Add Multiple Schedule A Filings
Click Schedule A-New in the Add Schedules box to create an additional Schedule A.

- Add Additional Page 2
Click the p2 link next to the Schedule A form under DRAFT-EDIT to insert additional pages to an individual Schedule A.- The p2 link may be selected multiple times to add as many additional entries necessary to complete the Schedule A.

- Rename Page Descriptions
Like the other forms and schedules, each Schedule A and its pages can be labeled with a distinct 8-character name to differentiate entries and pages.

To add a Summary Annual Report (SAR) or Annual Funding Notice (AFN), click on the link to the corresponding notice within the "Add Schedules" box. If you add the SAR, you will not have the option to add the AFN until you delete the SAR from the "DRAFT-EDIT" column. The reason you are unable to add both the SAR and AFN at the same time is because the AFN is similar to the SAR, but is only used for Defined Benefit Plans that are subject to the PBGC - all other plans should use the SAR.
NOTE: The SAR/AFN checklists are populated with plan information at the time you click on the link under the 'Add Schedules' box. You should only add the SAR/AFN once all your schedules for the current year are completed.
Most information for the SAR can be obtained directly from the forms and schedules you already have completed. We still recommend opening the SAR Checklist to review and ensure the checklist is completed accurately. Some information cannot be obtained from the schedules and you will have to complete this information on the checklist itself.
Note that there are options in the Admin Menu (located at the top of most screens in ftwilliam.com):
- Set "SAR/AFN Defaults" (SAR/AFN instructions as cover page, Custom SAR/AFN instructions, Copy cost per page (SAR), Copy cost total (SAR), Corrective Distributions (SAR), and Rollover Contributions (SAR)) and
- Set default font type, font size, line spacing, and margins under "Edit Document/SAR/AFN Print Settings."
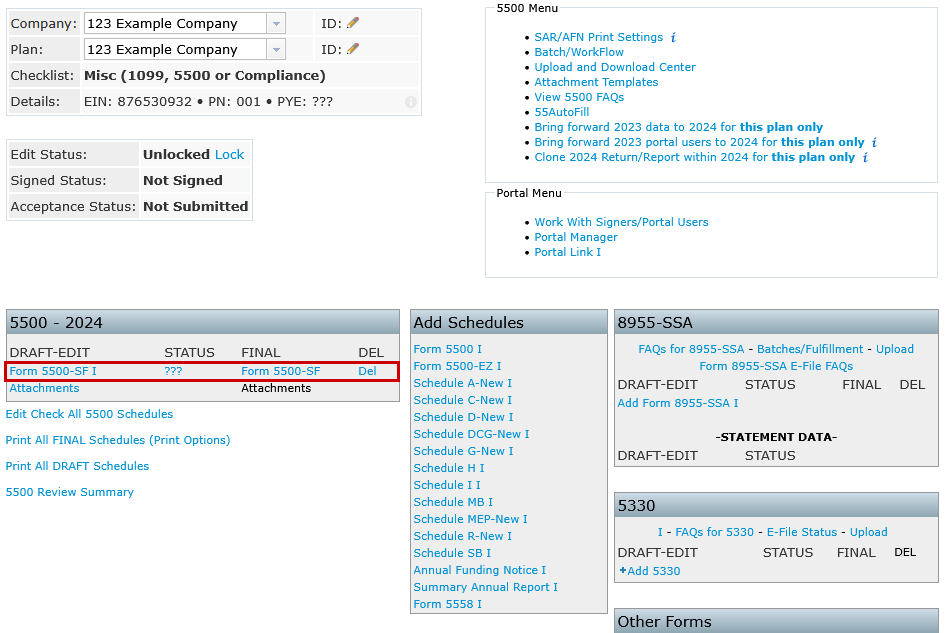
To enter information in a schedule, click on the schedule under the "DRAFT - EDIT" heading in the "5500 - Year" box (or on the link under "Active Schedules" once you are already editing a form/schedule). The actual speed to open a form/schedule is dependent upon the speed of your Internet connection. If you are using a high-speed Internet connection, the schedule should open immediately.
Once the schedule is open you may enter data as you wish.
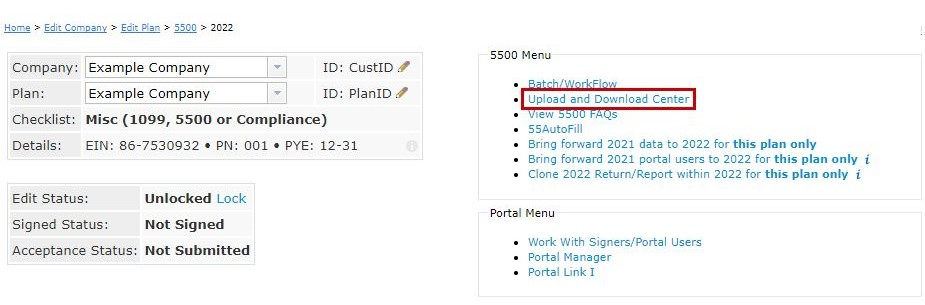
Note that you can jump to different schedules and add schedules without having to return to the "Form 5500 - Year" screen (See red arrow above).
There is no need to click on update buttons in the software. Changes are automatically saved once they are entered.
There are two methods of consulting the official DOL instructions.
- On the main "Form 5500 - Year" screen, you may click on the "I" link next to the appropriate schedule under the "DRAFT - EDIT" heading in the "5500 - Year" box. This will display a page with the full text of the instructions for the applicable schedule. There will also be "View General DOL Instructions" links on this page to the general Form 5500 instructions.
- When you are entering data on a schedule, you may click on the blue buttons with question marks next to the line item on the form to read the help materials related to that line item.
You may perform edit checks on the data for each form/schedule at any time. There are a few different ways to run edit checks and review errors/warnings:
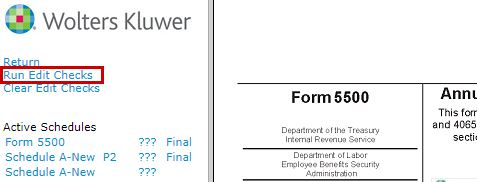
- Visual Edit Checks. While you are editing a form/schedule you may click on the "Run Edit Checks" link at the top left of the screen. This will visually show you the edit checks by highlighting the field where there is an error/warning.
 Errors are coded yellow for a failed edit check and red for an invalid entry (invalid date, 13/04/2022, for example). You may double-click on any highlighted field for more information on the edit check and close the window that appears by clicking on "close".
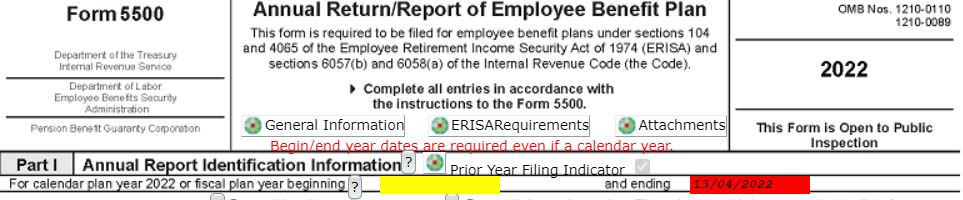
If you would like to complete the form without viewing the visual edit checks, you may click on "Clear Edit Checks" at the top left of the screen.
- Edit Checks in List Form. To see a list of edit checks for a particular form/schedule, click on the status link under the "STATUS" heading in the "5500 - Year" box from the "Form 5500 - Year" screen. You may also click on the status link next to the name of the schedule under "Active Schedules" if you are currently editing a form/schedule. This will open a separate page with a list of the edit checks for that form/schedule.
If you prefer to do all of your error checking for each form and schedule at once, click on the link under the "5500 - Year" box called "Edit Check All 5500 Schedules." This will open up a new web page and show you errors for all forms and schedules at once.
 Errors are coded yellow for a failed edit check and red for an invalid entry (invalid date, 13/04/2022, for example). You may double-click on any highlighted field for more information on the edit check and close the window that appears by clicking on "close".
The edit checks have codes to help identify the level of the problem detected. Codes that begin with "FW" are edits that have been drafted by ftwilliam.com. All other edits have been supplied by the DOL. Edits are also coded as either "error" or "warning" (data likely has a problem). Please note that any filing containing a non-FW error will not be accepted by the DOL. We strongly discourage filing if there are errors/warnings appearing for a filing until you are certain that the filing is correct.
NOTE: The edit checks are NOT intended to check for the accuracy, correctness or completeness of every response.
Immediately before printing the final version of all the schedules, it is a good idea to rerun all edit checks even if all status codes are "OK". The status of the edit checks is reflected under the "STATUS" heading in the "5500 - Year" box.
The following is a description of the status codes:
- OK A status code of "OK" indicates that the edit checking was successfully completed and no errors or warnings were detected.
- ??? A status code of "???" indicates that the information entered on the schedule has changed since the last edit check.
- NOT-OK A status code of "NOT-OK" indicates that the edit checking detected one or more errors or warnings. You may click on "NOT-OK" to reference those edits.
Clicking on this link will generate all final forms and schedules in one pdf file for the plan. This will be the same download that a signer must generate before he/she can electronically sign the filing. The pdf file can be saved to your hard-drive (as can the signer from the portal).
The "Print Options" link will give you options to include Form 5558 for purposes of printing from the "Form 5500 - Year" screen or via the Portal. Form 5558 will not be included in the printing of the filing by default.

The Form 5500 Software includes several upload and download features. Click on the "Upload and Download Center" in the top-right under "5500 Menu" to open the "Upload and Download Center" page as shown below. Each feature can be accessed by clicking on the corresponding link on the page.

In most upload menus, you will be provided a sample file. Most uploads require that you complete a .csv file with all of your schedule information. Make sure that your headers in your .csv file match the headers in the sample spreadsheet provided.
Upload Features
- Schedule A
In the Schedule A, specifically, we give you a sample spreadsheet (titled "Sample Schedule A") and an additional spreadsheet with what is called "Schedule A Schema." The schema is what you will use in your headers on your spreadsheet. The first column of the schema spreadsheet will list the data that you may upload and the column next to the data will give you the schema that corresponds to that data. For example, if you wish to upload the "Tax Period End", you would use "PlanYearEndDate" in the header of your spreadsheet.Additionally, please note the following if you are adding multiple brokers to the spreadsheet: You will use the "Name1" column for the first name, "Name2" for the second, through the "Name7" column. If you have more than 7 brokers to add, you will enter his/her name into the "Name3" column in the next row and continue through the "Name7" column. Entries that begin in the "Name3" column below the first row will add an additional Page 2 to the Schedule A.
Once your spreadsheets are completed, you may then proceed to uploading your data.

In the Schedule A upload menu, you will search for the file to upload and then enter the "Number of rows before column name." This entry will most likely be "0" unless you have entered a column for your own personal use. The software will not be able to read this information so you must tell it to ignore that particular row. Next, you will have to tell the software whether you are appending or deleting data. Appending means you are replacing the existing Schedule A data with the new/corrected data that you have uploaded. If you choose delete, the software will delete the existing data and replace it with the new data that you are uploading.
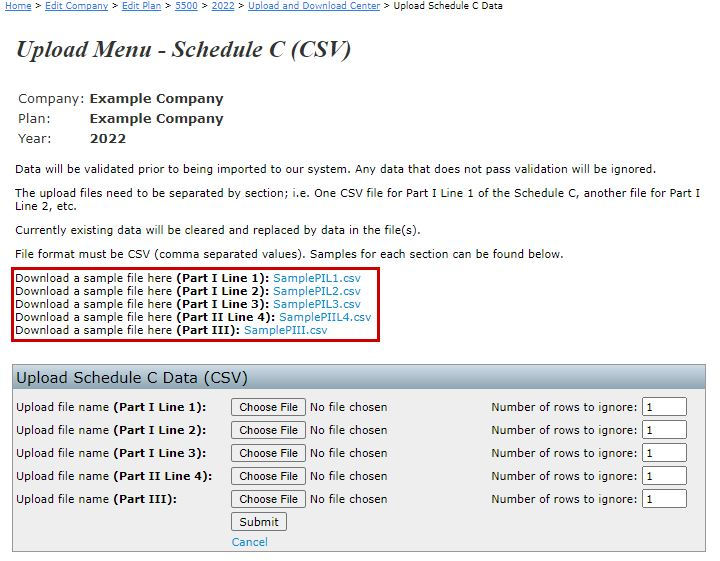
- Schedule C
As with the Schedule A, we have provided sample spreadsheets you may utilize in order to upload your Schedule C data. Please note, the file format of these spreadsheets must remain in CSV format. Each section of the form is uploaded separately in a different file. When uploading your file, the "Rows to Ignore" field will default to -1- (to indicate the column header row of your spreadsheet will be ignored). If you have inserted a row(s) above the column header row, you will need to update the -1- to reflect the row(s) you need to ignore.
- Schedule D
Schedule D data is broken into two parts. If you click on the link for either part, there is a sample .csv file you may download. You will be able to complete this file, save it to your computer and upload the file into the system. You will need to prepare Form 5500 before uploading Schedule D in order to ensure that Sections A, B, C and D of the Schedule D are populated.
If you currently use John Hancock, you may download the file to upload on ftwilliam.com from John Hancock. When you do the export, you'll indicate that you are using ftwilliam.com and their software will give you a file compatible with the ftwilliam.com software.
Please note that you do not need to ensure the column headers on your John Hancock file match the sample file provided by ftwilliam.com; as long as you input the correct number of rows containing data, your file's data will import correctly.
- Schedule G
Schedule G data is broken into two parts. If you click on the link for Schedule D, there are two sample .csv files you may download. You will need to complete each file, save the file to your computer and upload the file into the system.
- ftwLink XML File Upload
This is used to upload XML files formatted to ftwLink standards (ftwilliam.com XML interface). If you would like to use this feature, please contact 800-596-0714 or support@ftwilliam.com for further assistance.
- Generic XML File Upload
This is used to bring in data from Relius' software. Please contact 800-596-0714 or support@ftwilliam.com for more information.
- Upload Signers
This is used to set up your signers/portal users in batch mode. You may enter each signer/portal user under the Work with Signers/Portal Users link on the 5500 page for that filing, or you may upload the signers/portal users via this link. A sample upload file is provided. To help get you started, you may want to download [year] signers' information as described below.
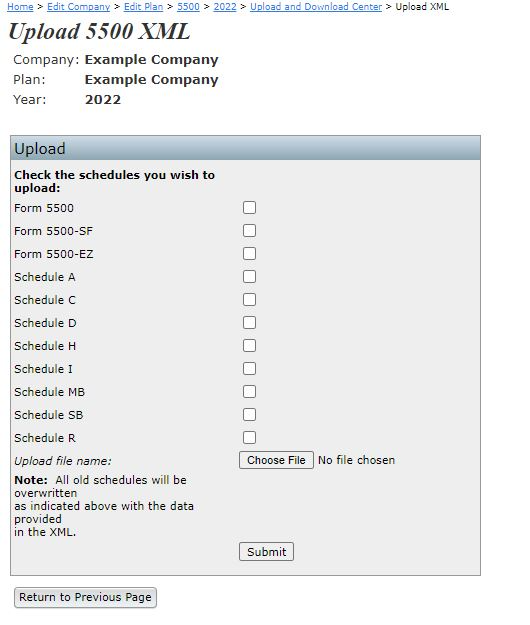
- Upload XML
This is used to upload standard 2009 or later 5500 XML files from other software vendors. If you click on "Upload XML", you will be taken to the "Upload 5500 XML" screen with options to load specific schedules and/or the Form 5500 itself.


Download Features
- Download [Year] Signers from 5500 Forms
This feature will download a list of signer names from the most recent filing in the ftwilliam.com system. The download will include a list of the plan name, sponsor name and address, EIN and plan number; as well as signer name and signer type (sponsor and/or administrator).
This download can be used to help create an upload for the "Upload Signers" option described above.
In addition to having a correct PIN and UserID from the DOL, signer names entered on the 5500 must also exactly match the signer name entered at the DOL website (the signer's profile information) or the filing will not be submitted to the DOL. Therefore, it is important to ensure signer names are accurate to ensure a filing will be accepted.
- Download Full Filing XML
This will download an XML file that may be uploaded into the DOL IFILE system. Note that this is generally not necessary, since ftwilliam.com will file the 5500 once signatures have been obtained.
- Download Form 5500 / Schedules (XML)
The other remaining XML download options will download an XML of a specific schedule or the Form 5500 only. The single schedule downloads can be uploaded into the DOL IFILE system to an existing 5500 in order to complete the filing. This is generally used if two different people are completing the 5500 using different software. Note that the "Download Form 5500 XML" option, different from the "Download Full Filing XML" option, cannot be uploaded to IFILE, but we are offering it as an XML download since it may be useful for uploading to other vendors' software.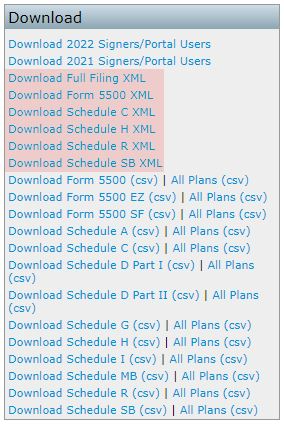
- Download Form 5500 / Schedules (csv)
The csv download options will download a .csv of a specific Form or Schedule.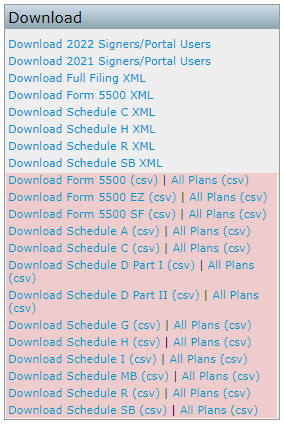


You may permanently remove a schedule by clicking on the "Del" link next to the appropriate schedule under the "DEL" heading in the "5500 - Year" box. Once a schedule is deleted, all of the information it contains will be permanently removed from the system.
You may permanently remove an Attachment by selecting "Attachments" under the "DRAFT-EDIT" column of the "5500 - Year" box. On the "Upload Menu" screen, choose the attachment you want to delete from the drop-down list within the "Delete Attachment" box and click "Delete Attachment." Once an Attachment is deleted, it is permanently removed from the system.
If you would like to invite users to the portal, you first must add a portal user under the Work with Signers/Portal Users link from the "Form 5500 - Year" screen. Once the portal user is added, you should have links available on the "Form 5500 - Year" screen next to the "Signed Status" line near the top of the screen. If the filing is not yet locked and users have proper permissions to view/print, edit or upload, the links to invite will appear as "Invite [Portal User's Name] to Portal". (Note that if the filing is not locked and a user(s) does not have permissions to view/print, edit or upload, then links to invite will only appear once the form has been locked).
Click on the link to "Invite [User name] to Portal" and the "Invite Signers/Portal Users" screen will appear with summaries of the user(s) name, username and email.

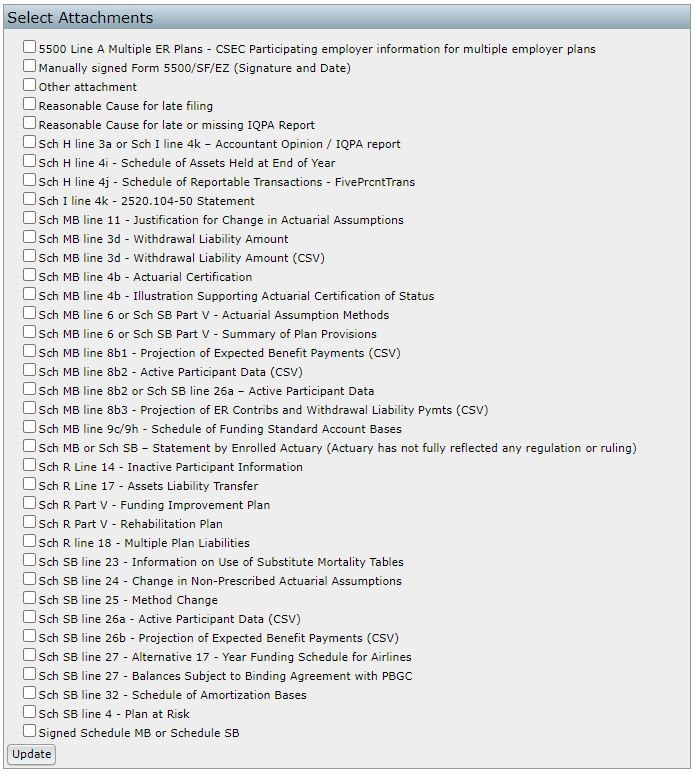
If you select "Yes" for "May Edit 5500" and select "Yes" for your signer to upload attachments to the filing, you will be able to click on "Select Attachments" to select which attachment(s) you would like your client to upload in the portal. Once your client logs into the portal, he/she will be able to view and/or delete the attachment after uploading the attachment to the filing.

Depending on your email settings, you will have different options to send and review the email:
- Click to open email: ("Preparer's Email Program" selected on the "Global Email Settings" screen)
- Select the "Click to open email"link and an email will be generated on your desktop from your personal email program (Outlook, Thunderbird, etc.). The email body will be composed from the default templates you created for the "Portal Email" located on the Global Email Settings screen within the "Select an Email to Edit" box and the custom language (if any) provided for that user.
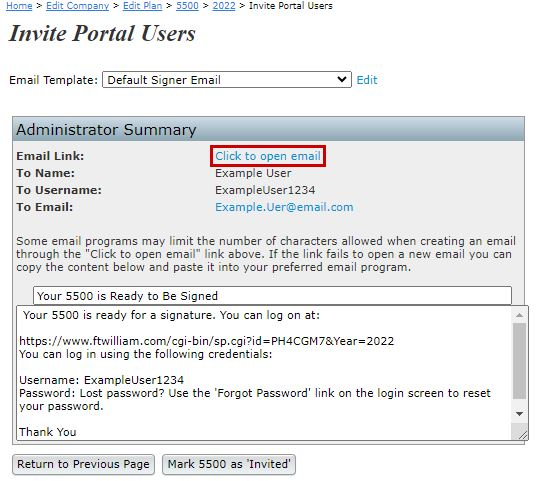 Once you have reviewed the email one last time, you may then click the "Send" button in your email program to invite the user to the portal.
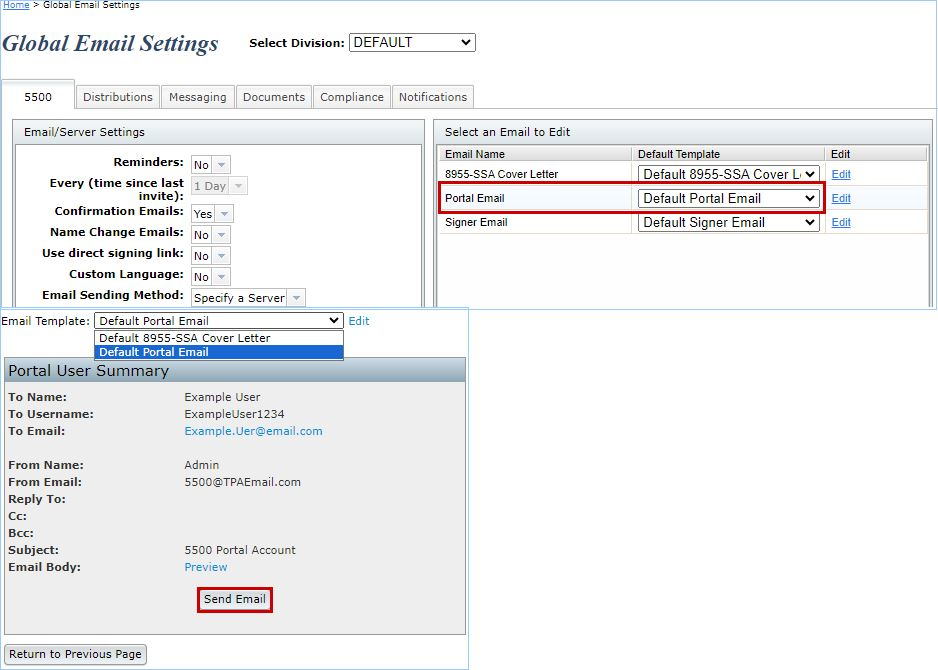
- Send Email ("Specify a Server" option selected on the "Global Email Settings" screen)
- A link is provided to preview the email body by clicking on "Preview." The email body will be composed from the default templates you created for the "Portal Email" located on the Global Email Settings screen within the "Select an Email to Edit" box and the custom language (if any) provided for that user.
- A link is provided to preview the email body by clicking on "Preview." The email body will be composed from the default templates you created for the "Portal Email" located on the Global Email Settings screen within the "Select an Email to Edit" box and the custom language (if any) provided for that user.

This function will set up who will be signing the Form 5500 and/or making changes to the Form 5500 filing via the portal (editing the form via the portal and/or uploading files via the portal). You will assign each user a username, password and email address. This information will generally be different for each 5500 filing on the system and must be completed for each 5500 filing.
Note that signers are often consistent from year to year so you will likely be able to "Add Existing" in future years (note the option to do this in batch mode discussed below). If you only want a user to view the current year information (and not see a prior year completed 5500 for example), you will need to add that user as an existing user to the current plan year and then go into the prior year and delete the user.
Bring forward [prior year] signers to [current year] for all plans. This function will move forward signer data to the current year for ALL PLANS. The process may take a few minutes. NOTE: If signer(s) have already been added for a given plan and year, the bring forward operation will silently skip said plan. There must also be signers from the previous year. The current year plan must be unlocked. Additionally, if your signer is designated to be signing as "None" in the prior year, he/she will not be brought forward into the current year.
You may also upload portal user information (portal username, password, email, signer status, etc.) for all your plans on the system at once. See information regarding "Upload Signers" in the Upload and Download Center.
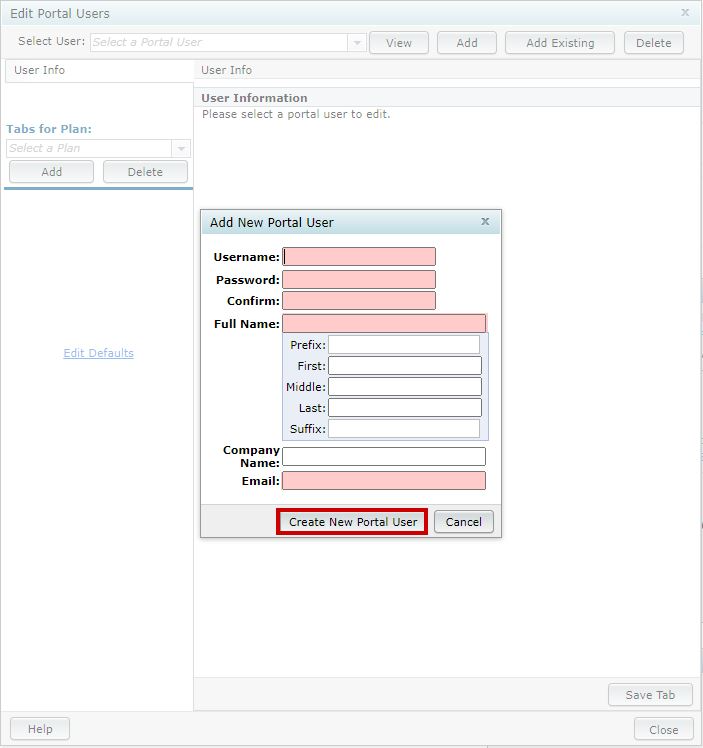
Clicking on "Work with Signers/Portal Users" within the "Portal Menu" box will bring you to the "Edit Portal Users" screen where you will be viewing your user's profile. Below are the steps to follow to add/change user information:
Step 1: Click "Add" if the user is not already in the system for that plan/plan year. More information will appear as relevant for the user selected. If the user was on the system for last year's filing or for a different filing on the system, you may select "Add Existing" and choose the user from the list that will appear.
 |
|
Step 2: Assign the user his/her relevant information. The fields highlighted in the image below are required when adding a new portal user. Each option will be discussed briefly below:
- Signer/Portal User Information:
- Portal Username: This is the Username that the portal user must enter (with the password, below) to enter the portal. The Username must be at least 6 characters and may not contain symbols. If you receive a message stating the username already exists, please note that portal usernames must be unique system-wide, over all ftwilliam.com customers. We do suggest making the portal username more unique by adding numbers, using your client's first and last name, etc. For example, you may use: JohnDoe123, JDoe123 or DoeJohn123.
- Full Name (Populates 5500): Each user will need a name to appear on the 5500 filing (if applicable). This information will be used to complete information at the bottom of page 1 of the Form 5500. If the user is signing as "Administrator and Sponsor," his/her name will only populate on the "Plan Administrator" signature line of the Form 5500. The name will also be used to identify the user in the ftwilliam.com 5500 software. (Signers will have the option to "change name" on the portal signing screen if their name is incorrect/misspelled.)
- Email: This is the email address that will be used to invite the user to the portal.
- Password: This is the password that the user will need to use to login to the portal and will be provided in the email with the link to the portal (assuming that the password placeholder has not been removed from the standard Global Email Settings options described above). The password must be at least 8 characters, a combination of letter(s), number(s), and special character(s). Please note: passwords are case-sensitive. The password will only be displayed for your clients within the Invitation Email if they are a new portal user within ftwilliam.com and have not previously logged into the portal and updated their password. Once your clients have updated their password, you will no longer see the "Password" and "Confirm Password" fields; rather, you will only see the "Reset Password" option as shown below. Note: 5500-Only customers (do not have access to ftwPortal Pro) have the option to turn off the security questions for 5500 portal users that do not have View/Print Permissions for the 8955-SSA. See Portal 5500 Always Require Challenge Questions above.
|
|

