Scrub/Eligibility Parameters
Click on the Scrub/Eligibility row to expand and view the parameters here. Within this section are the global eligibility overrides, HCE/Key overrides and limit overrides.

Scrub/Eligibility Results
When the Run button is pressed, the system does a large number of calculations/determinations. Using census data and any supplemental data you provide, plus prior year data and service history (if available), it will attempt to calculate/determine:
- Eligibility
- Entry dates
- Catch-up contributions
- HCE/key determinations
- Edit checks
- Field mapping
If the census scrub runs and a data element needed to do calculations on the system is not on the census grid and not mapped, the system tries to find the data somewhere else. For example:
- If service_eligibilityhours is on the grid, but service_vestinghours is not on the grid and not mapped, the system will populate vesting hours with eligibility hours and will generate a warning to let you know that the vesting hours of service has been defaulted to be the same as eligibility hours of service.
- If prior year compensation is missing from the census or from a supplemental census, the system will use current year compensation for prior year compensation and generate a warning.
The warning lets you know the substitution was done and you should confirm and correct as needed.
Below is an explanation of each of the boxes you may see on the "Run Scrub/Eligibility" pop-up window:
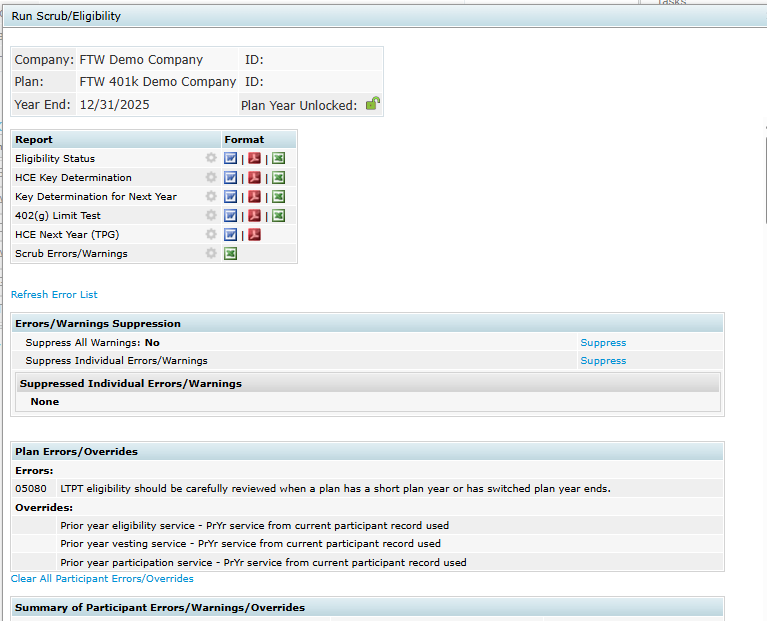
Error/Warnings Suppression
You may suppress all warnings by clicking on the “Suppress” link located to the right of “Suppress all Warnings”. You may suppress errors and/or warnings individually by clicking on the “Suppress” link to the right of “Suppress Individual Errors/Warnings”. This will open a list of each individual error and warning that is available and you can go through and suppress any you do not wish to see. If you would like to reactivate/reapply the error, you can click on "Activate" to have the error listed for the applicable participant(s).
Plan Errors/Overrides
This box shows plan level errors and any applicable overrides set within the Scrub task like overriding HCE and Key determination or 415 limit override.
Summary of Participant Errors/Warnings/Overrides
This box shows a summary of the number of unsuppressed errors and warnings that are applicable for each participant. You can click on the name of a participant to view their specific listing of errors, warnings, and overrides.
Note: Errors and warnings can be reviewed outside of the pop-up window by generating the Scrub Errors/Warnings report.
At the top of this box is a link to “Clear All Participant Errors/Overrides”. This gives you the option to clear the errors and warnings for all participants instead of suppressing the warnings. We would strongly encourage suppressing errors instead so that you can still review them for troubleshooting in the future.
Errors listed for each Participant
Each participant is shown in detail. If a default answer is used to complete a field, the default will be shown. The "Type" column will indicate whether it is an Error ("E"), Warning ("W") or Participant Level Override ("O").
Scrub/Eligibility Reports
Back at the Tasks screen, the "Reports" button on the Scrub/Eligibility task allows you to print or save the following reports in either Microsoft Word, PDF, or Excel:
- Eligibility Status
- HCE/KEY Determination
- Key Determination for Next Year
- 402(g) Limit Test
- Note: the Scrub/Eligibility task will show as passing (green check mark) even if the 402(g) Limit is exceeded
- For Fiscal Year plans, the *ftw Catch Up and Excess Report Fiscal report should be used instead of the 402(g) Limit Test Report. The 402(g) Limit Test Report is for calendar plans.
- HCE Next Year (TPG) - Word/PDF only
- This report is ONLY for plans using Top Paid Group for HCE determination
- Scrub Errors/Warnings - Excel only
As is the case for all the default reports on the system, if there is information you would like to see that is not in one of the predefined reports for the data census scrub, go to the Other Import/Export/Report Menu and review some of the more detailed report grids there.
Set Allocation Parameters
Clicking on the Allocation row will expand the Allocation Parameters. Here you can enter details about how allocations should be handled in the plan and the necessary allocation formula(s). The options you see will be based upon the plan specifications (for example, if matching is not permitted in the underlying plan specifications, then options for matching allocations will not be available for selection).
Allocation Overrides
If employer contributions will be uploaded (not system calculated), the source specific overrides should be used. The overrides must be set prior to running the data scrub. If the employer contributions are uploaded and the overrides are set to no, the data scrub will zero out all of the contributions uploaded with the census. If this happens, set the source override (match or profit sharing, for example) to yes. Then, re-upload the census file and re-run the data scrub.

Matching Allocation
This section is where the safe harbor match and discretionary match formulas will be entered, as applicable, as well as any plan limits related to the match. The match formula (both safe harbor and discretionary) can have up to four rates. Below is an example of a discretionary match formula, where 100% of compensation will be matched on the first 3% of compensation deferred, plus an additional 50% will be matched on the next 2% of compensation deferred. Please note that in the second tier, 5% is entered as the maximum, not 2%.

Top Heavy Allocation
Questions related to top heavy minimum allocations will be found here. The system will display the top heavy status for the current plan year. This is based on the prior year top heavy test or the Top Heavy Parameters, if overrides are used. If Top Heavy as of Determination Date is "Yes", a top heavy minimum allocation will be due. If this is “No”, then no top heavy minimum allocation is due for the current plan year. If otherwise excludable employees should be excluded from the Top Heavy minimum allocations, that exclusion would be set in this section of the Allocation task. Also in this section is where the top heavy minimum allocation override is found. The top heavy minimum override must be set to yes and a percentage entered if the plan has self employed persons.

Nonelective Allocation
Both safe harbor and discretionary nonelective allocation formulas will be entered in this section. The safe harbor non-elective allocation must be entered as a percentage (cannot be a dollar amount). Pro rata and integrated nonelective allocations can be entered as a dollar amount or a specified percentage. When “Dollar” is used, the dollar amount entered will be allocated across the eligible participants, so that the total allocation equals the dollar amount entered here. When “Specified” is selected, the percentage entered is the percentage of compensation each participant will receive.
There is also a "Maximize" option that allows users to direct the software to compute the allocation by maximizing HCEs or a particular participant. Users select the amount to maximize as either the 415 limit or a fixed dollar amount.
If the plan has an Age weighted allocation, the user must have a dollar amount entered. Age weighted allocations cannot be allocated using percentages.
New comparability formulas will be allocated by groups. Users can enter a dollar, percentage or the greater of a dollar or percentage for each group. Note: the dollar or percentage entered is what is allocated to each eligible participant in the group.
Run Allocation
Clicking on the Allocation “Run” button from the tasks page will calculate employer contributions based on the allocation parameters. A pop-up box will open and display errors and overrides, if applicable.
Allocation Task Reports
The Allocation Task reports include the Allocation Report, Top Heavy Minimum Allocation Report, True-Up Report (if applicable), and Integration Report (if applicable). These reports are included at the bottom of the Allocation Task results window, but can also be accessed within the Reports button on the Tasks webpage.

If a contribution type is not applicable to the plan and the source is appearing on the Allocation Report, you can suppress the source on the Work with Sources screen in Plan Specifications.
As is the case for all the default reports on the system, if there is information you would like to see that is not in one of the predefined reports, go to the Other Import/Export/Reports Menu and add/review available grids.
The “Combined Test” is a series of tests that includes the 415 Annual Additions Test, 410(b) Coverage Test, Deduction Limit test and the Compensation Test (as applicable to the plan).
Set Combined Test Parameters
Expanding the Combined Test task will allow users to enter details about how the Combined Tests should be handled in the plan.
In the Combined Test task, there are a number of options regarding Aggregation/Disaggregation that will apply to the ADP/ACP tests and the General Test as well as those covered under the Combined Test. These answers will be displayed in the ADP/ACP and General Test Parameters screen but can only be modified in the Combined Test Parameters. For step-by-step instructions on aggregation or disaggregation, please see the Special Topics section.

For specific help on each question within this section, use the help text question mark bubble next to the field in question.
Do Combined Test
Click the "Run” button next to the Combined Test to run the 415 Limit test, 410(b) Coverage test, 404 Deduction Limit, and 414(s) Compensation tests. The Combined Test results pop-up window will appear where results are shown for each of these tests. There will be a Pass or Fail for the 415 test. There 410(b) Ratio Percentage Test results will be shown for each contribution type. If the 410(b) Ratio Percentage Test failed, the 410(b) Average Benefit Test will automatically run and the results of that test will be included in the results window. There is a summary version of the Deduction test results and the Compensation Ratio Test, if applicable. Detailed results of any test are included in the test report(s).
Combined Test Reports
You can print the report for each test performed directly from the "Combined Test" pop-up window or once you return to the main Tasks page, click on the "Reports" button to view the test results report.
As is the case for all the default reports on the system, if there is information you would like to see that is not in one of the predefined reports, go to the Other Import/Export/Report Menu to add/review additional reports.
Set ADP/ACP Testing Parameters
Clicking on ADP/ACP Test from the Tasks page will expand the ADP/ACP Parameters. Here you can enter details about how ADP/ACP Testing should be handled in the plan. This is also where prior year testing data can be entered if prior year testing is selected and it is the plan's first year in the system. You may also need to manually enter the prior year ADP/ACP data if the current plan year was created before the prior year's testing was completed.
Note: if you want to use disaggregation of otherwise excludable employees for ADP/ACP testing, you would need to set Disaggregation using otherwise excludable employees to Yes in the “Combined Test Parameters” screen as it will apply to all of the required tests.

For more information and examples, use the help text question mark bubble next to the field in question.
Run ADP/ACP Test
Clicking the "Run” button next to ADP/ACP Test from the Tasks page will calculate the ADP/ACP Test based on the testing parameters. Test results will be displayed (PASS/FAIL) in a pop-up window. ADR (Actual Deferral Ratio), ACR (Actual Contribution Ratio), ADP (Actual Deferral Percentage) and ACP (Actual Contribution Percentage) will be shown, if applicable, for nonhighly and highly compensated employees.
Please note that if you are using disaggregation of otherwise excludable employees for the ADP/ACP tests, you will see three rows of results on the ADP ACP Test Results screen.
- “DisaggOver” - this shows the test results for the group who are not excludable.
- “DisaggUnder” - this shows the test results for the group who do not meet statutory eligibility.
- “ExclNHCE” - this shows the results excluding only the NHCEs not meeting statutory eligibility from the test.
If there are no excludable HCEs, DisaggOver and ExclNHCE results will be the same.

When using disaggregation, you should select the Testing Combination. “ExclNHCE:1” provides results based on the test excluding NHCEs who have not met statutory eligibility. This is also known as the "carve out method". Alternatively, you can select “Two Tests:1” which runs two separate tests for those statutorily non-excludable and statutorily excludable. Once you select your testing combination method, make sure to click Select Test Option. The ADP/ACP results and correction method will be based on your selection.
On the ADP/ACP Test Results pop-up window, you will see a summary of the outcome of test. To correct a failed ADP or ACP test follow the steps below.
Do Refunds/Calculate Catch-ups
Clicking the Do Refunds/Calculate Catch-ups link will display the amount of refunds to HCEs necessary to pass the failing test(s). If any of the HCEs targeted to receive a refund are catch-up eligible and have not used their entire annual catch-up amount, then as much of the refund as possible will be recharacterized as catch-up. Amounts that do need to be returned will be displayed in the ADP (or ACP) Refund Earnings box. You can calculate earnings either by entering the amount of the beginning balance plus contributions during the year, and the earnings for the Elective Deferral or Roth source for the HCE, then click the “Update earnings” link and the software will calculate the amount of the earnings to be refunded. If you have transactions posted in the Transactions area, you can click the “Update ADP/ACP refund earnings with transaction data” link to calculate the earnings based on the posted beginning balance, contributions, and earnings.
Estimate QNECs
You should also see the option to estimate QNECs so long as the plan is set up to allocate QNECs to NHCEs only; this is in the Eligibility section of Plan Specifications. You can click the “Estimate QNECs” link to see the percentage required for each NHCE; the total cost of the QNEC is also displayed. Note that the allocation formula for the QNEC is selected in Plan Specifications under Contributions. Pro-rata, Bottom-up (Targeted) and Fixed Amount formulas are all available.
Note: The option to estimate QNECs is not available for Prior Year tested plans.

ADP/ACP Test Reports
You can print the detailed report of the test results, corrections report, and QNEC report directly from the "ADP ACP Test Results" pop-up window or once you return to the Compliance Menu page, click on the "Reports" button on the right of ADP/ACP Test.
As is the case for all the default reports on the system, if there is information you would like to see that is not in one of the predefined reports, go to the Other Import/Export/Report Menu to add/review more detailed report grids there.
Clicking on "General Test" bar from the Tasks page will expand the "General Test Parameters". Here you can enter details about how the general test should be handled in the plan.

The General Test options affect the rate group test, average benefit test and/or gateway test.
Type of General Test:
- Cross Test - Selecting Cross Test will run the general test based on the allocation projected to retirement age. This is the system default.
- Standard – Selecting Standard will run the general test using actual allocation rates (does not project benefits into the future). Please note that the gateway test is not required to be met using this option.
Testing Period:
- Current Year – Selecting current year will run the general test based on current year allocations. This is the system default.
- Account Balances – Selecting Account Balances will run the general test using participant’s account balances divided by the number of participation years of service.
- A participant’s account balance is calculated when statements are run.
- Transactions must be uploaded in the system for the current year.
- Correct end balance batch must be posted for the current year.
- Statements must be run to have the system pull the correct account balance data. Note: statements must be re-run any time changes are made to participation years or when balance information is changed.
- The account balance is split by source type as follows:
- GenTestAllocationPermDisp GenTestAllocationNoPermDisp, GenTestAllocationOtherSource GenTestAllocationOtherPlan as applicable
- Participation years of service
- Go to Other Import/Export/Reports and select “Sample Census Supplemental w disagg no OR with prior participation yos (638be22)” in one of the user defined spots and press update. Then press the “Edit Data” link next to the grid. Enter the number of prior years of participation each participant has earned for Service_ParticipationPrYrCummMT and Service_ParticipationPrYrCummPS. If the values are different, the system will select the higher number.
- Note: If it is the first year on the system you will not need to set the individual participant overrides to “Yes” since the global override is automatically set to yes. If it is not the first year on the system, you will need to set the individual participant override (Service_ParticipationPrYrCummOverride) to “Yes” for all individuals you will be overriding. Or, you can set the global override for prior year participation service by clicking Scrub/Eligibility Parameters and setting Override calculation of prior year participation service to yes.
- After all changes are made to prior year participation service, run the data scrub, then run one of the statement options in the Transactions menu.
If Testing Period is "Account Balances" override calc of balances:
- No – If No is selected, account balances will be pulled from the statements (after one of the Transactions options are run).
- Yes – If Yes is selected, the user should go to Other Import/Export/Reports and select Sample General Test Acct Bal grid. The following fields are added together and will need to be changed (as applicable). Note: these fields are normally system generated as described below, but once you set the override to yes, you can just overwrite the data in these fields.
- Acct Bal Non-elective Perm Disp: Non-elective contributions.
- Acct Bal Non-elective Perm Disp – Adj: Enter any distributions (as a positive amount) from the non-elective source here.
- Acct Bal Non-elective No Perm Disp: Safe harbor non-elective contributions, QNECs.
- Acct Bal Non-elective No Perm Disp – Adj: Enter any distributions (as a positive amount) from the Safe harbor non-elective contributions and QNEC source.
- Acct Bal Other Source: 401k, Roth, Match, Safe Harbor Match
- Acct Bal Other Plan: Balances from other plans (ex. Defined Benefit)
Override NRA:
- No – If No is selected, the normal retirement age that was selected in Plan Specifications will be used in the general test.
- Yes – If Yes is selected the normal retirement age selected in the following question will be used in the general test.
Determination of age:
- Last - Selecting Last uses a Participant’s age at the end of the Plan Year.
- Nearest - Selecting Nearest could skew test results, depending on birth dates of HCE and NHCE. The testing age for anyone born in the first six months of a Plan Year (assuming a calendar year plan year) is the age attained during the Plan Year. For anyone born after June 30th, the testing age would be attained age on the next birthday (January 1 to June 30 of the next Plan Year).
Impute Disparity (May not be Yes if NRA < 55)
- Yes – Selecting yes will run the general test with imputing disparity.
- No – Selecting no will run the general test without imputing disparity. Note: Imputed disparity cannot be used if NRA is less than 55.
Interest: The interest rate is a factor in cross testing when projecting the allocation to retirement age. A higher interest rate will produce a larger value at retirement age.
- Select "7.5%", "8.0%", or "8.5%".
Actuarial Table: Actuarial tables determine one of the factors used in cross testing when projecting the allocation to retirement age.
- Select one of the actuarial tables listed from the drop down box.
Override Gateway Test
- No: This is the system default. Selecting No allows the system to calculate the gateway test.
- Yes: Select "Yes" to override system calculated result. This will show an automatic PASS result.
Run General Test
Clicking on "Run” General Test from the Tasks page, will calculate the General Test (Rate Group Percentage Test and/or Average Benefit Test, if applicable) based on the parameters. You will be taken to the "General Test" page where testing parameters will be shown as well as the Rate Group Test, Gateway Test and Average Benefit Test (shown at right). You can print the test report directly from the "General Test" page or once you return to the Compliance Menu page, click on "Print Reports" to view allocation calculations and eligibility for each contribution type.
If you fail one or more of the tests, the Auto Solve options to correct a failed test will be displayed on the General Test screen. You will see two options to correct each test - either to increase amounts given to NHCEs or to decrease amounts to NHCEs. Clicking one of the links will show you the change required to pass the test and you will see a “View Changes” link that you can click to see the cost or the amount of the reduction for each group.
For each failed test you can select the preferred correction method and click “Revise Allocations and Re-run Test” to correct.

General Test Reports
The Rate Group Test and Average Benefits Test reports can be printed directly from the General Test results screen or accessed via the Reports button on the General Test bar. The Reports feature allows you to review the details without redoing the task.
As is the case for all the default reports on the system, if there is information you would like to see that is not in one of the predefined reports, go to the Other Import/Export/Report Menu and review some of the more detailed report grids there or set up your own report under the Work With Data Entry Grids menu.

Click here for help troubleshooting top heavy testing.
Set Top Heavy Test Parameters
Clicking on "Top Heavy Test" bar from the Tasks page will expand the Top Heavy Parameters.
The Top Heavy calculations are run at the end of an annual cycle after allocations have been run and transactions have been posted in the system. Transactions must be up-to-date as of the determination date for the applicable testing year. Note that one of the parameters that you need to set under “Top Heavy for Next Year” is whether to use all transactions or just ending balances. Generally the software calculates ending balances from the other transactions - beginning balances, plus contributions and other gains, minus distributions, fees etc. So unless you actually have a batch of ending balances posted in the Transaction menu you need to select “All transactions other than ending balance” from the “Transactions to use when calculating Participant balances:” drop-down box.
If the employer has multiple plans the Top Heavy test must be run on an aggregated basis. This can be accomplished by entering an aggregation code, which is the same for all plans of the employer. The indication that aggregation is used and aggregation IDs are found on the ADP/ACP Test Parameters screen (the ID code is one you may make up and must be the same for all aggregation group members). If for some reason account information is not available for other plans (e.g. the plans are not on the ftwilliam.com Compliance system) you can manually enter ending balances for the other plans (Under the "Set Top Heavy Test Parameters" menu, there are fields to enter Key and Non-Key Balances for other plan).
To override the system calculation of the Top Heavy ratio, set the override at the top of the "Set Top Heavy Test Parameters" menu to “Yes”. Set the order of Top Heavy allocations and select which Participants will share in Top Heavy minimum allocations. Also, make sure that all Key Employees are identified as such, especially for the first Plan Year the Plan is on ftwilliam.com's Compliance system.
For more information and examples, click on the help button for a particular question or click here.
Run Top Heavy Test
Clicking on "Run” Top Heavy Test from the Compliance Menu page will calculate the top heavy test based on the parameters and balances in the Transaction Menu. The "Top Heavy Calculation" results screen will pop-up, containing basic top heavy status information.
Top Heavy Test Report
You can print the test report directly from the "Top Heavy Calculation" page or once you return to the Compliance Menu page, click on "Reports" to view Top Heavy Calculations. The Report feature allows you to review the details without redoing the task.
As is the case for all the default reports on the system, if there is information you would like to see that is not in one of the predefined reports, go to the Other Import/Export/Report Menu and review some of the more detailed report grids there or set up your own report under the Work With Data Entry Grids menu.
The software allows you to select a package of reports and statements that you can send to your client; this section of the User Guide describes how to customize this package.
The steps in the process are as follows:
- Create one or more custom styles to use for all your reports and statements (or you can use one of the default styles).
- Add a default client letter that will be available for all your clients.
- Assign a style to each of your reports and statements - you do this plan by plan.
- Select which reports and statements to include in the client package - again this is done plan by plan.
- Print the package, plan by plan.
Select Reports
Click on the arrow next to Print Reports and press the “Select Reports” option to identify what reports to include in the client package.

The first box on the left “Edit Client Letter” is used for the cover letter that is included with the client package. You will see a link: “Update Default Letter” at the top of this box; clicking this link will populate the box with the text entered for the global client letter on the Edit/Create Custom Styles screen. You can now customize the letter for this particular client.
The first box on the right, “Prepared By” will feed to the cover page for the client package. You can add or modify your firm name in this box to determine how the name is displayed on the cover page, which appears after the cover letter and before the table of contents in the package. Note that first entry that you make to this box will populate globally, across all plans. Any changes you make subsequently will only be made on a plan by plan basis.
Next you can indicate which reports and statements you want to include in the client package by adding a number in the box on the right for each report you want to include; the number indicates the order that you want the reports to appear in the package. The cover letter will always be first followed by a Table of Contents. If you want the Eligibility Report to appear first, enter “01” next to it. Enter “11” next to the report you wish to appear second and so on. These numbers do not have to be consecutive; the software just looks at the value and orders the reports based on the relative value. Using numbers that are a few units apart allows you to more flexibility to change the order of the reports, or add additional reports to the package at a later date.
Please note that there are two alternate formats for participant statements. One is the Individual Participant Statement, a one page per participant summary of activity, and the second is the Custom Participant Statement which is typically is a two page statement and includes the following:
- An additional section showing a “Your account at a glance”.
- A second custom message option - all messages are added on the “Edit Print Styles” screen described above.
- Separate tables showing the breakdown of assets by investment and by source.
- Available in portrait format only.

Print Package
To print your reports package, after you have indicated which reports and statements to include, return to the main Tasks page and click the “Print Package” button. This will generate a document in Microsoft Word© containing all the reports and statements that you selected for the package. Note that it is still editable - you can make changes to the formatting if you wish. Once the package is as you want, you can print it, or send electronically to your client. To print in pdf format press the arrow button next to the “Print Package” button and select the pdf option.

