Portal allows users to securely send communications and files that do not require e-signature through Direct Messages.
Please note, the Portal User does not have to be associated with a particular plan for them to receive a Direct Message. As such, all Direct Messages sent to and from Portal Users will populate on the Global Dashboard rather than on a Plan level dashboard. (However, Direct Message may be created from the Plan or Global level dashboard.)
To send a message, navigate to either the Global or Plan level dashboard, select the Communications Tab, and New:

All ‘New’ communications begin as Direct Messages until the Classification is updated. The main differences between a standard communication through the Portal and a Direct Message is that any portal user may be added to a Direct Message regardless of plan association, and documents attached are not available for e-signature:

Once ‘New’ is selected the Direct Message will populate like the standard communications sent through the portal. To add portal users, click on the ‘Add Portal Users’ space next to the Direct Message classification. From here there are multiple options:
a. Search by Username, Name, or E-mail
b. Select portal users individually by clicking on the check box next to the user’s name
c. Select all users by checking the box in the header next to the username

Once the Users are added, ensure all the fields are completed starting with the Subject and review the Direct Message from top to bottom just as we advise for any communication:

1. Subject: Each communication needs a subject for it to be sent.
2. Send Email Invite: This toggle option indicates whether a communication will be sent to the portal user that the items are available, or if toggled off the message and documents will be published to the portal without sending an email invitation.
3. Confirmation Email Recipient: This field indicates who will receive a confirmation that the Portal User has downloaded or accessed the documents in the communication (this will either be the Admin associated with the plan or the Master User on the account). This is also the user alerted when a Portal User responds to a Direct Message.
4. Expiration Field: this field allows an expiration date for the message. Once this date has passed these documents will no longer be on the Portal Users Portal. (This is an uncommon field, as most users would like their portal users to have access to these documents in an ongoing basis.)
5. Email Invite: This is the field that indicates what template to use when sending the invitation to your portal user to inform them they have items to review or sign. You can select from system generated or custom templates by selecting the dropdown icon in this section. You are also able to create or edit templates by selecting the gear icon to the right of the template dropdown. You also have an option to add information to the Portal Message, which is the message that displays within the portal view for your users. This can be left blank, you may be able to enter a custom message, or you can elect to have the e-mail invitation copied to the Poral messages by marking the checkbox indicated below.

6. Add ToDo with Portal Access: this allows you to add items that do not require actions to a client’s ‘To Do’ list. Adding items to the To Do list will also trigger reminders if reminders are set in the Global Email Settings.
7. Upload Files/File Name- Attach any files you wish for the users to review, when using Direct Messages please note that anyone on the message is able to view the files, so you want to ensure these are generic and not plan specific documents.
8. This field contains the ability to Preview your communication as well as create a Direct Link, the direct link option (that looks like two chains linked together offers users the ability to access the documents within the communication/Direct Message without having to log in to the Portal. Please Note: When Direct Link is enabled, the link will turn green:

When Using Direct Link, an expiration date may be set for how long the link is viable:

You may also Publish the items to portal which will post the items without an e-mail being sent to the Portal User (this option populates when the ‘Send Email Invite’ toggle from item D has been turned off). Lastly there is the Post and Send option which will publish the items to the client portal as well as send the e-mail communication alerting them there are things to review within the Portal.
The image below is a screenshot from a sample portal user's perspective. The message you sent (and any attachment if applicable) is available in the portal under ' Inbox'. If the user has rights to send messages, the user will see the 'Reply' button shown.

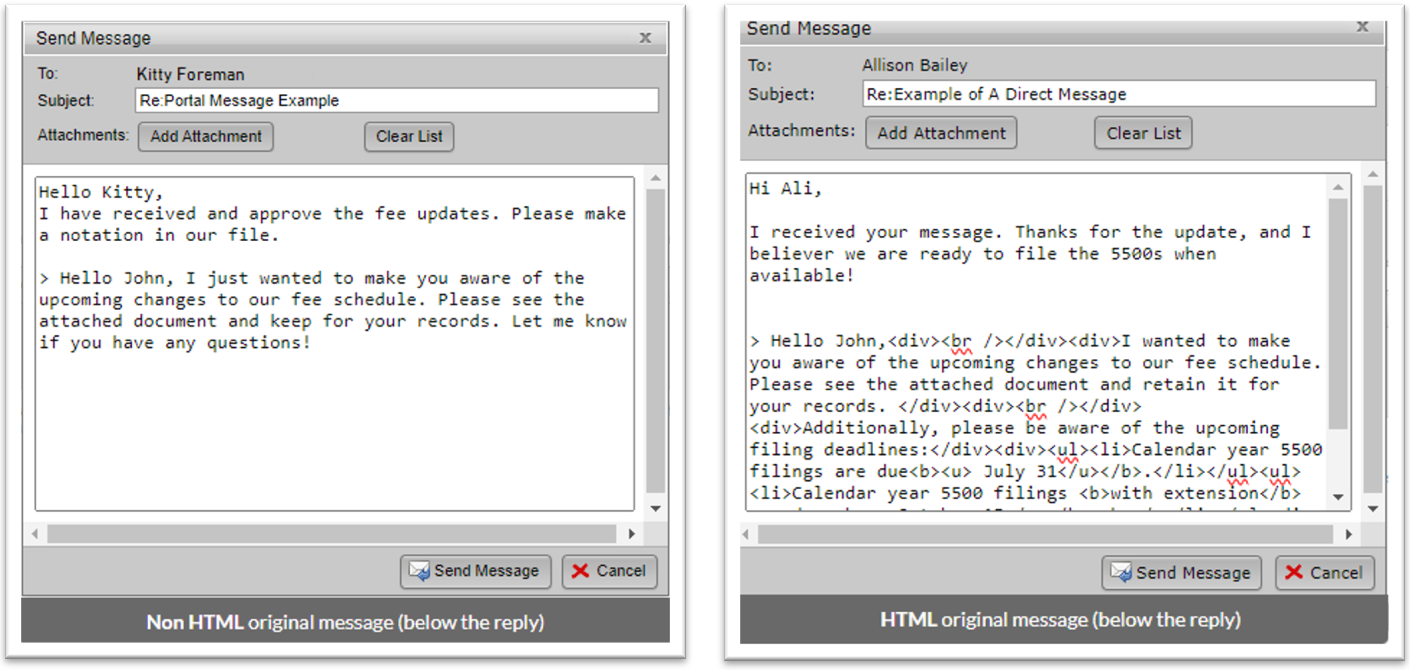
If the user clicks to ‘Reply’ to a message, the screen shown at below will be displayed with options to add/modify the subject, message body, and add an attachment. The original message will be displayed below the new message (although users can delete this text if they wish).
Note: Reply messages are not formatted, so if the message was sent with HTML functionality the reply will display with the original message with the programmed formatting. Below is an example with the original in HTML and Non-HTML:
When a reply message is sent, if notifications are turned on in the Global Email Settings, you will receive an e-mail alert with a link to access the message. (As shown below some e-mail providers will run the link through filters which will alter how the link appears.)

Selecting the link will first require logging back into the software, but will direct you to the Global Dashboard filtered to only that communication:

Alternatively the response may be reviewed without the link, by navigating to the Portal Global Dashboard >Communications Tab. We suggest sorting the dashboard by messages received to differentiate Direct Messages from communications:

All Direct Messages (either sent or received) are indicated by a small red envelope to the right of the communication under the ‘Status’ heading, select the menu button (tricolon) next to the communication and ‘Open Communication’ to view the response.

