When you are setting up email setting for the various modules, you will be able to set up confirmation emails.
5500 Module*:
Confirmation Emails: If you would like to receive confirmation emails when the Form 5500/SF has been submitted, you would select “Yes” to be notified if the filing was Rejected, Not-Accepted, or Accepted. Note: The admin that has been assigned to the plan from the “Batch Workflow” => “Review/Assign Detail Status/Extensions” grid will receive the notification.
Name Change Emails: If you would like to receive notification emails if the signer clicks on “Change Name”, you will select “Yes”. Note: The admin that has been assigned to the plan from the “Batch Workflow” => “Review/Assign Detail Status/Extensions” grid will receive the notification, along with the original sender of the portal invite, if different.
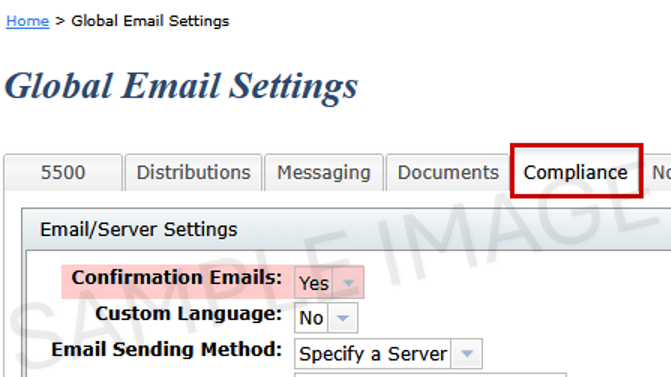
Compliance Module*:
Confirmation Emails: If you would like to receive confirmation emails when the portal user has downloaded the Online Annual Questionnaire, Annual Questionnaire and/or Census Worksheet, you would select “Yes”. Note: The admin that has been assigned to the plan will receive the notification.
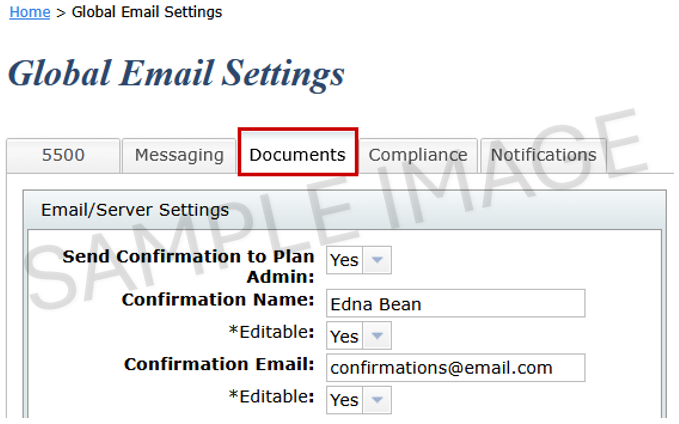
Document Module*:
Send Confirmation to Plan Admin: If you would like the admin assigned to the plan to receive confirmation emails when the portal user downloads a document, select “Yes”. Note: Enabling this feature will override the global confirmation email settings (see Note below).
Confirmation Name: If you have an administrator that you would like to receive confirmation emails, maybe in addition to the plan admin, when a portal user downloads a document, you would enter the administrator’s full name.
Editable: Allows you to override the default confirmation name when sending a document to the portal user.
Confirmation Email: If you have an administrator that you would like to receive confirmation emails, maybe in addition to the plan admin, when a portal user downloads a document, you would enter the administrator’s email address.
Editable: Allows you to override the default confirmation email when sending a document to the portal user.
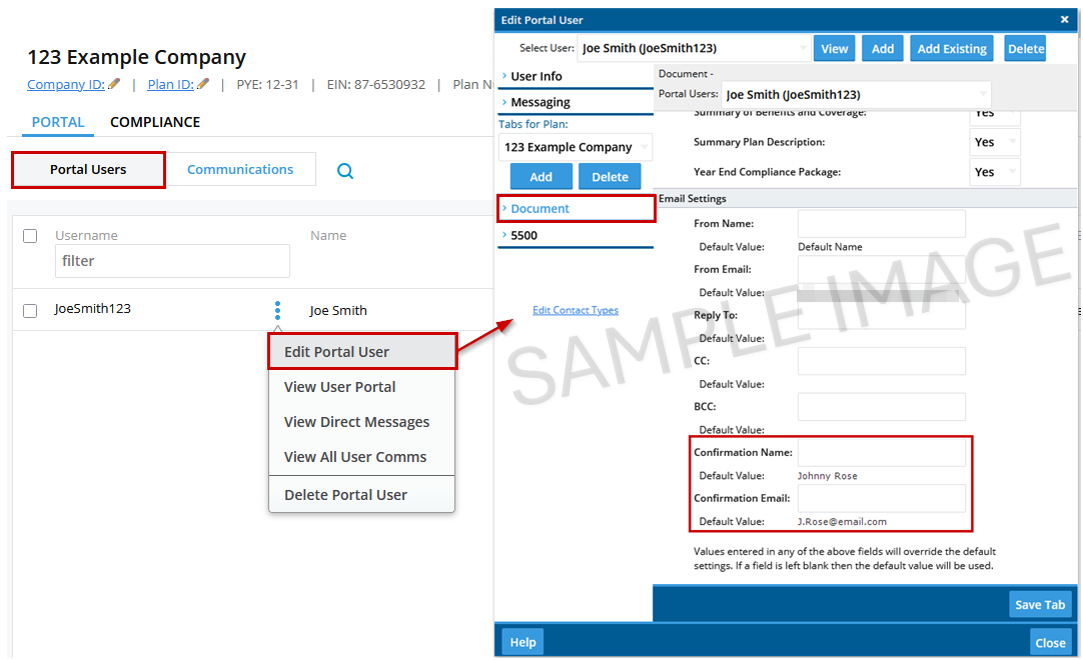
Note: The Confirmation Email address is determined in the following order (whatever is found first in this order is what is used):
1. Confirmation email override on the document (Portal Pro and only applies to download document notifications).
2. Confirmation Email setting for the portal user.
3. Global Email Setting – Send Confirmation to Plan Admin
4. Global Email Setting – Confirmation Email
Please Note: We are currently exploring enhancements to the Document's module that would allow confirmation emails to be fully disabled; however, this functionality is not available today.
In the meantime, there are a few ways to manage the impact of these emails. We recommend using a dedicated email address in the global email settings and setting up an email rule to automatically route confirmation messages to a separate folder.
If there is ever uncertainty about who will receive a confirmation email, the Confirmation E-mail Assistant can be used to review the expected recipients.
Messaging Module:
Confirmation Name: If you have an administrator that you would like to receive confirmation emails when a portal user replies to a message, download a file from within a message, or sends a message, enter the administrator’s full name. Note: The admin that originally sent the message would also be included on the confirmation email.
Editable: Allows you to override the default confirmation name when sending a message to the portal user.
Confirmation Email: If you have an administrator that you would like to receive confirmation emails when a portal user replies to a message, download a file from within a message, or sends a message, enter the administrator’s email address. Note: The admin that originally sent the message would also be included on the confirmation email.
Editable: Allows you to override the default confirmation email when sending a message to the portal user.
Administration Email: Enter an email address in this field to enable portal users to request a change to their demographic information. If enabled, the button will appear on the portal user’s profile page in the portal. The email address specified will receive all requests. Request emails will contain information about the portal user’s requested change, as well as a link to use to apply that change to the portal user’s account.
Notifications:
E-Sign Completion Notification: Portal users that have been assigned to receive e-sign completion notifications will receive the notification after all signers have signed the document, if applicable.
Follow-up Email: Follow-up emails are sent to the TPA assigned to the plan for a specific module to let them know that a portal user has not completed a task that is on the portal user's ToDo list.
Reminder Email: Follow-up emails are sent to the TPA assigned to the plan for a specific module to let them know that a portal user has not completed a task that is on the portal user's ToDo list.
*See “How Do I Assign Admins to a Plan” below to learn how to assign admins to the Document, Administration and 5500 Modules, or to view who has already been assigned to plans.
The purpose for the Reminder/Follow-Up email Notifications is to help you and your clients keep track of what tasks remain on the portal user's ToDo List.
To set up Notifications in the Global Emails Settings, you have to be the Master Admin User or a Designated Admin. If you have these designations, the Global Email Settings may be accessed by selecting the Wolters Kluwer Logo, selecting Administrative Tasks> Portal/Workflow> Global Email Settings.
Once on the “Global Email Settings” screen, select the ‘Notifications’ tab.

You will have the option to enable Portal User Reminder Emails and TPA Follow-Up Emails per module, based on the portal user's ToDo List. If you do not wish to send the portal user reminders, but you do want to have TPA follow-up reminders turned on, you can set the ‘Portal User Reminder Days’ to 0 and the ‘Follow up Reminder Days’ set to a positive number. Note: If the two numbers added together are less than or equal to zero, the follow-up reminders will not be sent. If you would like the TPA Follow-Up Emails to be sent before the Portal User Reminder Emails, you could enter a negative number, such as -2 for the ‘Follow up Reminder Days’ and a positive number for the ‘Portal User Reminder Days’ so that 2 days before the portal user reminder emails are scheduled to be sent, the TPA will receive the follow-up email. In this case every 5 days the TPA would receive the reminder and every 7 days the portal user would receive the reminder.
1. DEFAULT ftwilliam.com Email – Designed to send Portal User Reminders to the portal users from donotreply@ftwilliam.com for all your clients with overdue items in the ToDo List.
2. Specify a Server – Designed to send Portal User Reminders to the portal users from one specified email address for all of your clients with overdue items in the ToDo List. Selecting the "Specify a Server" option will allow you to enter additional information in the fields below.
From Name: This is the name that will appear when your client receives an email from the address you’ve chosen when utilizing the “specifying a server” email setting.
From Email: This is the email address associated with the “From Name” mentioned above.
Reply To: This is the email address that will be used when your client hits “reply” to an email they have received from you. Note: You can add multiple email addresses by separating the addresses with a comma or semi-colon.
CC: This email address will be CC’d when you send an email to your portal user(s). Note: You can add multiple email addresses by separating the addresses with a comma or semi-colon.
BCC: This email address will be BCC’d when you send an email to your portal user(s). Note: You can add multiple email addresses by separating the addresses with a comma or semi-colon.
SMTP Server/SMTP Port: Simple Mail Transfer Protocol (SMTP) allows you to use to send emails through outgoing mail servers. You can easily search the internet to find popular web-based email smtp settings. The standard port number is 25, which is our default. However, some email programs use a different port number. If we use gmail as an example, we will find that the smtp server should be entered as “smtp.gmail.com” and that the port number would be “465”.
Secure Connection: You have three options to choose from: None, SSL and TLS. For the example above, if we use gmail, then the Secure Connection would be "SSL". If you do not know how to answer, we recommend you contact your internet provider or a member of your IT staff. We can also help at support@ftwilliam.com.
Username: This is the username for the “From Email” you will be utilizing.
Password: This is the password associated with the “From Email” address you will be utilizing.
3. User Messaging Settings – Designed to send Portal User Reminders only to the portal users from the settings used within the Global Email Settings for "Messaging" regarding the overdue items in the ToDo List.
The Notification Tab in Global Email Settings now includes an option to set a maximum number of days for reminder emails about Portal Messaging, Documents, and 5500 tasks.
- During the Reminder Period: Emails are sent to users with tasks on their To-Do list. These emails include all outstanding or overdue tasks, even if some extend beyond the set number of days.
- After the Reminder Period Ends: Documents remain accessible in the Portal, but no further email notifications are sent.
This feature ensures reminder emails are limited to a specific time frame rather than continuing indefinitely.
Updating the Maximum Reminder Days
To update the maximum number of days for reminder emails:
- Select the Wolters Kluwer Logo> Administrative Tasks>Portal Workflow> Global Email Settings
- Select the Notifications Tab
- Enter the desired day limit in the ‘Maximum Reminder Days’ dropdown per module

Important Notes
- This feature supports a maximum setting of up to 400 days.
- If set to zero, or if the Maximum Reminder Days is less than the value in the Portal User Reminder Days dropdown, the system will continue to send reminders until tasks are completed.
- Please note that this feature is currently not available for communications sent from the Compliance Portal.
- This only impacts reminder emails sent to Portal Users; follow-up emails sent to TPAs will still show full lists of outstanding items.
If you have Notification emails enabled for the 5500, Documents, Messaging and/or Compliance modules, then Portal User Reminder emails are sent to the specific portal user(s) every X number of days for each enabled module regarding the overdue items in the portal user's ToDo list.
Note: If portal user reminders are set to 0, the portal user reminder emails will not be sent and the follow-up reminder emails will be sent every X number of days instead.
For example, in the screen shot below, the portal user would not receive a reminder email, but the TPA would receive the follow-up every 5 days for the Messaging module and every 4 days for the Document module.
Note: Email settings, such as the DEFAULT ftwilliam.com Emails, Specify a Server, and User Messaging Settings, only affect portal user reminder emails. Follow-up emails are always sent from donotreply@ftwilliam.com.
Follow-Up reminders are sent to assigned Admins or confirmation email addresses at X number of days after the reminder email was sent to the portal user.
Note: If the numbers for the portal user reminders and follow-up reminders add up to a value less than or equal to zero, follow-up reminders will not be sent out.
For example, in the screen shot below, both the portal user and TPA would not receive a reminder for the Messaging module. For the Document module, the portal user would receive a reminder email every 1 days, but the TPA would not receive a follow-up email because both values added together are less than zero. You would not be able to to send a follow-up email 2 days prior to every 1 day for the portal user reminder email.

Only Master Admin Users or Designated Admins can assign admins to plans for various modules.
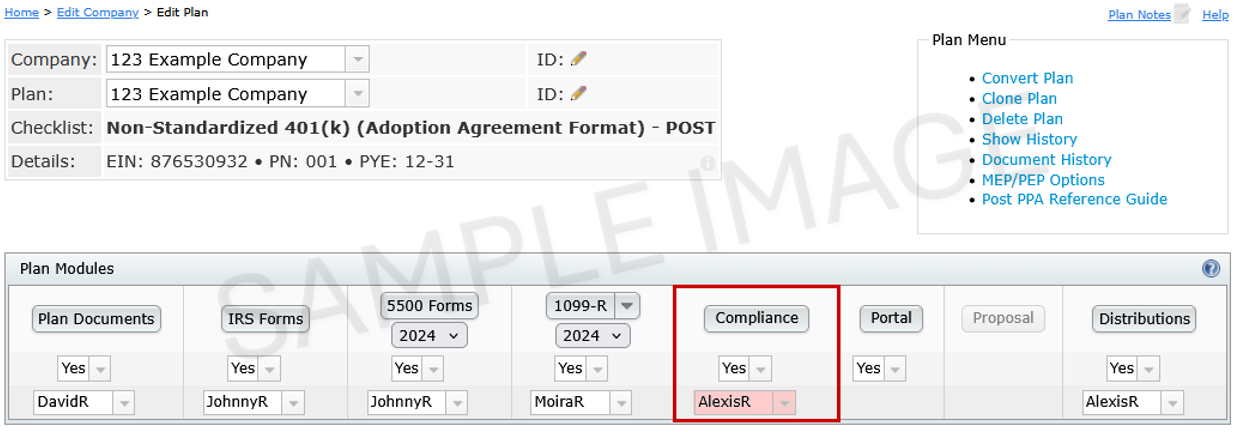
Individual Plan Update
Admins and responsibility fields may be updated on the Edit Plan screen of individual plans, by selecting the name from the dropdown directly below each module:

Mass Import
To update admin and responsibility fields via mass import, download the 'All Plans Selected Provisions' report under the Wolters Kluwer logo> Reports.

This report includes details about the companies and plans within the account and contains the necessary details for importing admins and responsibilities. Scroll to columns T-AJ to view plan names, numbers, and associated admins or responsibilities. Update the Admin module and 'RespForPlan' fields as needed.
Note: The upload feature only adds or modifies entries; it does not remove users or responsibilities if a field is deleted.
Example: Updating the spreadsheet for the Documents, IRS Forms, and 5500 Module:

Once the spreadsheet is completed, select the Upload Company/ Plan data on the Home screen> Add/Modify Company and Plan Data.

On the next screen select the top link 'Add/Modify Company and Plan Data'. which will redirect to the screen shown below. Choose the file and select the 'Submit' Button.

Once the file has been submitted, a confirmation screen will populate for users to review the information and confirm the import. Nothing will be altered in the account until the 'Perform Upload' button has been selected. Please review this screen thoroughly.
Below are the different views of what to anticipate based on the details on the spreadsheet. These are in reference to adding new plans or updating existing plans.
ADDED:
The following is an example of an upload where plans were added to the software. If ADDING companies or plans review the highlighted sections.
UPDATED:
The following is an example of an upload where updates to plans were made. If UPDATING companies or plans review the highlighted sections.
Confirmation E-mail Assistant Simulator
This tool will help identify where confirmation e-mails will be sent based on the module selections entered into the Global E-mail Settings and other locations specific to the module.
To use:
- Please select the module button below.
- Complete the questions provided.
- Select Generate Outcome for guidance.
 Please review the Global E-mail Settings and answer the following: