By going to the "WK Logo" drop-down menu at the top of most screens, Administrative Tasks > Portal/Workflow > Global Email Settings, users will have the option to work with Email Settings and Email Templates. Along the left-hand side of the screen are options to set up the email address that will be used to send invitations to the web portal and set up reminder emails for signers (discussed under Email/Server Settings). Along the right-hand side of the screen, users may customize standard email correspondence that will be used as a default for all filings on the system (discussed under Portal Email Default Templates).

Be sure the 5500 tab is selected at the top of the screen to access 5500 software email settings if you have other ftwilliam.com portal software.
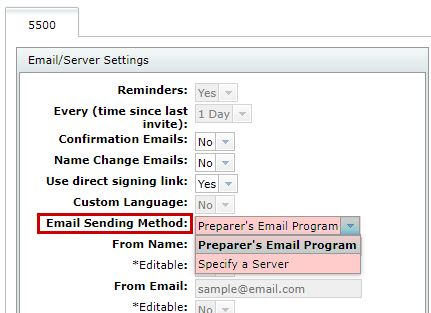
- Email/Server Settings. Top There are two options:
- Preparer's Email Program - Users that choose this option, the email invitation will come from the email program (i.e. Outlook, Thunderbird Lotus Notes, etc.) that is loaded onto the computer being used by the preparer that invites a portal user to the portal. When you invite your client to sign, an email will pop up on your computer for you to send to your client (similar to clicking "compose" in your email account). Note that the email is being sent by your computer. You need to click "Send" to send the email, just as the user would any other email sent from the user's computer. ftwilliam.com assumes that the majority of users will select this option.
Note: Users that are using a web-based email program (gmail or yahoo) that does not use software loaded onto the user's computer, this selection will not automatically open a default email. Some web-based emails that do not use accompanying installed software may be able to use the Specify a Server option below as an alternative (this will take some investigating to determine the appropriate settings). Alternatively, users can copy and paste the text provided into an email message when inviting. - Specify a Server and Reminders for Signers - If users choose this option, the user's email invitation to the web-portal will come from one specified email address for all of the user's clients. Selecting the "Specify a Server" option will allow users to enter information in the fields below. The only required field for the ftwilliam.com software is the SMTP Server (however the email server may require other fields to be completed in order to work, such as the SMTP Port, Username, Password and From Email. The ftwilliam.com system will default to SMTP Port 25).
Some fields will allow users to select whether the field is editable. Marking a field as "Editable" will allow preparers to choose their own value for this field for a particular portal user.
When users select to invite a portal user to the portal, a screen will appear to allow users to review the email before sending (it will not pop-up in the user's email program as it would if users select the Preparer's Email Program above). This option allows for less ad-hoc editing of emails since users cannot modify the email in the user's own email program.
Reminder Signer Emails. This option is only available if users select "Specify a Server" under the "Email/Server Settings". Once the "Specify A Server" option is selected, click "Yes" next to "Reminders" (see screen shot above). Users may then select the number of days for reminder emails to be sent. For example, if users choose 3 days, a reminder email will be sent every 3 days until the filing is signed by the portal user. The reminder email will be the same text as the original signing invitation email except the end of the subject line will include "(Reminder)."
- Preparer's Email Program - Users that choose this option, the email invitation will come from the email program (i.e. Outlook, Thunderbird Lotus Notes, etc.) that is loaded onto the computer being used by the preparer that invites a portal user to the portal. When you invite your client to sign, an email will pop up on your computer for you to send to your client (similar to clicking "compose" in your email account). Note that the email is being sent by your computer. You need to click "Send" to send the email, just as the user would any other email sent from the user's computer. ftwilliam.com assumes that the majority of users will select this option.

If your filing is "Not Accepted," there is a "Details" link next to the status on the "5500 - Year" screen as shown below: Click on the "Details" link to view the reason(s) for the filing not being accepted by the DOL. Click on the "Details" link to view the reason(s) for the filing not being accepted by the DOL. |

Once you've clicked on "Edit" for the Default Portal Email*, for example, you be able to update the Default Template; hide the Default Template; or Clone the template. If you choose to hide a template, it will not display for admins when sending portal invites. Note: You may not delete Default Templates (the button is grayed out for Default Templates). |

If you clone the Default Portal email, a pop-up box will appear for you to name the template. After you have named the template, you will have the option to update the text; hide the template; clone the template; or delete the template. Once you are done, click on the "Close"button. |

Within the "Select an Email to Edit" box, you will now be able to select the template you would like to default to when sending the Invite to Portal email. You will need to click on "Save Settings" towards the bottom of the screen. Note: the Default Portal Email was hidden so it does not appear in the drop-down list. |
Now that the default template has been selected, when you go to the 5500 Module and click on the "Invite X to Portal" link, the selected default from the Global Email Settings will appear in the drop-down list. However, you are able to select another template type for the standard Default Portal Email, any cloned Portal Email Templates, Default 8955-SSA Email or any cloned 8955-SSA Email Templates. |
*Note: We have provided default email subjects and sample correspondence, but you may customize this language any way that you like. It is important that you leave the web-portal link and the "Username" and "Password" information in your email (if applicable); however, you may change the placement of these items if you wish. If after you have edited the text and wish to return to the default language, click on "Revert Email" and the body of the Invitation Email will revert back to its original text.
There are a few features of the standard emails described in more detail below:
- Custom Language. Custom language will be completed by language you enter that is specific to a user and filing. For each user you add under the Work with Signers/Portal Users option, there will be a box to add custom language for that user. If you are not sure whether you will use custom language, we would recommend leaving in the "!@!CustomLanguage" text. (If you enter no custom language for a particular user and signer, there will be no information added to the email and it will cause no harm.) You may also change the placement of the custom language text. We have placed this at the beginning of the email since it will allow you to personalize the email. For example, you could enter custom language like the following:
"Dear Ms. Smith:
Thank you for the opportunity to assist you with your 5500 filing requirements this year." - Html Option. This option is only available if you "Specify a Server" under the Email/Server Settings described above. Once you have the box checked for "HTML Email?", then an html editor bar will appear below the Subject line for you to edit the email. You do not need to know html in order to use this feature.
- Testing. We have provided the ability to test your email settings (and html coding if applicable) for each of the standard emails. Please note that the "!@!CustomLanguage", "!@!Username" and "!@!Password" text will be customized for the user and either left out of the email if blank or filled in with the appropriate information (if there is no custom language the "!@!CustomLanguage" text will not appear).
- Placeholders. You will want to ensure you insert the placeholders you wish to use into the "Signer Email" or "Portal Email." You will only need to insert the placeholder itself (i.e. !@!Password) and not the placeholder and placeholder description.
There are a number of placeholders that you can insert into an email. To see the full list of possible placeholders for a given email template, click the "Placeholder List" button on the Edit Template form.
On the Portal Branding page, you may customize the look of the portal with your company's logo and corporate colors, so your clients feel like they are accessing your website and not ftwilliam.com's.
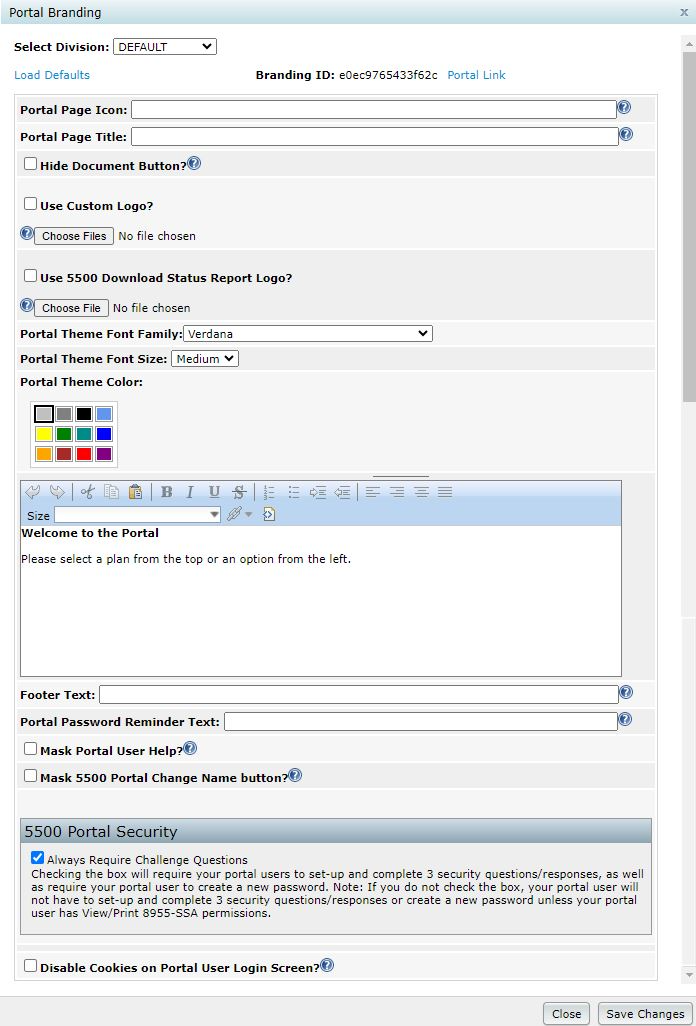
Portal Page Icon and Title: The favicon is the small image that is associated with the web page. If you currently have a favicon, you should be able to type http://yoursite.com/favicon.ico and the image will display. If not, you should speak with your web designer to help you set one up. The custom page title is the text that will appear as the title of the web page once your client logs into the portal.
Portal 5500 Document Feature: Customers who only subscribe to the 5500 Software package will be able to select this option to remove the "Documents" tab from the main portal screen. When your client logs into the portal, he/she will see each document (e.g. 5500, SAR, 8955-SSA, 5558) listed on the left-hand side of the screen. Your client will need to click on each option to view/print the selected form.

Portal Logo: The logo you upload will be used in the upper-left hand corner of the portal. To see what the settings look like, you can click on the "Portal Link" at the upper-right hand corner of the "Portal Branding" screen (shown above).
Portal 5500 Download Status Report: If you select this option, you may upload a logo that will appear on the 5500 Report your client downloads in the portal after clicking "Check 5500 Status" and selecting "View as a PDF." Please be sure and follow the recommended file sizes and types, as if you attempt to upload a file that is not PNG, JPG or GIF, or the file is too large, your client may be unable to view the 5500 Report in the portal.
Portal Theme: You may select a font style, font size or color to further customize the portal.
Portal Custom Welcome Message: You may enter a customized message that your clients will see upon logging into the portal.
Footer Text: You may enter custom footer text here. If no footer text is provided, the default text, "© 2007-2023 CCH Incorporated or its affiliates" will be used.
Portal Password Reminder Text: You may enter text here that will replace the default text of "Lost Password? Use the 'Forgot Password' link on the login screen to reset your password" that is displayed in the Invitation Email. The "Lost Password?" text appears in the Invitation Email after a portal user logs into the portal and updates his/her password. Oftentimes, portal users believe their password is lost based on seeing the default language that displays, so it may be helpful if you enter customized text such as the following: "Your password will no longer be displayed within this email. Please use the password you created after answering your three challenge questions. If you no longer remember your password, please contact your filing's preparer for further assistance or click on 'Forgot Password' to reset your password."
Portal Mask Portal User Help: If you select this option, the "Help" button will be masked for your client on the portal log in screen, as well as when he/she is logged into the portal.

Note that we also offer a portal customization service for an additional fee. If you would like to take advantage of this service or would like more information, please call 800.596.0714 or email support@ftwilliam.com for more details.
Portal 5500 Always Require Challenge Questions: Customers who only subscribe to the 5500 Software package will be able to select this option to continue to require your portal users to set-up and complete 3 security questions/responses, as well as require your portal user to create a new password. Note: If you do not check the box, your portal user will not have to set-up and complete 3 security questions/responses or create a new password unless your portal user has View/Print 8955-SSA permissions. 
You have the ability to upload a spreadsheet with each of your customers' names, along with their email address. To upload a file, click on "browse", locate the file and indicate the number of rows to ignore before the column names. You should have a "Name" column and an "Email" Column. (If the first rows in your spreadsheet are "Name" and "Email", then there will be zero rows before Column Name). Once you've reviewed the recipient list by clicking on "View Recipient List" you may then batch email your clients. The default language we have prepared is shown below. Note that "!@!Name" will actually be filled in the with the name you upload in your excel spreadsheet. Please also note that we have prepared some of the instructions in a manner that will be suitable for the majority of plans but that there may be customizations you will want to make depending on your processes. If you make changes but would like to revert to the default language, see the link to "Load Defaults" on the Portal Correspondence page. |

Dear !@!Name,
The Department of Labor (DOL) is requiring that all 5500 filings be electronically filed and signed (known as "EFAST 2"). For the first filing year under EFAST 2, signers must register for filing credentials at the DOL website. Below are instructions for how to obtain filing credentials with the DOL.
Once this process is complete, you can continue to use the UserID and PIN provided by the DOL in future years. If a different person signs the 5500 filing in a future year, that person will have to register with the DOL signing credentials at that time. In addition, more than one person may obtain credentials to sign a 5500 form if more than one person may actually sign the filing.
5500 Form Signer Credential Procedures
There are several steps to registering at the DOL website. We suggest that you set aside approximately 15 minutes to complete the process. However, please keep in mind that it may take more than 15 minutes as there are several steps in the process. Please also note that the DOL may change the registration process - these are the steps as we understand them at the time of this email.
- Go to https://www.efast.dol.gov and select the link to register.
- You will be asked to read and sign a privacy statement.
- Complete your profile. You will be taken to a screen where you will be required to complete information that will serve as your profile (name, address, email and user type). Your user type is "filing signer."
- Challenge question. Once your profile information is complete, you will be asked to select a challenge question and answer. This is required and will be used to obtain your UserID and PIN in step 6.
- Confirm email. Check your email and click on the link provided in the email.
- Answer your Challenge Question. You will be asked the challenge question you set up earlier in the process.
- PIN agreement. You will then be asked to sign a PIN Agreement whereby you will agree not to share the PIN that is assigned to you.
- Signature Agreement. You will then be asked to agree to a more detailed "signature agreement".
- UserID and PIN. You will then be provided a UserID and PIN. We strongly suggest printing this page for your records.
- Password. The last step in the process is to create a password that will be assigned to the UserID and PIN that you were just provided. We suggest making a note of the password that you enter for your records. The password can be used with your UserID to obtain your PIN and/or log in to the DOL website in the future to change any profile information if necessary.
Click here for detailed instructions on how to obtain signing credentials with screenshots.
Once your Form 5500 and schedules have been prepared, we will contact you to complete the signing ceremony online. At that time, you will be required to enter the UserID and PIN that you received through the process outlined above.
Thank you for helping us make the transition from paper filing to EFAST 2 electronic filing as smooth as possible.
Sincerely,
After selecting a Plan from the "Home" screen and by clicking on "Edit Plan", the user will be directed to the "Edit Plan" screen. In the "Plan Modules" box, the user will be able to select the 5500 Plan Year (1988 - present) the user would like to work on before clicking the "5500 Forms" button.
The screen shown below displays what it looks like if the user has an IRS Forms, 5500, 1099, Portal and Distributions subscriptions with ftwilliam.com. Depending upon the subscription(s) the user has with ftwilliam.com, the "Edit Plan" screen may appear differently.

Note that signers are often consistent from year to year so you will likely be able to "Add Existing" in future years (note the option to do this in batch mode discussed below). If you only want a user to view the current year information (and not see a prior year completed 5500 for example), you will need to add that user as an existing user to the current plan year and then go into the prior year and delete the user.
Bring forward [prior year] signers to [current year] for all plans. This function will move forward signer data to the current year for ALL PLANS. The process may take a few minutes. NOTE: If signer(s) have already been added for a given plan and year, the bring forward operation will silently skip said plan. There must also be signers from the previous year. The current year plan must be unlocked. Additionally, if your signer is designated to be signing as "None" in the prior year, he/she will not be brought forward into the current year.
You may also upload portal user information (portal username, password, email, signer status, etc.) for all your plans on the system at once. See information regarding "Upload Signers" in the Upload and Download Center.
Clicking on "Work with Signers/Portal Users" within the "Portal Menu" box will bring you to the "Edit Portal Users" screen where you will be viewing your user's profile. Below are the steps to follow to add/change user information:
Step 1: Click "Add" if the user is not already in the system for that plan/plan year. More information will appear as relevant for the user selected. If the user was on the system for last year's filing or for a different filing on the system, you may select "Add Existing" and choose the user from the list that will appear. |
Step 2: Assign the user his/her relevant information. The fields highlighted in the image below are required when adding a new portal user. Each option will be discussed briefly below:
- Signer/Portal User Information:
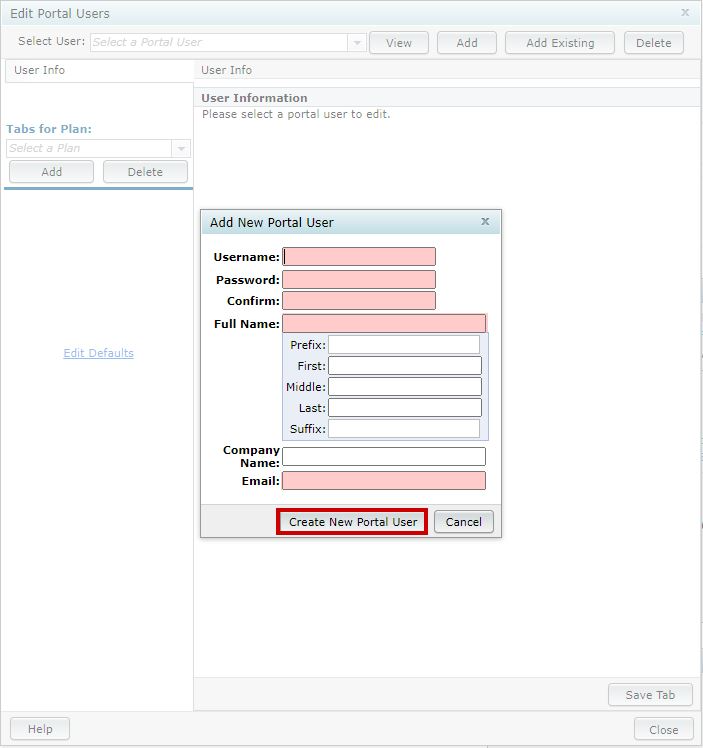
- Portal Username: This is the Username that the portal user must enter (with the password, below) to enter the portal. The Username must be at least 6 characters and may not contain symbols. If you receive a message stating the username already exists, please note that portal usernames must be unique system-wide, over all ftwilliam.com customers. We do suggest making the portal username more unique by adding numbers, using your client's first and last name, etc. For example, you may use: JohnDoe123, JDoe123 or DoeJohn123.
- Full Name (Populates 5500): Each user will need a name to appear on the 5500 filing (if applicable). This information will be used to complete information at the bottom of page 1 of the Form 5500. If the user is signing as "Administrator and Sponsor," his/her name will only populate on the "Plan Administrator" signature line of the Form 5500. The name will also be used to identify the user in the ftwilliam.com 5500 software. (Signers will have the option to "change name" on the portal signing screen if their name is incorrect/misspelled.)
- Email: This is the email address that will be used to invite the user to the portal.
- Password: This is the password that the user will need to use to login to the portal and will be provided in the email with the link to the portal (assuming that the password placeholder has not been removed from the standard Global Email Settings options described above). The password must be at least 8 characters, a combination of letter(s), number(s), and special character(s). Please note: passwords are case-sensitive. The password will only be displayed for your clients within the Invitation Email if they are a new portal user within ftwilliam.com and have not previously logged into the portal and updated their password. Once your clients have updated their password, you will no longer see the "Password" and "Confirm Password" fields; rather, you will only see the "Reset Password" option as shown below. Note: 5500-Only customers (do not have access to ftwPortal Pro) have the option to turn off the security questions for 5500 portal users that do not have View/Print Permissions for the 8955-SSA. See Portal 2 5500 Always Require Challenge Questions above.
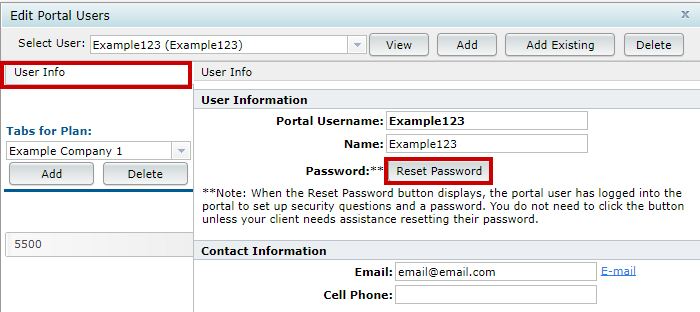 Once the reset password button is selected, there are two options available.
Select only one of the availbale options, do not select both.
1. Reset Portal User Password: This emails Portal Users directly with a link to reset their password.
2. Manually Reset Portal User Password: This option allows you to enter in a password of your choosing that meets the criteria (at least 8 characters, a combination of letter(s), number(s), and special character(s). This option does not generate an email to the user, and will require you communicate the new password to the Portal User.
- Confirm Password: This confirms the password entered above. Once a password is entered, the information will disappear from the screen but will be saved to the system and will be provided in the email with the link to the portal that is sent to the user once you invite them (again, assuming that the password placeholder has not been removed from the standard Global Email Settings options described above).

 Once the reset password button is selected, there are two options available.
The 5500 > [Year] screen is the "Homepage" for the 5500 return/report for the plan.
Near the top of the screen you will find information showing the Company, Plan Name and checklist type for the plan.

Just below that is information regarding the Edit Status (Locked, Unlocked), Signed Status (Signed or Not Signed) and Acceptance Status from the DOL (Not Submitted, Submitted, Rejected - rare, In Process, Accepted, Not Accepted). These statuses are related to the signing and completing of a 5500 form discussed in more detail in the Signing a 5500 Filing section of this guide.
Below the status information are links for 5500 Forms Settings and Batch Features (Work With Signers/Portal Users, Batch/WorkFlow, Portal Settings, and Portal Link).
In the center of the screen are links to 5500 forms and schedules. See Completing 5500 Forms and Schedules for more information.
In general, new users will first want to address Completing the 5500 Forms and Schedules, review the 5500 Forms Settings and Batch Features for the software and finally, Signing a 5500 Filing.
Clicking on the "Batch/Workflow" link within the "5500 Menu" box from the "Form 5500 - Year" screen, brings you to the "5500 Batch/Workflow" menu. You will see the options to Bring forward (prior year) data to (current year) for all plans, Bring forward portal users to (current year) for all plans, Batch Invite 5500/SF, 5500 Workflow Grid, Admin Summary Status, Batch SAR, Batch Annual Funding Notice, Batch Local Sign, 8955-SSA Batch/Fulfillment, Batch 5558, and Batch Lock 5500. Each is discussed below. The options of Batch Invite 5500/SF, 5500 Workflow Grid and Admin Summary Status work similarly, as do the options to Batch SAR, Batch Annual Funding Notice, Batch 5558, and Batch Lock 5500, so those items will be discussed together. |
In addition, if you click on the option to "Bring forward (prior year) data to (current year) for all plans", the following warning will appear in a pop-up window:

When you are ready, click on "OK" to proceed. It may take a few minutes to process. Once the process is complete, you will be brought to the "Bring forward Form 5500 data to (current year)" screen with results shown indicating the number of forms updated.
This function will move forward signer data from the prior year to the current year for ALL PLANS. The process may take a couple minutes. NOTE: If signer(s) have already been added for a given plan and year, the bring forward operation will silently skip said plan. There must also be signers from the previous year. The current year plan must be unlocked.
The 5500 Workflow Grid (sample screenshot shown below) replaces all the functionality of the prior "Review/Assign Detail Status/Extensions" grid, but has a number of new features. You may access the 5500 Workflow Grid by clicking on the "Batch/Workflow" link from the "Form 5500 - Year" screen. It can also be accessed from the "Admin Menu" at the top of most pages after log-in under "5500 WorkFlow."
Note that not all options may be available for all ftwilliam.com 5500 software users.
 |
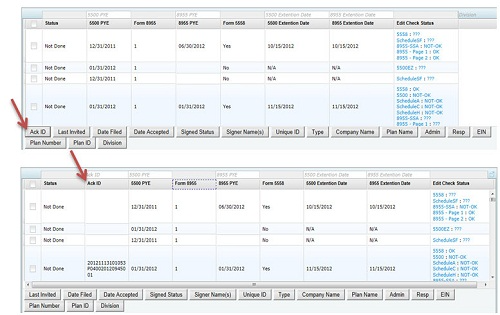
The 5500 Workflow Grid; Batch Invite 5500/SF; Admin Summary Status batch options will all open a data-entry grid resembling the view shown below. Each option displays different information and not all options may be available for all ftwilliam.com 5500 software users. You can access the grids by clicking on the "Batch/Workflow" link from the "Form 5500 - Year" screen.
Each option will allow you to view data for all the plans on the system at once in a grid format. Many grid fields will allow you to change/update items directly in the grid. Each grid will be explained in detail below.
- Batch Year: Select a plan year from the drop-down list.
- Upload/Download Plan Admins.
- Download Current Admins
- Upload Revised Admins
- Upload/Download Unique IDs.
- Download Current Unique IDs
- Upload Revised Unique IDs
Note that the upload and download features were available under the prior 'Review/Assign Detail Status/Extensions' grid but that we expect some users would rather use the "Do with selected" feature discussed below for updating plan admins.
- Default Template: Master and Designated Admins will start off with a Default Template.
The grid options that appear for all users will depend upon what template is selected by the admin user(s) at the bottom of the '5500 Batch Workflow Grid' page. If you do not see one of the columns described below, the admin user has likely selected a different template for its users.
- Default column headers include:
- Status (Not Done, Locked (Ready for Signature), Invited, Accepted, Not Accepted)
- Resp (Yes/No)
- Admin (admin assigned to the plan)
- AckID (acknowledgement ID from the DOL)
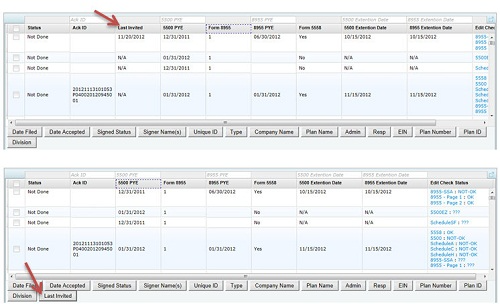
- Last Invited (date the signer(s) was last invited to sign)
- Date Filed (date the filing was submitted to the DOL)
- Date Accepted (date the filing was not accepted/accepted by the DOL)
- Signed Status (Invited/Not Signed/Signed)
- Signer Name(s) (Pulls from the work with signer/portal user first, local sign second, 5500 third)
- Unique ID (Editable field)
- Type (5500/Schedule SF/5500EZ)
- Company Name (pulled from Line 1 of the 'Company Information' on the 'Select Plan' screen)
- Plan Name (pulled from Line 2a of 'A. General Information' of the 'Edit/Print Menu' screen)
- EIN (pulled from Line 8 of the 'Company Information' on the 'Select Plan' screen)
- Plan Number (pulled from Line 1 of 'A. General Information' of the 'Edit/Print Menu' screen)
- Plan ID (ftw specific ID- uneditable)
- PlanID (UDF)- (User Defined Field that correlates to the Plan ID on the Edit Plan screen)
- 5500 PYE (PYE date on the 5500)
- Form 8955 (Yes/No - 8955 present or not)
- Form 8955 PYE (PYE date on the 8955)
- Form 5558 (Yes/No - 5558 present or not)
- 5500 Extension Date (date on the 5558 for the 5500 extension)
- 8955 Extension Date (date on the 5558 for the 8955 extension)
- Edit Check Status (displays the status of the Form/Schedules/8955/5558 added to the plan)
- If you utilize Divisions, you will be able to add a 'Division' header (see Show/Hide Template Tray below).
- Default column headers include:
- Do With Selected:
This feature allows you to update plans selected in the first column of the grid to update the Resp, Admin, Unique ID column, Confirmaton E-mail, and up to 3 User Defined Fields (UDF). First, you need to select the applicable plans and then click on 'Do with selected'. Only admin users can update the Resp and Admin columns.
- Change a Column.
- Resp (batch assign Yes/No)
- Admin (batch assign admins)
- Unique ID (batch assign Unique IDs)
- Confirmation E-mail (batch assign Confirmation E-mail addresses)
- UDF1/2/3 (batch assign User Defined Fields)
- Change a Column.
-
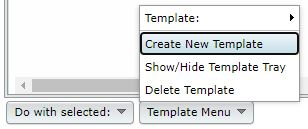
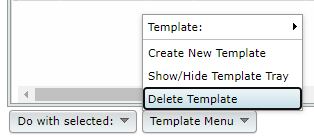
Template Menu:
- Template Default- This item will show the current grid template as well as any other custom template(s) created.
- Create New Template
- Create New Template (create a template, which will replicate the Default and select it from the Template drop-down list)
- Use only letters, numbers, spaces and dashes to create templates
- Once created, you will need to select that template from the Template drop-down list before you can edit it under the 'Show/Hide Template Tray' option described below (or delete it).
- Create New Template (create a template, which will replicate the Default and select it from the Template drop-down list)
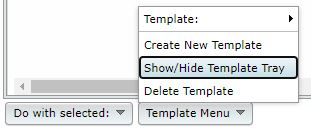
- Show/Hide Template Tray
- Show/Hide Template Tray (customize the Default or any template created).
- First ensure the template you want to work on is selected and then click to 'Show/Hide Template Tray'.
- Add column headers by clicking on the header in the tray. Note that headers will be added in the default order.
- Remove column headers by dragging them into the tray.
- Delete Template
- Deletes the template that is currently displayed on the 'Template' button.
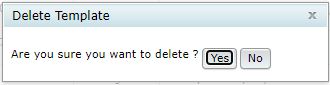
- Pop-Up window appears to confirm you are sure you would like to delete the template.
- Export current view to CSV
- Export a CSV file for the template you have selected.


- Batch Invite 5500/SF. This feature allows a user to review the plans that have been locked to see if users have been invited and whether the plan has been signed. This will allow you to send batch emails as either an initial invitation to sign the filing or as a reminder if the signer has been invited but has not yet signed. In order to use this feature, you must have specified a server under Global Email Settings.
The data entry grid will display signers that have been set up as a portal user on plans that have been locked and will display the status of the filing (Not-Signed, Invited, or Signed). You are given the opportunity to select the user to send the email invitation to. When you are ready, click "Invite Selected," you will be asked to confirm and the email(s) will be sent out.
The text of the email will be the "Invite Signers Email" that you set up under Global Email Settings.
Admin Summary Status. This grid allows a user to review the status of a particular administrator's assigned plans at a glance. Each column will be explained in detail below:
- Admin: displays the name of the administrator assigned to the plan (same as username used for logging into the ftwilliam.com system).
- Not Done: The number of filings assigned to the admin that have not yet been locked. (This will include any filings that may have been submitted and currently being amended and plans that have been rejected.)
- Locked: The number of filings assigned to the admin that have been locked but are awaiting signature.
- Invited: The number of filings that have been locked and an invitation has been sent (or marked as sent) to the signer.
- Submitted: The number of filings that have been signed and submitted to the DOL.
- Accepted: The number of filings that have been accepted by the DOL.
- Not Accepted: The number of filings that have not been accepted by the DOL.
- Total: Total number of 5500 plans allocated to the administrator.
- % Accepted: number of accepted plans divided by the total number of plans assigned to the user described above.
Note that users can be assigned to a plan under the 5500 Workflow Grid option described above.
The first step is to create a customized cover letter for your clients (SAR/AFN only). If you will be printing and mailing the letters, you may set options for the cover letter including font size and page margins. You may also generate a spreadsheet file for the purpose of generating mailing labels/envelopes by clicking on the "Print Address Labels Only (Single File)" link. The next step is to generate an edit list of client plans. This may be done by clicking on the link called "List Plans." After you have prepared your cover letter and have made sure that all plans requiring a SAR/AFN are showing up on the list of plans, you are ready to generate the respective document/form. See below for more information about each function of the Batch feature. |
After clicking on the "Edit Cover Letter Options" link, you will be presented with a pop-up window containing various options.
The Cover Letter will default to today's date, as indicated by the 'Today' setting under Letter Date. The date will be placed on the cover letter using the form: Month Day, Year. E.g. July 4, 2006. You may also set the date to an arbitrary value by selecting 'Fixed Date' from the drop down box. You will then need to enter a date in the Date field. The date entered into the Custom Date Field will be used in the cover letter exactly as entered.
The default font size for the cover letter is 10pt. You may change this value by selecting the appropriate font size from the drop down box. The available font sizes are: 8pt, 9pt, 10pt, 11pt and 12pt. The font size only affects the cover letter and does not alter the font size of other documents.
 "Yes" [Greeting Text] [Letter Recipient],
  "No" [Letter Recipient],
  "No greeting" [BLANK LINE]
The margins for the cover letter may be set in inches. The default margins are 1" for each side. You may set each margin independently of the rest in order to conform to the letterhead or paper you will be using to print the cover letter. In order to change a margin, you will need to enter a new margin value in the appropriate margin box. You may set margins as a fraction such as 1.33 or whole numbers like 1.
Sender
You may enter a name into the "Email Sender (Friendly Name)" field to display a name that may be recognizable to your client(s) upon receipt of the e-mail. Additionally, you may enter the "Email Sender Address" and "Email Sender (Carbon Copy)" address into the appropriate fields. After making changes, please be sure to click "Save" to save the changes that have been made.
A default cover letter is provided for your use. You may modify the default cover letter or use your own text. The cover letter allows for several format codes, which alter the appearance of the document.
Format Codes are available which affect spacing (tab/paragraph) as well as lists (numbered).
In order to place a tab in the body of the letter, you will need to enter "[tab]" (without the quotes) at the location you wish a tab to appear.
In order to start a new paragraph in the body of the cover letter you will need to have an empty line in the body text.
You may also use a numbered list, by inserting "[numlist]" (without the quotes) into the cover body at the location you wish numbering to start. A numbered list is stopped by entering "[normal]."
After making changes to the cover letter options, you will need to click on the "Save" button. In order to close the cover letter options window, you will need to click on the "Cancel" button. You may close the cover letter page without saving your changes by clicking on the "Cancel" button.
Review Cover Letter (SAR/AFN only)
The review cover letter link may be used to generate a sample cover letter based on the cover letter options. After clicking on the "Review Cover Letter" link, a cover letter for the first plan will be generated and delivered as a Microsoft Word document.
After you are satisfied with the appearance of the cover letter, you may continue generating the SAR/AFN and cover letter documents for each plan.
Clicking on the "List Plans" link will open a pop-up window containing all of the plans that may qualify for the SAR/AFN. You will also have the option to download the list of plans into an Excel spreadsheet.
Edit checking will be performed on all SAR/AFNs. A summary will appear at the top of a new web page showing the results of the edit checks for each plan. If a plan has errors, you may click on the plan name to review the errors for that plan.
Clicking on the "Print Address Labels" link will create an Excel spreadsheet which contains the information necessary to print address labels or envelopes for the plans. It will be necessary to use the mail merge feature of Microsoft Word in order to print the address labels or envelopes. The Excel spreadsheet will contain the following columns:
- Plan Name
- Plan Administrator
- Company Name
- Address Line 1
- Address Line 2
- City
- State
- Zip Code
Print Cover Letter Only (SAR/AFN Only)
A cover letter will be generated for each plan using the cover letter options. The cover letters will be returned as either a single Microsoft Word document, containing the cover letter for each plan or as a zip file which contains a separate Microsoft Word document for each plan.
A document/form will be generated for each plan and returned to the user as either a single Microsoft Word document, or as a zip file containing a separate Microsoft Word document for each plan.
Should the size of the generated document/form file exceed 750KB, it will be compressed into a zip file. This will generally only happen if you are generating documents/forms for a large number of plans.
After clicking on the "Print SAR/AFN Only" link it may take several seconds for the document to be generated. This is especially true for customers who are generating documents/forms for a large number of plans, as it takes about a minute to generate the SAR/AFN for 400 plans. After clicking on the "Print SAR/AFN Only" link, please be patient and do not cancel the operation or click the link again, as the document will be delivered to your browser as soon as it is generated.
Print Letter and SAR/AFN (SAR/AFN Only)
Both the Cover Letter and SAR/AFN will be generated for each plan and returned to the user as either a single Microsoft Word document containing all of the documents, or as a zip file containing a separate Microsoft Word document for each plan.
Should the size of the document/form file exceed 750KB, it will be compressed into a zip archive. This will generally only happen if you are generating documents for a large number of plans.
After clicking on the "Print Letter and SAR/AFN" link it may take several seconds for the document to be generated. This is especially true for customers who are generating documents for a large number of plans, as it takes about a minute to generate the SAR/AFN for 400 plans. After clicking on the "Print Letter and SAR/AFN" link, please be patient and do not cancel the operation or click the link again, as the document will be delivered to your browser as soon as it is generated.
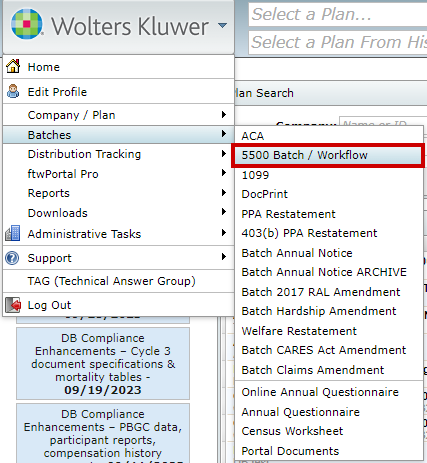
- Option Two On the ftwilliam.com "Home" screen click on the Wolters Kluwer logo. In the drop-down box, click on "Batches"adn then click on "5500 Batch/Workflow".
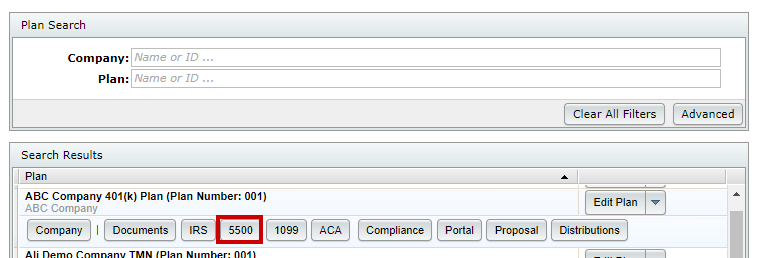
- Option Three On the ftwilliam.com "Home" screen, click on a plan that will be used in a batch. Click on "5500". Next, the user will be able to select the plan year to work within.
Once taken to the "Local Sign Batches - 20XX" screen. Click on "Create New Batch" in order to set up a batch.

 On the "5500 Batch/Workflow" screen, select the year the batch will be created in.
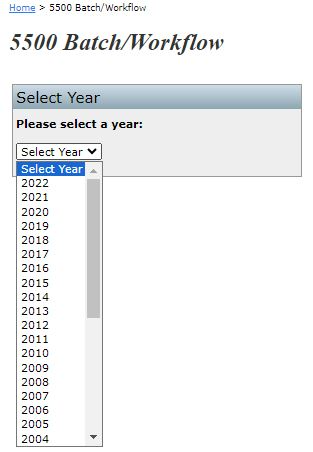 Once the year is selected, the user will be taken to the 20XX screen. Click on "Batch Local Sign" in the Options box.
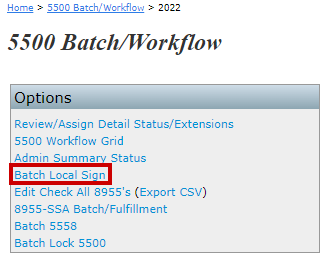 Once taken to the "Local Sign Batches - 20XX" screen, click on "Create New Batch" in order to set up a batch.
 Once on the "Form 5500 - 20XX" screen, click on "Batch/Workflow" under the 5500 Menu. Note, filing must be locked in order to use the batch feature.
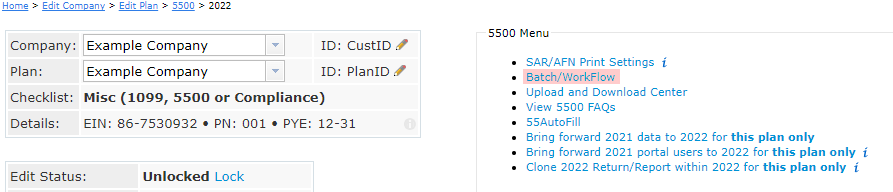 On the "5500 Batch/Workflow" screen, click on "Batch Local Sign" in the Options box.
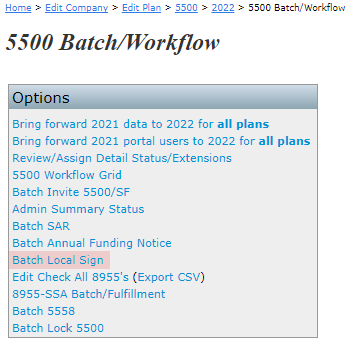 Once on the "Local Sign Batches - 20XX" screen, click on "Create New Batch" in order to set up a batch.
After clicking on "Create New Batch", a screen will appear to enter the batch name. Click "OK" to add the batch.
After clicking OK, you will be taken to the batch menu screen. To add plans to the batch, click "Add Plans."
A screen will appear where the user can select which plan(s) to add to the batch. Once the user has selected the plan(s) to include, click on "Add Plans".
The batch menu screen will automatically update to reflect the plan(s) the user has selected for the batch.
Next, the user will check the plans they wish to sign and submit to the DOL. Once checked, click on "Sign and Submit" under the "Do with Selected" dropdown box at the bottom.
A screen will appear before proceeding forward with filing. The user must click "OK" in order to move forward to the Signing screen.
Once the user has clicked OK, the next screen will display with a drop-down box to select who will be signing the form.
There are six options to choose from when selecting who the user will be signing as:
- Preparer - On behalf of Administrator/ Sponsor or Admin Only. The Administrator must have signed the 5500 form, the signed 5500 must be attached to the filing as a pdf "Manually Signed Form 5500", and an authorization for the preparer to electronically sign on behalf of the Administrator must be completed (but need not be attached to the filing sent to DOL). Sample authorization available here and on the "Form 5500 - Year" screen under the "Attachments" box on the right-hand side of the page.
- Preparer - On Behalf of DFE The DFE must have signed the 5500 form, the signed 5500 must be attached to the filing as a pdf "Manually Signed Form 5500", and an authorization for the preparer to electronically sign on behalf of the DFE must be completed (but need not be attached to the filing sent to DOL). Sample authorization available here and on the "Form 5500 - Year" screen under the "Attachments" box on the right-hand side of the page.
- Preparer - On Behalf of Administrator and Sponsor The Administrator and Sponsor must have signed the 5500 form, the signed 5500 must be attached to the filing as a pdf "Manually Signed Form 5500", and an authorization for the preparer to electronically sign on behalf of the Administrator and Sponsor must be completed (but need not be attached to the filing sent to DOL). Sample authorization available here and on the "Form 5500 - Year" screen under the "Attachments" box on the right-hand side of the page.
- Single Signer - Administrator/Sponsor or Admin Only. The Administrator/Sponsor is also the filing's preparer.
- Single Signer - DFE. The Direct Filing Entity is also the filing's preparer.
- Two Signers - Administrator and Sponsor. The Administrator/Sponsor is also the filing's preparer. Both signers must be present to complete the signing process (PINs will be masked upon entering them).
Once the user selects the appropriate option, more information will appear below depending upon the option the user chooses. Each is explained in more detail below.
Preparer - On behalf of Administrator/ Sponsor or Admin OnlyTop The "Sign 5500" screen that will appear reads as follows:
You may complete the electronic signing information below. Once you click on "Sign 5500," the filing will be sent electronically to the Department of Labor.
I certify that I have been specifically authorized in writing by the plan administrator/employer, as applicable, to enter my EFAST2 PIN on this return/report in order to electronically submit this return/report. I further certify that:
- I will retain a copy of the administrator's/employer's specific written authorization in my records;
- I have attached to this electronic filing, in addition to any other required schedules or attachments, a true and correct pdf copy of the first two pages of the completed Form 5500 or Form 5500-SF return/report bearing the manual signature of the plan administrator/employer under penalty of perjury;
- I advised the plan administrator/employer that by selecting this electronic signature option the pdf image of that manual signature will be included with the rest of the return/report posted by the Department of Labor (DOL) on the Internet for public disclosure;
- I will communicate to the plan administrator/employer any inquiries and information that I receive from EFAST2, DOL, IRS or PBGC regarding this annual return/report.
If you do not have your signing credentials you will need to obtain them by going to http://www.efast.dol.gov and registering as a signer. Click here for detailed instructions on how to obtain signing credentials.
If you have lost your User ID or PIN contact DOL EFAST2 support at 866-463-3278 or visit the website https://www.efast.dol.gov/.

Single Signer - Administrator/Sponsor or Admin Only. Top The "Sign 5500" screen that will appear reads as follows:
You may complete the electronic signing information below. Once you click on "Sign 5500", the filing will be sent electronically to the Department of Labor.
Verify that Name, User ID, and PIN exactly match (including punctuation and spacing) what you entered/received from the DOL registration process.
If 'Name' does not exactly match click the button 'Return to Previous Screen' and update the name on this 5500.
You must keep a signed copy of the 5500 for your records.
Under penalties of perjury and other penalties set forth in the instructions, I declare that I have examined this return/report, including accompanying schedules, statements and attachments, as well as electronic version of this return/report, and to the best of my knowledge and belief, it is true, correct and complete.
If you do not have your signing credentials you will need to obtain them by going to https://www.efast.dol.gov/ and registering as a signer. Click here for detailed instructions on how to obtain signing credentials. If you have lost your User ID or PIN contact DOL EFAST2 support at 866-463-3278 or visit the website https://www.efast.dol.gov/.
Single Signer - DFE. Top The "Sign 5500" screen that will appear reads as follows:
You may complete the electronic signing information below. Once you click on "Sign 5500", the filing will be sent electronically to the Department of Labor.
Verify that Name, User ID, and PIN exactly match (including punctuation and spacing) what you entered/received from the DOL registration process.
If 'Name' does not exactly match click the button 'Return to Previous Screen' and update the name on this 5500.
You must keep a signed copy of the 5500 for your records.
Under penalties of perjury and other penalties set forth in the instructions, I declare that I have examined this return/report, including accompanying schedules, statements and attachments, as well as electronic version of this return/report, and to the best of my knowledge and belief, it is true, correct and complete.
If you do not have your signing credentials you will need to obtain them by going to https://www.efast.dol.gov/ and registering as a signer. Click here for detailed instructions on how to obtain signing credentials.
If you have lost your User ID or PIN contact DOL EFAST2 support at 866-463-3278 or visit the website https://www.efast.dol.gov/.
Two Signers - Administrator and Sponsor Top The "Sign 5500" screen that will appear reads as follows:
You may complete the electronic signing information below. Once you click on "Sign 5500", the filing will be sent electronically to the Department of Labor.
Verify that Name, User ID, and PIN exactly match (including punctuation and spacing) what you entered/received from the DOL registration process.
If "Name" does not exactly match, click the button "Return to Previous Screen" and update the name on the Form 5500.
You must keep a signed copy of the 5500 for your records.
Under penalties of perjury and other penalties set forth in the instructions, I declare that I have examined this return/report, including accompanying schedules, statements and attachments, as well as electronic version of this return/report, and to the best of my knowledge and belief, it is true, correct and complete.
Both Signers must be present to submit this form 5500.
If you do not have your signing credentials, you will need to obtain them by going to https://www.efast.dol.gov/ and registering as a signer. Click here for detailed instructions on how to obtain signing credentials.
If you have lost your User ID or PIN contact DOL EFAST2 support at 866-463-3278 or visit the website https://www.efast.dol.gov/.
Once the user has selected who they are signing as and entered the correct DOL credentials, the user can click on "Sign 5500".
After clicking on "Sign 5500", the user will be taken to a Status screen.
Once the user navigates back to the "Local Sign Batches - 20XX" screen, and clicked on the batch name, the user will see the updated status for each individual plan.
To view a spreadsheet of the plans that are filed, the user can click on "Export current view to CSV" below the grid.
The 5500 module allows for users to mass edit check as well as lock or unlock 5500/EZ/SF filings. To access this feature, navigate to the Wolters Kluwer Logo> Batches> 5500 Batch/Workflow.
From here, select the applicable year from the dropdown menu. Please note, this feature is only available starting with the 2021 form year. Once the year is selected, click on “Batch Lock 5500 “.
From within the Batch Lock 5500 screen, select the “Create New Batch” button from above the grid and enter in a naming convention for your batch.

This will redirect to the specific batch where users are able to add plans by selecting the “Add Plans“ button above the grid.
NOTE: The Batch screen is year specific and will only allow you to create batches on the selected form. For example, if the 2022 year was selected from the Batch Lock 5500 menu, only filings populated on a 2022 form, that have not already been filed, and have the responsibility field as ‘Yes’ on the Edit Plan screen will be available to add to the batch.
The “Add Plans” window allows for user to filter plans by one or more search entries above each column header.
Users may select individual plans or click on the checkbox to the left of the Company Name header to select all available plans. (If a filter is utilized, the select all will only select the plans in the filtered view). The current plans available and the number of selected plans populate at the bottom of the window.

Once the plans are added to a batch, user are able to run edit checks, lock/unlock the filings, or remove the plans from the batch through the “Do with Selected” option at the bottom of the screen. To use these features, select the checkbox to the left of each plan, or select all plans in the batch by selecting the checkbox to the left of the Company Name header.

When an option is selected from within the “Do with Selected” menu, a pop-up window will populate confirming the request. When running edit checks or locking/unlocking the forms, a progress bar will populate. Once completed, edit checks and lock statuses may be viewed from within the grid by scrolling to the right:

Clicking on the hyperlinks under the Edit Check will redirect you to the specific plans edit checks and draft forms to make the alterations. Once alterations are completed and the forms are locked, you can mark the batch completed on the individual batch screen or from within the batch landing screen. Note: This is for record keeping purposes only and does not stop users from making further alterations to the batch or to plans within the batch but will prevent the batch from being deleted.
