Edit checks can be performed on any form or schedule at any time. There are two ways to run and review edit checks:
Visual Edit Checks
While editing a form or schedule, click Run Edit Checks at the top left of the screen.
- This highlights fields with issues, using yellow for failed edit checks and red for invalid entries (e.g., an incorrect date format like 13/31/2023).
- Double-click any highlighted field for details; close the information window by selecting close.
Note: Radio dial edit checks will not highlight, however hovering over the item will provide the warning or error notations.


Edit Checks in List Form
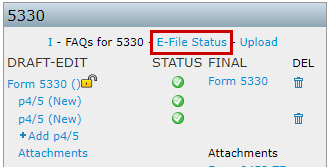
To view a list of edit checks, select the triangle next to the form on the top left of the draft form screen, or click the icon under the STATUS heading in the 5330 box. A separate page will open with the edit check list.


Edit Check Codes
Edit checks have codes to help identify the level of the issue detected.
- Codes that begin with FW are edits that have been drafted by ftwilliam.com.
- All other edits have been supplied by the IRS.
Edits are also coded as either Error or Warning .
NOTE: Any filing containing a non-FW error will not be accepted by the IRS.
The following is a description of the status codes:
![]() A status code of a green check indicates that the edit checking was successfully completed, and no errors or warnings were detected.
A status code of a green check indicates that the edit checking was successfully completed, and no errors or warnings were detected.
![]() A status code of a yellow caution symbol indicates that the information entered on the schedule has changed since the last edit check.
A status code of a yellow caution symbol indicates that the information entered on the schedule has changed since the last edit check.
![]() A status code of red x indicates that the edit checking detected one or more errors or warnings. You may click on the icon to reference those edits.
A status code of red x indicates that the edit checking detected one or more errors or warnings. You may click on the icon to reference those edits.
Immediately before printing the final version of all the schedules, it is a good idea to rerun all edit checks even if all status shows with a green checkmark. The status of the edit checks is reflected under the "STATUS" heading in the "5330" box.
We strongly discourage filing if there are errors/warnings appearing for a filing until you are certain that the filing is correct.
NOTE: The edit checks are NOT intended to check for the accuracy, correctness, or completeness of every response.
A filing must be locked before it can be e-filed. A green check under the Status column for all associated forms confirms that all edit checks have been passed, allowing the filing to be locked. Locking is not possible if any forms fail the edit checks.
Two Locking Options:
Option One: Within the 5330 Section:
- Select the padlock next to the Form 5330.
- Padlocks are disabled until edit checks are passed, denoted by a green checkmark icon next to each form.

Option Two: From the E-file Status Page:
- Click the E-File Status hyperlink in the 5330 section.
- This opens a plan-level dashboard showing all associated 5330 forms for the selected year.
- Select the padlock next to the filing.
- Padlocks are disabled until edit checks are passed, denoted by a green checkmark icon next to each form.


Important Notes:
- Locked filings cannot be edited unless unlocked.
- All users with portal access can view locked forms.
- Portal users with e-filing access can complete the e-filing process, even if an invitation to file has not been sent.
There are two primary methods to add a Portal user for viewing or e-filing Form 5330.
Method 1: Using the 5500 Menu
- Navigate to the 5500 menu.
- Select Work with Signers/Portal Users.

- If a Form 5500 or 8955-SSA has already been added for the filing year, any assigned Portal user will automatically populate, allowing permissions to be set for the 5330.
- If these forms haven’t been added yet, follow these steps:
- Select a Contact: Choose from the dropdown, which lists all Portal users in the company.
- Add a New User: This option is used if the Portal user isn’t already in the company system.
- Add Existing: Filter users by username, first/last name, or email address, and add them to the 5330 filing year.
Method 2: Using the E-File Status Link
- Open the Form 5330 section.
- Click on the E-File Status link within the 5330 Box.

- From within the Plan level E-file Status dashboard, select the Work with Signers link.
- If a Form 5500 or 8955-SSA has already been added for the filing year, any assigned Portal user will automatically populate, allowing permissions to be set for the 5330.
- If these forms haven’t been added yet, follow these steps:
- Select a Contact: Choose from the dropdown, which lists all Portal users in the company.
- Add a New User: This option is used if the Portal user isn’t already in the company system.
- Add Existing: Filter users by username, first/last name, or email address, and add them to the 5330 filing year.
5330 User Permissions
Once added to the plan, 5330 users can be assigned two types of permissions:

View Permissions: Allows the user to view Form 5330 within the portal.
Selecting the checkbox next to Add ToDo (Optional) will add viewing the Form 5330 to the Portal User's to do list as an actionable item. If reminders are enabled, users will receive notification to view Form 5330 until the task has been completed.
NOTE: Signers must view Form 5330 by default; selecting this checkbox adds a separate To-Do action requirement.
- E-file: Allows the user to view and e-file Form 5330 through the portal.
Multiple users can be assigned signing permissions, but only one can complete the e-filing process. Once a filer completes the process, e-filing is disabled and removed from other users’ ToDo lists.
NOTE: The Signing As designation applies only to the 5500 and does not affect signing permissions for the 5330.
_________________________________________________________________________________________________________________________________________________________________
*Alternative Method 3 for Adding 5330 Portal User Access (Only available for ftwPortal Pro Module subscribers)
- From the Plan Level Dashboard, select the portal user associated with the plan.
- Click the tricolon (⋮) and Edit Portal User.
- Select the 5500 Module and the correct year from the dropdown.
- Click Add Portal User, and their permissions for that year will populate.
This process will successfully add a Portal user to the filing year to set permissions for the Form 5330.


Once a portal user has been assigned to the plan with 5330 permissions, a link will appear on the 5330 E-File Status dashboard.
Regardless of lock status, if a user has proper permissions to view/print the Form 5330, a link to invite will appear as Invite [Portal User's Name] to Portal".

If the filing is locked, and a portal user has been assigned with signing permissions only, the Invite [Portal User's Name] to Sign link will appear.

If users have both view and signing permissions, two links will appear, allowing selection of the invitation template.
NOTE: The same username may be listed for both if the user has both permissions assigned.

The email templates used for sending invitations are pre-configured and can be found in the Global Email Settings under the Select an Email to Edit section. You can edit these templates to customize the content, but by default, the following are used:
- Invite [Username] to Portal: This link uses the Default Portal 5330 Email template.
- Invite [Username] to Sign: This link uses the Default E-file 5330 Email template.

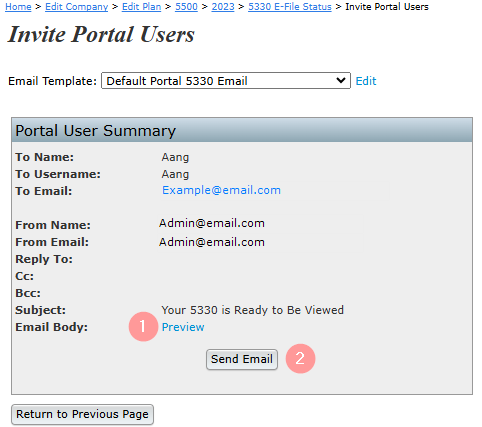
Once the appropriate link is selected, the system redirects to the Invite Signers/Portal Users screen, displaying a summary of the user's First and Last name, username, and email.
Depending on your email sending method, the options to review and send the email will vary as outlined below:
Preparer’s Email Program
- Selecting the Click to open email link will generate an email on your desktop from your personal email program (Outlook, Thunderbird, etc.). Once the e-mail has been reviewed, select the Send button in your email program to invite the user to the portal.
- To mark the filing as invited select the Mark as Invited box after sending the communication. This option will update the E-file Status dashboard as invited with a date timestamp * The mark as invited button only populates when selecting the Invite [Username] to Sign link.

Specify a Server
- Selecting the Preview link lets you review the email prior to sending.
- After reviewing, click the Invite Signers button to send the invitation and update the E-file Status dashboard with a timestamp.

NOTE: *If you are only inviting the user to the portal rather than to sign, select the Send Email button from within the Portal User Summary box.
The E-File Status Dashboard is a plan-level tool designed to track and manage all active Form 5330 filings for a specific plan and filing year.
Accessing the Dashboard
- Navigate to the 5500 Module.
- In the 5330 section, click the E-File Status link.
- This redirects to the E-File Status Dashboard for the selected plan and filing year. Scrolling to the right on the grid provides additional filing details.


On this screen, users can perform various actions as well as review filing details for each form associated with the plan selected.
Work With Signers/Portal Users: Allows users to add or edit portal users associated with the plan for Form 5330 viewing or signing purposes.
Portal Manager: This link to redirect to the Portal Plan level dashboard *only listed for subscribers of ftwPortal Pro.
Invite: These links invite the portal users to view and/or e-file the Form 5330.
NOTE: For detailed steps on the features above please see related articles:
The grid columns contain the following details:
Company and Plan Name and ID: The following details are pulled from the Edit Company and Edit Plan screens, not from the Form 5330:
- Company and Plan Name as listed in ftwilliam.com
- Company ID and Plan ID- User assigned fields
EIN- This 9 digit number corresponds to the Sponsor EIN entered on Form 5330, Line E and is automatically populated from the EIN listed on the Edit Company Screen at the time the form is added to the plan.
- If manual updates to Sponsor EIN field are made on the form, it will be reflected on the dashboard.
- *Please note, updating the EIN on the Edit Company screen, or an individual Form will not alter the information on existing locked or unlocked forms.
Description (Desc.): This (up to) 5 character description identifies the specific form associated with the details in the grid. By default the software automatically generates these descriptors in numerical order.
NOTE: The description identifier can be removed or updated to any 5-character name from the draft screen of the 5330, in the upper left-hand corner.

Edit Check Status: The icons indicate the status of the specific forms. Clicking an icon runs an edit check to ensure the form includes all required data for IRS submission. A new window will open with the results, showing any issues that need to be resolved.
![]()
A status code of a green check indicates the filings are passing edit checks.
![]() A status code of a yellow caution symbol indicates edit checks have yet to be run.
A status code of a yellow caution symbol indicates edit checks have yet to be run.
![]() A status code of red x indicates that errors or warnings are present and need to be corrected before the filing can be locked and e-filed.
A status code of red x indicates that errors or warnings are present and need to be corrected before the filing can be locked and e-filed.
Lock Status: Selecting the padlock icon will allow you to lock or unlock a filing. Please note if the filing is not passing edit checks the lock icon is disabled. *If a user has been invited to sign, unlocking the filing will remove the option to sign the filing within the portal.
There are two possible lock statuses:
![]() Unlocked: Changes may still be made to the forms, schedules, or attachments and the option to invite a client to sign is disabled.
Unlocked: Changes may still be made to the forms, schedules, or attachments and the option to invite a client to sign is disabled.
![]() Locked: The plan is ready to be e-filed and the options to invite users to sign the filing will populate above the grid. When in a locked status changes are unable to be made to the form, schedules, or attachments unless the filing has been unlocked.
Locked: The plan is ready to be e-filed and the options to invite users to sign the filing will populate above the grid. When in a locked status changes are unable to be made to the form, schedules, or attachments unless the filing has been unlocked.
Section ID: Specifies the section of Form 5330 being completed. The IRS requires only one section per form. If this column is blank, it usually indicates multiple unchecked "Blank Section" checkboxes on the form.
Date Locked: Provides a timestamp of when the filing was marked as locked and ready to e-file. Unlocking and re-locking the filing will update this date.
Date Last Invited: Provides a timestamp of the last date the Signer was invited to e-file the Form 5330.
Date Submitted: Provides a timestamp of when the Portal user submits the filing to the IRS.
Date Completed: Provides a timestamp of when the IRS received the filing with an accepted status.
Status: Shows the current filing status of the Form 5330, additional details are provided by clicking on the status link after the filing has been submitted by the Portal user.
- There are 5 status results:
- Invited: at least one portal user has been invited to sign the 5330, but the form has not yet been e-filed.
- Submitted: the filer has completed the signing process, but the connection to the IRS server took longer than 3 minutes to supply additional information. A submission date and Receipt ID may still populate unless the filing has failed. Once the Portal User checks the status of the filing within the sponsor portal this should update to Accepted, Rejected, or Failed.
- Please Note: the presence of a receipt ID with a submitted status does NOT indicate the filing is completed.
- Accepted: the IRS has accepted the filing.
- Rejected: the IRS rejected the submission, corrections must be made, and the filing resubmitted. Clicking the Rejected link will provide the IRS response.
- Rejected filings will automatically be unlocked for edits.
- Rejected filings have a 10-day Perfection Period. For more details, see FAQ Q9: What happens if a filing is rejected?
- Failed: the submission had a formatting issue. Please contact support@ftwilliam.com for details of the failure and how to correct the filing.
Examples of an Accepted Message:

Example of a Rejected Message:

Example of a Failed Message:

Receipt ID: Once the IRS has received the filing, either in Accepted or Rejected status a confirmation Receipt ID will populate in this field.
Amend: options in this column become available after a filing is submitted. If changes are needed, clicking the Amend button unlocks the Form 5330 with the "Amended" box pre-selected. It also creates a new line item on the 5330 E-File Status Dashboard.
Important Note: The Amend option on the grid is only available for forms that were originally submitted through the ftwilliam.com software.
Once a filing has been submitted there are two options that will populate in this column.
- Amend: This unlocks the Form 5330 with the "Amended" box pre-selected on line H. It also creates a new line item on the 5330 E-File Status Dashboard.
- Restore: This option appears on the new line item created when a filing is amended. Selecting it reverts the original filing to its pre-amended state, removing all changes and updates. The filing is returned to its locked status, and the second "amended" listing is removed from the 5330 E-File Status Dashboard.
Amend Version: indicates whether the filing is original* or amended. For filings amended and submitted multiple times, each version is listed as a separate line item, labeled as Amend 1, Amend 2, etc.
Important Note: If a form is manually marked "Amended", and the original filing was not submitted through ftwilliam.com, it will still appear on the dashboard as an original filing.
To amend a filing that was originally e-filed via ftwilliam.com, navigate to the E-File Status page of the 5330 section.

Once on the E-file Status page, scroll to the far right of the grid and select Amend next to the filing that needs to be corrected.

Selecting this button will:
- Redirect to the 5500 module.
- Unlock the Form 5330.
- Check the Amended box on Form 5330 Line H.
- Create a new line item on the 5330 E-File Status Dashboard for the amended form.
- Amending the form does not retain the original attachments. Any necessary documents submitted with the original filing will need to be reattached.
When making corrections to a Form 5330, the IRS requires an attachment be generated explaining the alterations made to the filing. This must be uploaded as a .csv file using the template provided on the Attachments screen.
It is suggested that this template be downloaded and completed while making alterations to the Form 5330, as it requires the original inputs to be identified.
To access the template, select the Attachment link below the filing that is being corrected:

Select the Amended Return Changes attachment type from the dropdown menu:

Once selected, a link to the .csv template will populate:

To comply with IRS requirements, every column in the provided spreadsheet must be completed without modifying or removing any of the header row or the content in rows 1–11. Do not remove or alter rows 1-11 or the file will not import properly.
Here's a detailed breakdown of each column's purpose and instructions:
Column A: PartNum
- Specify whether the alteration affects Part I or Part II of Form 5330.
- For changes impacting both Part I and Part II, create separate line items for each correction or alteration.
- Use the following codes:
- Enter “I” if the change pertains to Part I (Lines 1–16).
- Enter “II” if the change pertains to Part II (Lines 17–19).
Note: You do not need to document changes made to specific schedules listed on pages 3–6 of Form 5330.
Column B: LineNum
- Indicate the specific line number from Form 5330 that is being corrected or altered.
Column C: OnPreviousReturnAmt
- Enter the original value found in the field identified in Line Number from Column B before the alteration was made.
Column D: OnAmendedReturnAmt
- Enter the updated value that will be reported on the amended return.
Column E: ExplanationTxt
- Provide a clear explanation of the reason for the change.

If the amended filing does not include an attachment an error will populate that prevents users from filing:
FW-5330-277:
-->Error: Line H - If Line H is checked, then the Amended Return Changes must be attached.
