The Census Batch Dashboard may be accessed from multiple locations within the software:
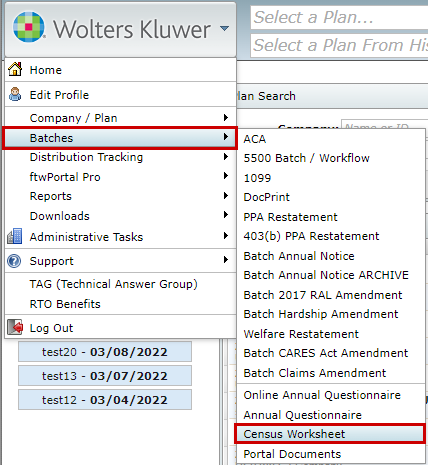
- Select the Wolters Kluwer Logo > Batches > Census Worksheet.
- Navigate to the Portal Global Dashboard and select the 'Census Batches' tab. (Wolters Kluwer Logo > ftwPortal Pro > Global Dashboard)

- Navigate to the Plan Level Dashboard and select Module Options> Census Batch

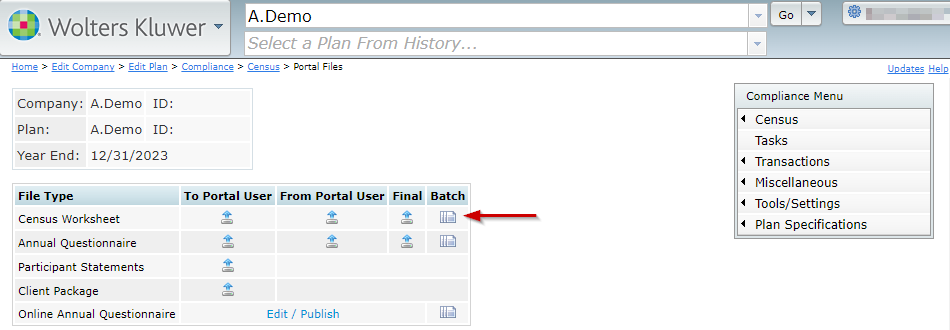
- Navigate to the Compliance Module of a plan, within the Compliance Menu, hover over census and select ‘Portal Files’. Within the menu grid, select the stack of papers in the ‘Census Worksheet’ row.


The Census Batch Dashboard is located on the Global Dashboard of the Portal Module. The following features are available from the select a batch screen:

- Module Options: Like the ‘Portal User’ and ‘Communications’ tab, the same Module Options button is available in the Census Batch.
- Create a Batch: Selecting this button will allow users to create a new census batch. For further steps please see the article entitled: ' How to Post a Census Batch
- Tricolon Menu: Selecting the tricolon next to the individual batch will allow users to open the batch (which is also available by selecting the batch name) as well as delete a batch. Deleting a batch will remove the census posted to the portal users as well as enable the plan to be added to another batch. Note: If a portal user has returned a response, the response will NOT be removed with the deletion of the batch. To add this plan to a new batch, the portal user’s response will need to be removed from the plan level Compliance Portal files.
- Do with Selected: There are two options included in the dropdown menu:
- Mark a Batch as Completed: Marking a batch as completed locks it from further edits, disables the 'Post Batch' and 'Send Invites' buttons, and prevents any changes except updating portal user permissions. Batches cannot be marked as completed if they haven’t been posted but can be if invites were not sent. Note: This action cannot be undone.
- Download Batch Info: This option will create a .csv export of all the information associated with the batches. This includes:
- Batch Name
- Batch ID
- Plan Count
- Year (the plan year end as MM/DD/YYYY for each plan in the batch)
- Portal Users associated with the plan that have Compliance permissions.
- Census (the name of the census file if the batch has been posted. If not posted either Not Customized or Customized will populate)
- Posted Date(the date the census was posted to the portal)
- Invited Date(the date the portal user was invited to view items in the portal. Specify a Server is required)
- Downloaded Date(the date the portal user downloaded the census if applicable)
- Completed Dat(when the batch was marked completed)
- Current View/Number Selected : This shows a count of all batches in the Census Batch Dashboard. The 'Number Selected' indicates there is a checkmark to the left of the batch. The number selected is used to show how many plans will either be marked as complete, or how many plans are selected for the 'Download Batch Info' option under 'Do with Selected'.
- Export CSV: This button creates a .csv file that contains the information shown on the Census Batch>Select a Batch screen.
- Batch Name
- Batch ID
- Plan Count
- Posted Dates
- Invited Dates
- Completed Dates
Rolling Forward Users for an Individual Plan
- Select the Portal Module of the desired plan.
- Click the Menu icon (three vertical dots) on the right-hand side of the screen.
- Choose 'Bring Forward Compliance Portal Users' from the menu.

Rolling Forward Users for All Plans
- Navigate to the Global Dashboard (WK logo > ftwPortalPro > Global Dashboard).
- Click the Menu icon (three vertical dots) on the right-hand side of the screen.
- Select 'Bring Forward Compliance Portal Users.' This action will pull forward all users across all plans.

Note: A subscription to both the Compliance Software and Portal is needed to use the batch features. Specify a Server will need to be set up within the Compliance tab of the global email settings to send a communication to portal users.
To access the census batch screen, select the Wolters Kluwer Logo > Batches > Census Worksheet.
Before creating a current year census batch, it is recommended to roll forward Compliance Portal Users from the previous year. Please review ‘How to Roll Forward Compliance Users’ for steps on completing this process.
To create a new census batch, select the ‘Create Batch’ button above the grid and enter a batch name:

Once the batch is created, a new screen will populate with Batch Options.
Batch Options:

- Select a Batch: This button will return users to the main census batch screen to select a batch. Batches display in alphabetical order.
- Edit Name: Select the pencil next to the batch name to make alterations.
- + Add Plans: Select the plans to add to the batch. Plans that have already uploaded a census in the Compliance Portal (either through another batch or at the plan level) will not appear in the 'Add Plans' screen. Any plan year may be included (e.g., 2021, 2022, 2023) in the same batch. +Add Plans screen includes the following filters for easy searching (hit the enter key on your keyboard for the filter to be retained).
- Plan Name/ Plan ID
- Company Name/ Company ID
- EIN
- Year End (*Search for plans by Year End using the following formats: by MM/DD, MM/DD/YYYY,MM-DD, MM-DD-YYYY, YYYY-MM-DD, YYYY/MM/DD, and YYYY. Note: The year must be entered as YYYY, not YY.)
- Checklist Type
- Checklist Version
- Administrator (listed on the Edit Plan screen for the Compliance Module)
- Multiple filters may be used at the same time.
- After entering filters and selecting the plans to add, click on the Add Selected Plans button in the lower left-hand corner.
- The add plans grid is exportable both in the full and filtered view by selecting the Export CSV button in the bottom right-hand corner.
- Only plans that are unlocked in the compliance module will populate in the Add Plans window.

- Default Worksheet: There are 3 options for sending the census to the Portal:
- Upload File: Upload a custom census that is not generated by ftwilliam.com.
- Load Prior Year Census: This radio dial selection will load the prior year census for the listed plans, it will contain census data and participants from a prior year.*Please note: if the prior year census grid selection is different than the current year grid selection in compliance, the software will enter the applicable data into the new grid format.
- Load Current Year Census: This radio dial selection will load the current year census for the listed plans, this will be a blank census (or will contain any data entered into the compliance module census for the current year) and will match the census grid selection in the Compliance for the current year.
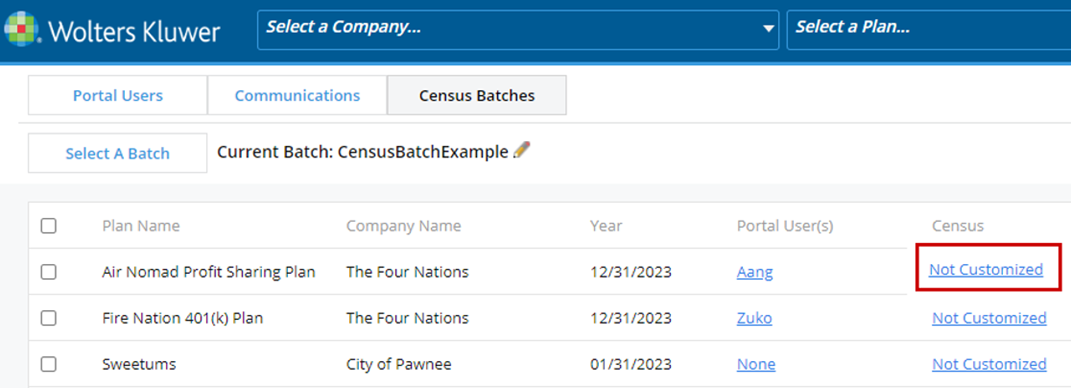
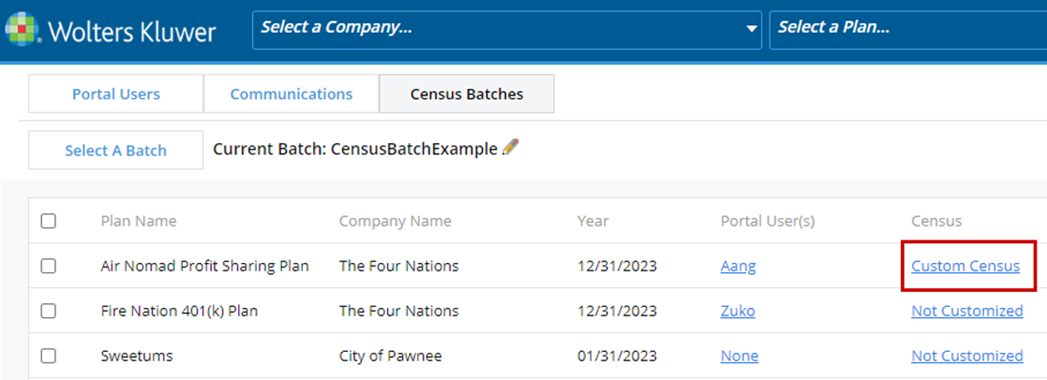
*Note: Customized Option: in addition to selecting one of the options outlined above, users may also add custom census to specific plans.
- Select the ‘Not Customized’ link in the grid.
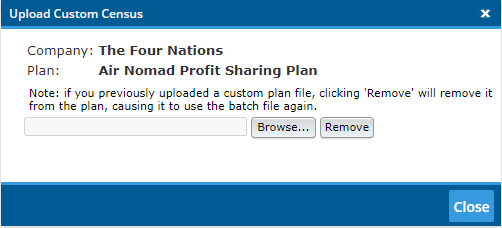
- A pop-up window with the Company and Plan Name selected will populate.
- Select the ‘Browse’ button and add the unique custom census template.
- The name of the file will populate in the blank box to the left once the upload is complete.
- Select the ‘Close’ button and the grid will then show with ‘Customized’ for that plan listing.
- Delivery Options: There are 3 options for delivering the census to portal users
- Download only: Allows the portal user to download the census but is unable to make changes within the portal screen or re-import the information. This is often used for review purposes only. *Not a commonly used feature.
- Download and Upload CSV: Allows the portal user to download the census to make alterations and then provides an import option to send respond with the updated census. *This will create two separate To-Do list tasks (Download and Upload.)
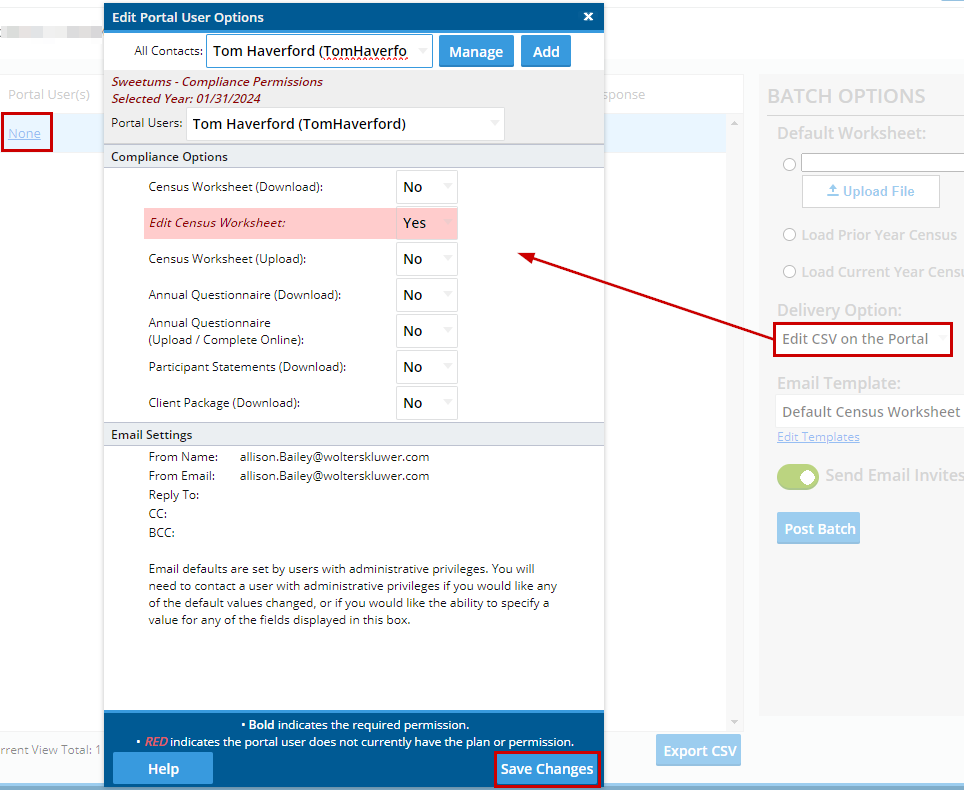
- Edit CSV on the Portal: This allows the portal user to alter the census directly in the Portal screen.
- Selecting this link will open the ‘Edit Portal User Options’ window.
- Select a user from the ‘All Contacts’ drop down.
- The user will be added to the year specified in the batch with the permissions defined by the Delivery Options for the batch.
- Ensure the ‘Save Changes’ button is selected.
-
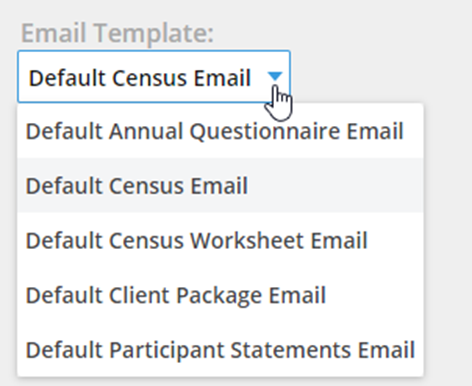
Email Template: Here the template sent to the portal user may be viewed/edited or a new template may be selected. This template will automatically default to the selected template in the Global E-mail Settings> Compliance Tab> Census Worksheet Default.
- To select a pre-existing e-mail template, select the drop-down menu. This menu will populate with all of the available compliance default e-mail options:
- To alter, edit, or create a new template for this batch, select the Edit Templates Link directly below the ‘Email Template’ drop-down.
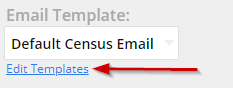
- This will open the ‘Email Template Editor’ for the Compliance module to add or edit templates. For additional guidance on this feature please review the article entitled: 'How to Edit Or Clone Default E-mail Templates.'
- Post Batch: Selecting this button will post the Census Worksheet to the User Portal. If the ‘Send Email Invites’ toggle is green, an invitation (using the Email Template selected for the batch) will also be sent to the Portal Users associated with the plan.
- Do with Selected: Based on the status of the batch, the ‘Do with Selected’ options will vary as described below:
- Prior to posting a batch, the ‘Do with Selected’ option allows a user to select all or individual plans and remove them from the batch.
- After posting a batch, the ‘Do with Selected’ option allows a user to:
- Remove Plan(s)- when a batch has been posted and s removed from the batch a confirmation window will populate alerting that the census posted to the users portal, as well as posted in the compliance module will be removed. However, responses from the portal user will remain unaffected and will still be both in the compliance module and associated with this plan if added to another batch unless manually removed.
- Send E-mail Invites- allows users to select specific plans to send initial invites to, or re-invite to complete the census without sending invitations to the entire batch of plans.
- Download Posted Census- selecting this option will export the census that was posted to the user portal in bulk. These are downloaded into a zip file with the following naming convention: ‘NameOfBatch Posted Census’.
- Download Census Responses- selecting this option will export the census responses from portal users. These are downloaded into a zip file with the following naming convention: ‘NameOfBatch Census Received’.
- Export CSV: The export CSV option from below the grid will export all the data within the census batch grid into an editable .csv file.
Things to note when adding plans:


*Note: Portal users will automatically be updated with the delivery option permissions set by the batch. The batch delivery options will only add permissions, it will not alter other existing permissions. For example, if prior to a batch the user has permissions to upload and download the census only, and the batch allows them to edit the CSV on the portal, once the batch is posted, this user will have permissions to Upload/Download and complete in portal.
When plans have been added, if a Portal User is not assigned to a plan, they may be added by selecting the ‘None’ link under the Portal User(s) column on the grid. (A Portal User must be listed in the Portal User column in order to post the batch. If None is displayed, a warning will populate to correct prior to posting.)


This guide outlines the steps to require .CSV file format for census uploads—both when sending census files to portal users and when receiving census uploads from them. This ensures consistency, reduces processing errors, and aligns with system requirements.
Enforcing .CSV Format for Internal Users
This setting is only accessible to the Master User on the account.
Access Account Profile Settings
- Navigate to Wolters Kluwer Logo > Administrative Tasks > Account Profile.
- On the Account Profile page, locate the Portal Options section.

Enable Restriction
- Check the box labeled: Restrict census file upload to .csv format only?
- Once selected:
- Users will be unable to upload census files in any format other than .CSV.
- If a non-CSV file is uploaded, the system will display the following error:
> Error: The file format selected is not acceptable. Uploaded files must be in .csv format to be submitted. Please correct and re-upload.
Enforcing .CSV Format for Portal Users
This option is accessible by Users with Designated Admin permissions.
Access Portal Branding Settings
- Navigate to Wolters Kluwer Logo > Administrative Tasks > Portal/Workflow> Portal Branding.

Enable Restriction
- In the Portal Branding section, check the box: “Restrict census file upload to .csv format only?”
- Once selected:
- Portal users will be restricted to uploading only .CSV files.
- If a non-CSV file is uploaded, they will see:
> Error: The file format selected is not acceptable. Uploaded files must be in .csv format to be submitted. Please correct and re-upload.
Division-Specific Configuration
- Each division can configure its own settings.
- If a portal user is associated with multiple divisions, their settings will default to the first company listed in the Plan Association drop down on the Edit Portal User page.
When sending a census to be completed in the portal, portal user permissions can be managed directly through the Compliance Module via the Compliance Menu>Census> Portal Files, Edit Portal Users:

Enabling Census Editing in the Portal
To allow a portal user to edit the census directly within the portal:
- Set Edit Census Worksheet to Yes on the Compliance tab.
- (Optional) Set Census Worksheet (download) and Census Worksheet (upload) to Yes to allow .CSV file download and upload.
- Select Save Changes before closing the screen.

NOTE: The census template must match a grid available in the Compliance module dropdown. If not, an error will appear when attempting to open the worksheet.
Portal User Experience
After being invited to the portal, the user will see the Edit Census Worksheet option. Each cell in the worksheet is editable, and participants can be added or removed directly on the screen. For a detailed explanation of the grid features please see Edit Census Worksheet Grid.

When editing access is enabled, selecting Edit Census Worksheet (via button or to-do list) opens a grid for direct data entry into the census template.

Grid Overview
Top Toolbar Features
- Search (Magnifying Glass)
Opens a search bar that scans the entire grid for matching values. Useful for quickly locating participants or data points without filtering by column.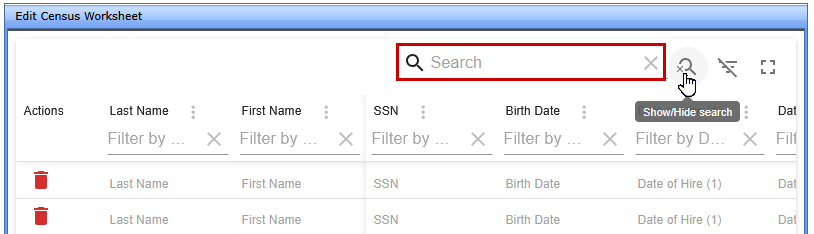
- Show/Hide Filters (Funnel Icon)
Toggles visibility of column-specific filter fields. These are enabled by default and allow for more targeted filtering within individual columns.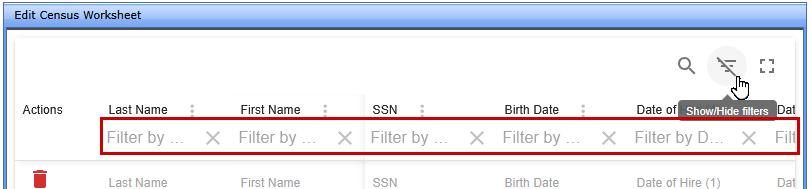
- Full Screen View
Expands the grid to fill the screen, making it easier to view and edit multiple columns. Search and filter tools remain accessible. Select again to return to standard view.
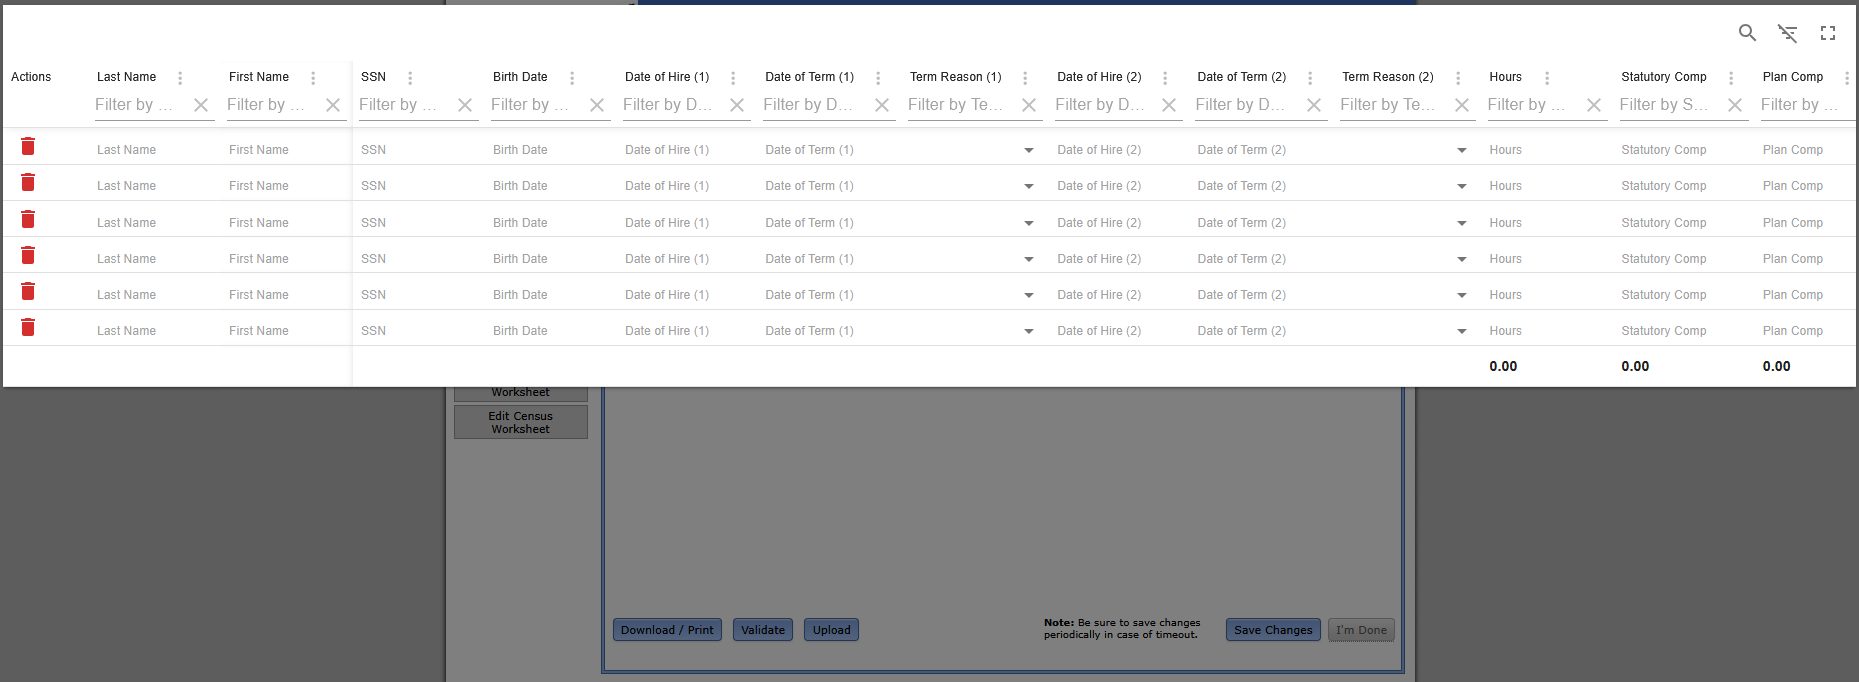


Column Features
Each column in the grid also contains additional features.
- Sort by Column Name:
Hover near a column name to reveal a sort arrow.- First click: Ascending order (*If the census grid contains multiple blank rows, those rows will be moved to the top when put in ascending order.).
- Second click: Descending order.
- Third click: Clears sorting.
- Only one column can be sorted at a time.
- Column Actions Menu (Tricolon Icon):
- Sort: duplicate functionality of the Sort by Column Name (sort ascending, descending , or clear).
- Filter: Enable or clear column-specific filters.
- Pin Left/Right: Keeps selected columns visible while scrolling. First and Last Name columns are pinned left by default. Pinned columns are marked with a dividing line.
Pinned columns are for convenience only and do not affect the exported file. Refreshing the page or uploading a new file resets the view to default (Name columns pinned left). If Name columns are not included in the template, no columns are pinned by default.
- Hide Column / Show All Columns:
Temporarily hide columns for a cleaner view. To restore, use Show All Columns from another Column Actions Menu (Tricolon Icon) or select Save Changes and refresh the page.

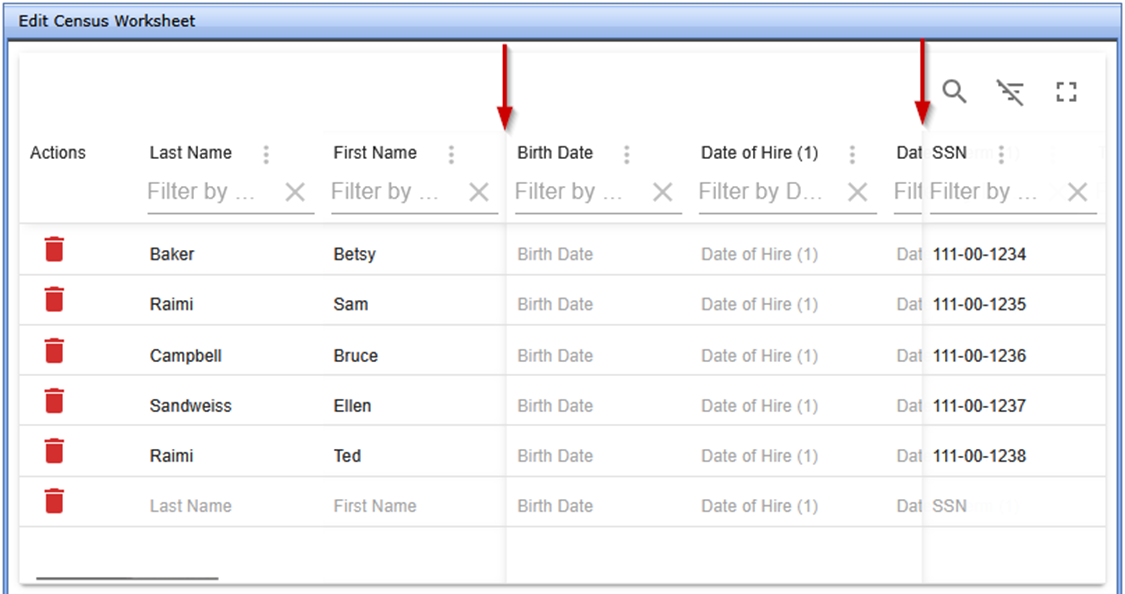
- Filter by Column Name
Each column includes a filter field (when enabled) to narrow down entries. Filters apply only to the selected column and support partial matches. This tool can be used alongside the global search tool.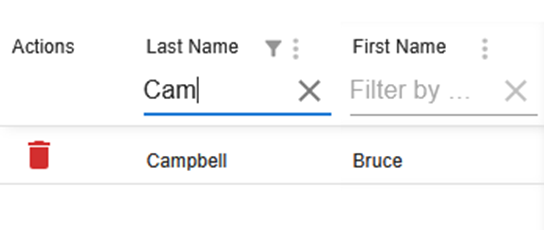

- Delete Row (Trashcan Icon)
Removes a participant row. If all rows are deleted, refreshing the page restores blank rows. Always save before refreshing to avoid losing data.
Grid Footer (Below the Grid)

- Download/Print
Exports the current census grid as a .csv file. This file can be used for:- Record-keeping or offline review.
- Making bulk edits outside the portal.
- Converting an existing census into the correct format for re-import
- The exported file can be re-uploaded using the Upload feature (see below).
- Validate (Optional)
If enabled through Portal Branding, the Validate button runs basic edit checks on the census data before submission. These checks help ensure required fields are completed and formatting is correct.- If errors or warnings are found, they must be resolved before submission is allowed.
- For more information, refer to the Census Validation section of the guide.
- Upload
Allows a completed or edited census file to be re-imported into the grid.- The uploaded file must match the original template format exactly.
- If the format does not match, an error message will appear and the upload will fail.

- This feature is especially useful after making bulk updates in the exported .csv file.

- Save Changes
The grid does not auto-save. It is essential to manually save changes frequently to avoid losing data due to:- Internet connectivity issues.
- Session timeouts.
- Accidental page refreshes.
- I’m Done
This button submits the completed census to the TPA and moves it to the Compliance Portal files. It remains disabled until one of the following conditions is met, depending on Portal Branding settings:- All columns in the grid have been scrolled through and completed.
- If validation is enabled, all errors and warnings must be cleared using the Validate button.
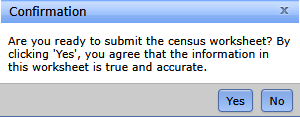
Once enabled, selecting I’m Done opens a confirmation window. Choosing Yes finalizes the submission.

An optional census validation feature is available for the Edit Census Worksheet, requiring basic edit checks to be completed before census data can be submitted.
When Validation Is Available
Validation is active only when both of the following conditions are met:- The Edit Census Worksheet permission is set to Yes
- Validation is enabled in Portal Branding
(Wolters Kluwer Logo> Administrative Tasks > Portal/Workflow > Portal Branding)

How Validation Works
Validation must be run before Portal Users can select the I’m Done button and submit the census. Selecting Validate triggers a review of the data and opens a results window showing any issues.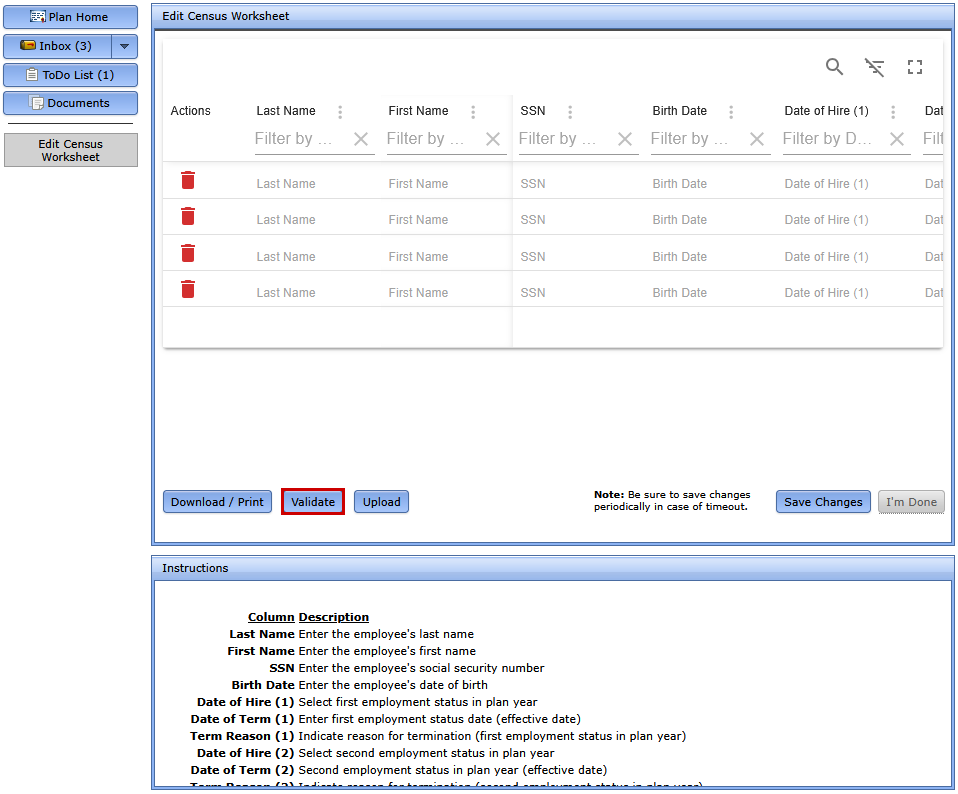
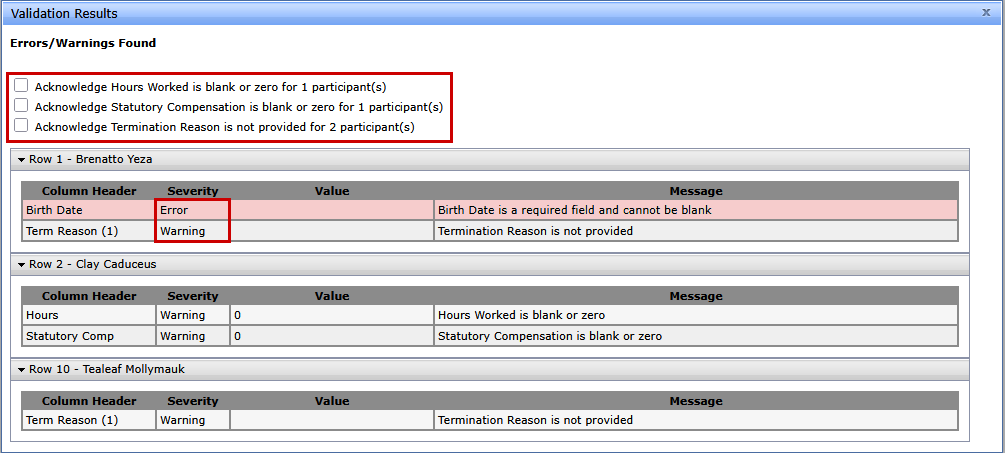
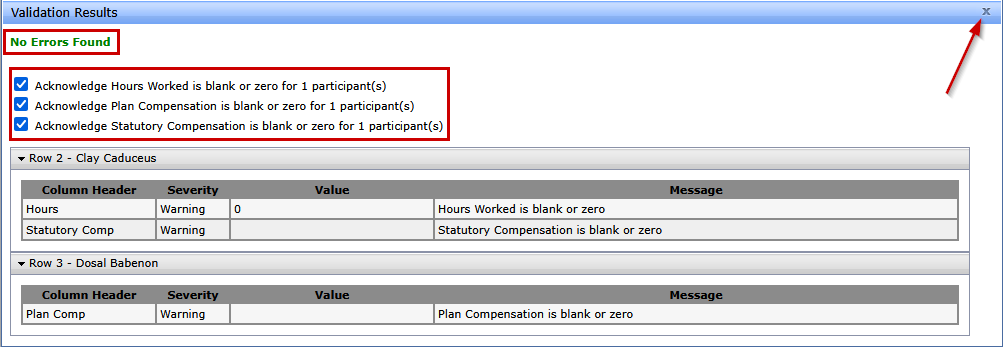
Validation Results
Results are grouped into two categories:- Errors (Must be corrected before submission)
- Triggered when required fields are missing or invalid:
- Last Name
- First Name
- Social Security Number
- Date of Birth
- Warnings (Can be acknowledged and bypassed)
- Triggered when optional fields are blank or contain zero values. Each warning includes an Acknowledgement checkbox that must be selected to proceed.
- Date of Hire
- Hours
- Compensation
- Term Reason (only if Termination Date is entered)
After Validation
- Portal users must Fix all Errors, then select Validate again.
- If Warnings remain, select the appropriate Acknowledgement check boxes.
- Close the validation window using the X in the upper-right corner. Acknowledgements are saved automatically.
Note: If additional changes are made to the census after validation, the process must be repeated before I’m Done becomes available.
Submitting the Census
Once validation is complete, portal users may select I’m Done in the lower-right corner of the grid. A confirmation window will appear; selecting Yes submits the census to the TPA and places it in the Compliance Portal files.Once the (Upload) census is populated and approved, the “Make Final” link will become active.
Note: The link will not be active if the (Upload) census has not been approved or if the (Final) census already appears in the Active Documents box.

Once approved, select the “Make Final” link.

The census file will automatically populate as “Final”. Once made Final, there is a link that will populate below the grid that will allow you to push the portal File Census to the Main grid Census for testing purposes.

Please Note: File must contain 5 header rows and census information only. Participants on the current year census (if any) with no upload record will be deleted.
Note: You do have to subscribe to the Compliance Software, ‘ftwPortal Pro’, and have ‘Specify a Server’ set up to post annual questionnaire batches. Please also know this is an Annual Questionnaire that is uploaded from your files to the software, and not an item that is generated by ftwilliam.com. These files will populate in the Portal Files of the Compliance Module.
1. Select Annual Questionnaire from the Batches drop-down list on the Select Company screen.
2. You have the option to edit a cover letter by clicking on Edit Settings.
Note: Any changes made here will also update the default email setting under the “Admin” tab for “Annual Questionnaire”.3. ‘Create New Batch’.
4. You will be directed to the ‘Edit Batch’ screen where you can:
- Edit Name: Modify your batch name.
- Browse: Upload the annual questionnaire you want to post to the portal.
- Add Plans: Plans will display based on the current plan year end and if they are not in another batch.
- When plans have been added, you are able to add/update portal users assigned to the plan with ‘Annual Questionnaire (Download):’ and ‘Annual Questionnaire’(Upload / Complete Online):’ permissions.
- You are also able to ‘Customize’ the Annual Questionnaire for each of the plans within the batch.
5. Post Batch: Sends the Annual Notice to the portal. If the ‘and send invites’ box is checked, you will be able to post the batch and send the invites to the portal users at one time.

The Workflow Grid is located in the Compliance Menu, under “Tools/Settings”, by clicking “Workflow”.

This is a global grid, listing each plan under a customer’s account to which a year end has been added in the Compliance software and showing whether or not each task has been run. Most entries in the grid are automatically updated by the software when the task in question is performed. Note that you can sort any column by clicking on the column name; you can also export the grid to Microsoft Excel via the “Download Spreadsheet” link.

The grid includes the following columns:
- Plan Name
- Year End
- Census Prep - whether the census has been prepared and posted to the portal (for portal customers only).
- Census Send - whether the census has been sent to the client via the portal (for portal customers only)
- Census Rec - whether the census has been uploaded
- Scrub - whether the data scrub has been run
- Alloc - whether the allocation has been run.
- ADP/ACP - whether the ADP/ACP tests have been run.
- Comb - whether the Combined Test has been run.
- Gen Test - whether the General Test has been run.
- Top Hvy - whether the Top Heavy Test has been run.
- C Pack - whether the Client Package has been prepared.
- Resp - for customer use to indicate whether responsible for the plan.
- Admin - for customer use to assign an Admin to the plan. All system users with Admin access will be available to select from the drop-down box.
