You will need the company code, username and password you received when you signed up for the ftwilliam.com system.

General ftwilliam.com website features available after log-in:
- Wolters Kluwer Drop-Down Logo. It provides the following options (not all options may appear depending on your subscription with ftwilliam.com):
- Home
- Edit Profile
- Company/Plan
- Add Company
- Edit Company
- Delete Company
- Add Plan
- Edit Plan
- Delete Plan
- Plan Search
- Upload Company/Plan Data
- Batches
- ACA
- 5500 Batch/Workflow
- 1099
- DocPrint
- PPA Restatement
- 403(b) PPA Restatement
- Batch Annual Notice
- Batch Annual Notice (Archive)
- Batch 2017 RAL Amendment
- Batch Hardship Amendment
- Welfare Restatement
- Batch CARES Act Amendment
- Batch Claims Amendment
- DC Compliance Batch Run All Tests
- Online Annual Questionnaire
- Annual Questionnaire
- Census Worksheet
- Portal Documents
- Distribution Tracking
- Global Dashboard
- Distributions Specifications Upload
- Status Manager
- Distribution Count
- Notifications Manager
- Push to 1099
- Plan Design Summary
- Global Dashboard
- Templates
- ftwPortal Pro
- Global Dashboard
- View Users Portal
- Portal User Manager
- Portal Document Batch
- Portal User Edit Grid
- Upload Portal Users
- Download History
- Portal User Help
- Reports
- Company Data
- List of Deleted Companies
- List of Deleted Plans
- ftwPro Amend History
- Document Provisions by Checklist [Downloads entire document checklist for a particular plan type into Excel format.]
- All Plans (Select Provisions) [Download into Excel basic information for all plans on the system (plan name, EIN, etc.)]
- 5500 Enterprise Report [Download into Excel information for all plans most recent 5500 filing and status]
- All 5500s (Select Provisions) [Option for current and prior year to download into Excel participant counts, total plan assets and more.]
- Downloads
- Blank Checklists
- Blank Adoption Agreements for Prototype-Style Plans
- IRS Letters for Pre-approved Plans
- ftwilliam.com Signed Amendments for Pre-approved Plans
- Print Blank GUST Documents
- List of Approved Outside Trust Agreements - PPA
- Plan Limit Table
- Download Document Schema
- All Portal User Messages
- Administrative Tasks (Master/Designated Admin Users Only)
- Portal/Workflow
- Global Email Settings
- Edit Module Admins
- Portal Branding
- Portal Correspondence
- Edit Contact Types
- Edit Document Classifications
- Edit Folder List
- View Portal Data Usage
- Create Custom Checklist Edit Checks
- Global Document File Names
- Global Document Print Settings
- SAR/AFN Print Settings
- Defaults
- SAR/AFN/8955-SSA Defaults
- ZZZ-Defaults
- Default Online Annual Questionnaire
- Default Portal Document SplitZip File Format
- Account Profile [Place for Master Admin User Only to update Company Profile.]
- Logged in Users
- Divisions [Place for Master Admin User Only to set-up containers which hold one or more companies (Plan Sponsors).]
- Users [Set permissions for users, log-in and password information.]
- View Online Usage Agreement
- Portal/Workflow
- Support:
- Help Center
- Contact Us
- Suggestion Box
- User Guides [Provides access to all user guides for the various modules.]
- Client Portal Help
- 5500 FAQs
- Post PPA Reference Guide
- Email and Tech Updates
- TAG (Technical Answer Group)
- RTO Benefits
- Logout
Overview
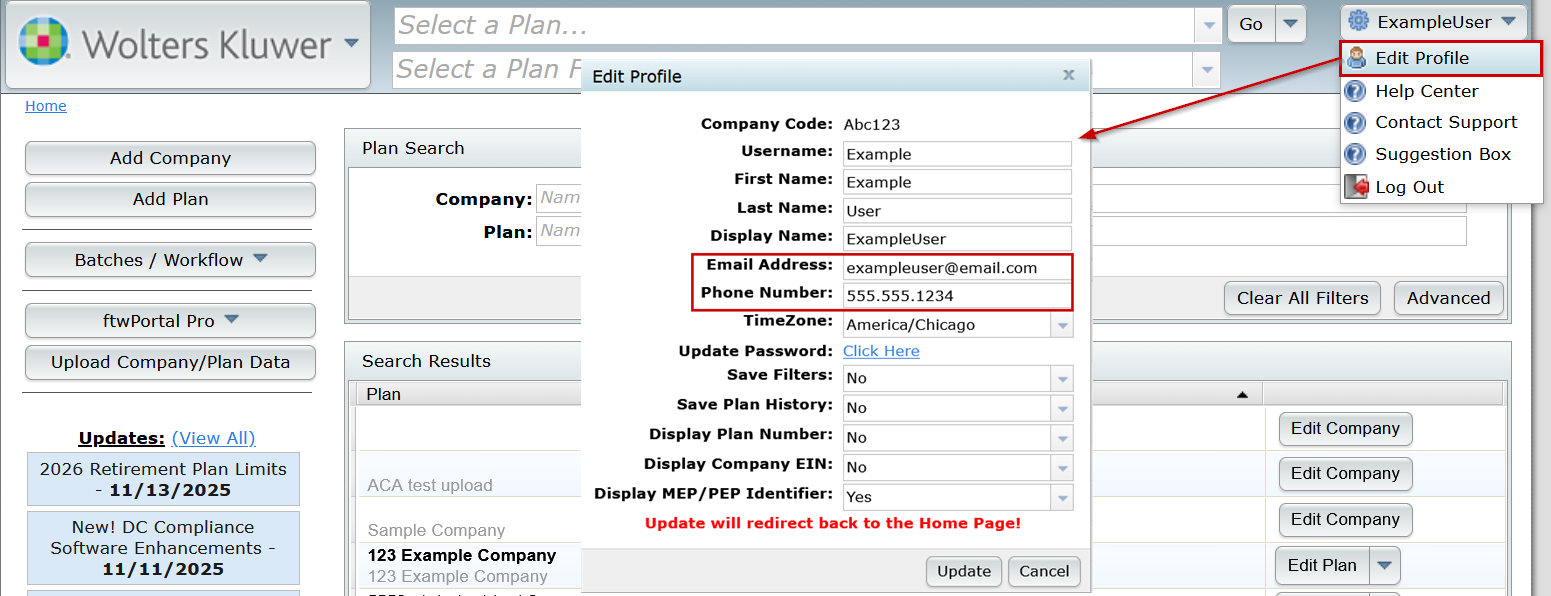
Each user on the ftwilliam.com system has a profile, which stores a variety of information, including login credentials, contact details, and module permissions. From the Edit Users screen, a profile can be updated by the Master User or a Designated Admin user. All users have the option to update their individual profile and passwords in the upper-right corner of the ftwilliam.com screen by clicking on their Display Name and by selecting Edit Profile.
FTW User Roles
Standard User
Designated Admin User
A Designated Admin User can manage users' permission by adding, modifying, and/or deleting other FTW users' contact information and permissions.
Master User
A Master User has the most access to ftwilliam.com. This user is generally the FTW user that creates an account with ftwilliam.com and should only be assigned to trusted individuals within the organization.
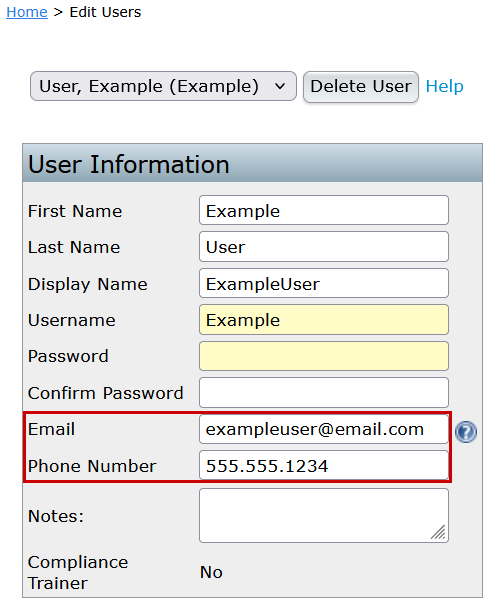
User Information
A FTW User first needs to be created in order to access the ftwilliam.com site. The Master User, or a Designated Admin User, will be able to add or modify other FTW users by filling out the following information:
First Name: An optional field for the FTW user's first name.
Last Name: An optional field for the FTW user's last name.
Display Name: A required field for the FTW user's display name, which will appear in the upper-right corner of the ftwilliam.com screen once logged into the site.
Username: A required field that will act as the FTW user's username during the login process for ftwilliam.com.
Password: A required field that will act as the FTW user's password during the login process for ftwilliam.com. The password must meet the minimum password complexity requirements:
- Minimum of 8 characters
- At least 1 number and at least 1 special character
- Confirmation does not match or blank
- Current password does not match
After updating the 'User Information', you will need to click on the 'Update' button in order to save the data to the ftwilliam.com systems. You may close the profile screen by clicking on the 'Close' button.
Module Permissions
The 'Module Permissions' section allows a Designated Admin to grant access to the user for each module purchased. The following permissions are available for each module:
- View Only: Does not allow the user to make changes to any plans or schedules.
- Edit Only: Allows the user to view and edit plans and schedules.
- None: Does not allow the user to use the specified module.
Users who have a permission of 'None' will not be able to enter that module, and will not be presented with a 'Go' button for the specified module.
Permissions
The 'Permissions' section offers a list of permissions which affect the user on a 'global' basis and do not relate to a specific module. The following permissions are available:
- Designed Admin: Setting this to 'Yes' makes the user a Designated Admin and will allow the user to add and delete users, as well as change the passwords and contact information for all users on the system. Most users will want to leave this set to 'No'.
Designated Admins can also grant the Designated Admin privilege to other users, as such, this privilege should only be granted to trusted users. - May Delete: Setting this to 'Yes' allows the user to delete companies and plans.
- May Add: Setting this to 'Yes' allows the user to add additional companies and plans.
📊 Permissions Matrix
Here’s a quick comparison of what each role can do:

💡 Tips for Admins
- To grant admin access, set “Designated Admin” to “Yes” in the user’s profile.
- Use the Admin Tasks page to manage users and reset passwords.
- Master Users can access all divisions and account-level settings.
After log-in, users will be taken to the "Home" page where users can:
- View a list of all company and plans associated with the account
- Add Company
- Add Plan
- Search for a Company and/or Plan
- Access various Batch services
- Access ftwPortal Pro (if part of the account subscription)
- Upload Company and Plan data in mass.
- Review email/technical updates
First-time ftwilliam.com users will need to add a company to get started. To do so, select the "Add Company" button from the home screen. This will redirect to a new window where users can either enter their company and EIN and proceed, or use the EIN lookup to enter the company name and state to locate the EIN.

Once the "Add Company" button is selected, the 55AutoFill feature will ask if users would like to import company information from 5500 form filings where available. Selecting the hyperlink provided will import all available data related to the EIN and plans listed. This information will automatically be imported for your use, even if you did not use our software in any previous year (Patent pending).

The Plan Search box allows quick searches for a Company or Plan using one or a combination of:
- Company Name
- Plan Name
- Company ID
- Plan ID
Partial matches are supported, so typing the first few unique characters of a name will display all matching results, often enough to locate the desired Company or Plan.
For advanced searches, click the Advanced button.

This provides additional search options, including
- Employer Identification Number (EIN)
- Plan Number
- Plan Type (a drop down menu populates with the different checklist options)
- Plan Year End
- MEP/PEP (a drop down menu populates with the selection of Master, Adopting Plan, Both)
- 5500 Admin
- Document Admin
- Compliance Admin
The advanced search also includes an option to display plans with all modules marked as "No" for "Resp" on the Edit Plan screen. Note: Plans marked as "No" for "Resp" across all modules are hidden from Plan Search results unless the Show Non-Resp Plans box is checked.
To hide the Advanced search options, click the Simple button in the bottom right of the Plan search window.

The large Search Results box below the Plan Search box offers quick access to software modules for any plan. Use the drop-down menu next to Edit Plan or click the Plan Name to access the available modules listed below it.
By default, the Search Results box displays all companies and plans. To refine the list, refer to the Plan Search instructions above.

From the "Home" screen, select a Company or Plan to access the "Edit Company" screen, purchased modules, or the "Edit Plan" screen. First-time users will need to add a Company and Plan before proceeding. The available plan types depend on the subscriptions with ftwilliam.com.
- Listings that only show the "Edit Company" button do not have any associated plans, as seen in the 'Sample Company' example in the screenshot below.
- Clicking on a plan name will expand its details, displaying quick-access buttons for the available modules.

Users can update Company/Sponsor information (including company/sponsor name, address, etc.) on the Edit Company page. On this page, there is also a box at the top of the page that will also update any future and unlocked 5500s and 8955-SSAs or 1099s with updated company/sponsor data for a particular filing year. Be sure to click on "Update" after checking the box to ensure the changes are reflected correctly.

Once users have completed any necessary updates to the "Edit Company" screen, an existing plan may be selected from the dropdown menu below the company name or a new plan may either be added via the "Add Plan" link from within the "Company Menu" box.

This will redirect to the "Edit Plan" screen. The "Edit Plan" screen allows users to update the online checklist for plan documents, if applicable as well as access other modules activated on the account.
Users can change the Plan Name in the ftwilliam.com system from the "Edit Plan" screen. In the "Plan Checklist" box, click on "A. General Information". Users can edit the plan name on Lines 2a and 2b. The system automatically updates the checklist once the user clicks out of the fields.

On the "Edit Plan" screen, the "Show History" link is a useful feature located below the "Plan Menu" near the upper-right corner of the screen, as highlighted in the image below.

Clicking on the "Show History" link opens the "History" screen, shown in the example below. This example displays a plan with 5500 and ftwPortal Pro data only. If a plan document had been added, changes to the plan checklist would also appear here.
This screen records activity details associated with the plan. For example, if the draft screen of a 5500 filing has been viewed, the date and time will be noted as "Viewed." Similarly, if a 5500 return/report is locked, it will appear in the history as "Locked."

What Are Divisions?
Divisions are containers that group companies (Plan Sponsors) together, allowing for customized permissions. This makes it easy to control which users can access specific companies. For example:
- If an employee manages 30 companies, a division can be created for just those companies, granting the employee exclusive access.
NOTE: Only the Master User on the account can add, edit, or remove divisions.
Key Division Setup Locations
Divisions are configured in three areas:
- Administrative Tasks > Account Profile: Enable divisions and set default permissions.
- Divisions: Add, edit, and move companies between divisions.
- Users: Assign home divisions and set permissions per division.
Setting Up Divisions
NOTE: Only the Master User on the account has access to the Account Profile and Division options.
Enabling Divisions (Administrative Tasks > Account Profile)
- Click the Wolters Kluwer Logo → Administrative Tasks → Account Profile.
- In the Company Options section, set Use Divisions to Yes.
- Click Update.
When divisions are enabled, the system automatically creates a division named DEFAULT and assigns all existing companies and users to it.
NOTE:
- Divisions can be disabled at any time by switching Use Divisions back to No.
- If re-enabled, prior settings are restored.
- Companies and users added while divisions were disabled will be assigned to the first division alphabetically.
Managing Divisions
To manage divisions, click the Wolters Kluwer Logo → Administrative Tasks→ Divisions.
From here, the Master User can add, delete, rename, and move companies between divisions, as well as download a list of all companies and their assigned divisions.
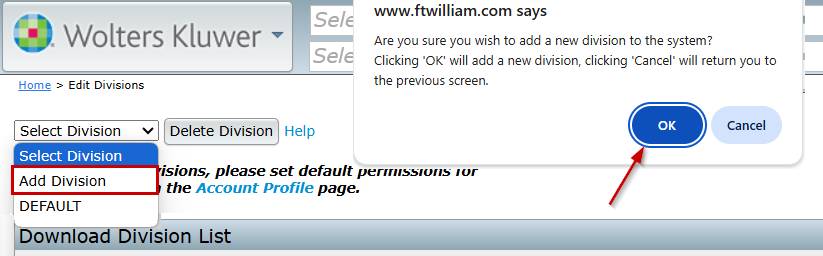
Adding a Division
- Select Add Division from the dropdown.
- Confirm the desire to add the division
- Name the division within the Division Edit section and click Update.
- There is no limit to the number of divisions.

Deleting a Division
- Select the division from the dropdown.
- Click Delete Division.
- A division can only be deleted if all companies have been moved to another division.

Renaming a Division
- Select the division from the dropdown.
- In Division Description, enter the new name.
- Click Update.

Moving Companies Between Divisions
- Select the division containing the companies to move.
- Hold Ctrl and click to select multiple companies.
- Choose the destination division from the dropdown.
- Click Move.

Guest Divisions
Users can belong to both a Home Division and Guest Divisions.
- Adding division permissions makes a user part of the guest division.
- This allows access to multiple divisions while maintaining distinct permissions.
Setting Division Permissions
To set permissions, click Wolters Kluwer Logo → Administrative Tasks→ Users
Permissions control which divisions and modules users can access. Users with Designated Admin permissions set to yes, may alter any users permission and guest division permissions.

Configuring Division Permissions
- From the Users screen, select the desired user from the dropdown.
- In the Divisions Menu:
- The Home Division for the user is displayed in the top right corner.
- If the home division is altered, be sure to select the update button prior to making additional permission changes.
- All permissions associated with that division are displayed on the screen.
- The Home Division for the user is displayed in the top right corner.
- Configure the following permissions:
- Module Permissions:
- Apply to specific sections of the software.
- Each module has three levels:
- Edit: Full access to make changes.
- View Only: Read-only access.
- None: No access.
- Based on subscription, Modules include:
- Retirement Documents
- Welfare Documents
- Non-Qualified Documents
- IRS Forms
- 1099 Forms
- 5500 Forms
- 8955-SSA Forms Package (inherits the most restrictive permissions set on the 5500 module.)
- 5500 Portal
- ACA Forms
- Compliance- DB (Defined Benefit)
- Compliance -DC (Defined Contribution)
- Portal
- Proposal- DB (Defined Benefit)
- Proposal -DC (Defined Contribution)
- Distributions
- Plan Design Summary
- May Add/May Delete:
- Special privileges that allow users to add or remove companies in the Home Division.
- Module Permissions:

Edit Guest Division Permissions
The Edit Guest Division Permissions link feature allows managing access to additional divisions beyond a user's home division.
- From the Divisions Menu, click Edit Guest Division Permissions.
- Select the Guest Division to modify from the dropdown.
- Configure the following settings:
- Visible:
- Yes: Grants access to the companies and plans in the division.
- No: Hides the division from the user.
- Companies in hidden divisions will not appear in the Select Company dropdown.
- Users cannot access any plans or data for that division.
- Per-module permissions cannot be set if Visible is set to No.
- May Add/May Delete:
- Grants privileges to add or remove companies in guest divisions.
- Module Permissions:
- Set to Edit, View Only, or None for each subscribed module.
- Visible:
- Click Update → Close when done.

Division Permissions & Hierarchy
Permissions are applied from most specific to least specific in the following order:
- Guest Division Permissions (Most Specific)
- User-Level Permissions
- Default Permissions (Least Specific)
Guest Division Permissions (Highest Priority)
Guest Division Permissions always take precedence over all other permissions.
- If a user is assigned permissions for a Guest Division, those settings override both User-Level and Default Permissions.
- This ensures that a user has the correct access for specific divisions, regardless of their Home Division settings.
Example:
A user has:
- "View Only" access in their Home Division (Division A).
- "Edit" access for Division B as a Guest Division.
- When working in Division B, the Guest Division permissions apply, allowing them to Edit even though their Home Division only allows viewing.
User-Level Permissions
User-Level Permissions are applied when a user has been granted specific permissions for a Home Division or additional Guest Divisions.
- User-Level Permissions override Default Permissions, but not Guest Division Permissions.
- A user’s Home Division is displayed in the top right-hand corner of the Divisions menu, along with their associated permissions.
Example:
A user has:
- "Edit" access in their Home Division (Division A).
- Default Permissions set to "None".
- When accessing Division A, the User-Level Permission applies, allowing them to Edit, even though the Default Permission is set to "None".
Default Permissions & The DEFAULT Division
Default Permissions are the least specific and only apply when:
- A user has no Guest Division or User-Level Permissions assigned.
- The DEFAULT Division settings from Company Options are used.
When divisions are enabled, the system automatically creates a DEFAULT Division and assigns all existing companies and users to it. Company Options settings are then applied to determine module-level access.

- If no division-specific permissions exist, the system will use the Company Options settings for each module.
- If specific permissions are assigned, they override the DEFAULT Division settings.
Example:
- In Company Options, the 5500 Forms module is set to:
- Edit: Yes
- View Only: No
- None: No
- Since no division-specific permissions exist, all users in the DEFAULT Division will have "Edit" access to 5500 Forms.
- If a user is later assigned Guest Division Permissions or User-Level Permissions, those will override the DEFAULT Division settings.
Key Takeaways
✔ Guest Division Permissions always take priority over User-Level and Default Permissions.
✔ User-Level Permissions apply only when a user has specific access assigned to a division.
✔ Default Permissions are used only when no other permissions exist and follow the Company Options settings.
Sample Configurations and Examples
Example 1: Dedicated 5500 Division
In this scenario, several employees manage their own set of plan documents, while a separate employee handles 5500 filings for all companies.
Solution: Create ten divisions—one for each employee managing documents.
- Assign full access to each employee for their respective division.
- Restrict 5500 permissions from these employees.
- Grant the 5500 employee access only to the 5500 Forms across all ten divisions.
Outcome:
- Document employees can manage only their assigned companies.
- The 5500 employee can access and file 5500 forms without document-related permissions.
Example 2: Separate Offices
A company has three offices: Minneapolis, Chicago, and New York, each managing its own companies individually. Most users do not need access to other office data.
Solution:
- Create three divisions—one for each office.
- Set the default "Visible" permission to "No" to restrict access across offices.
- Grant users full access to their own division only.
- For exceptions, add Guest Division permissions to allow cross-office access.
Outcome:
- Users can only access their office's companies by default.
- Selected users with Guest Division permissions can access multiple offices.
- If a user transfers offices, simply change their Home Division to match their new location.
Example 3: Advanced Configuration
For companies with complex access needs, divisions can be configured with granular permissions.
Scenario:
The company subscribes to:
- Retirement Plan Document Package
- 5500 Forms Package
- IRS Forms Package
There are:
- Two divisions: Midwest and Northeast
- Four users: John, Jane, Sam, and Mary
User Permissions Overview
| User | Home Division | 5500 Forms | IRS Forms | Retirement Documents | Guest Divisions |
|---|---|---|---|---|---|
| John | Midwest | Edit | View Only | None | None |
| Jane | Midwest | View Only | View Only | View Only | Northeast |
| Sam | Northeast | None | Edit | Edit | Midwest |
| Mary | Northeast | None | Edit | Northeast | Midwest |
Default Permissions Applied When No User-Level or Guest Division Permissions Exist
Visible | 5500 Forms | IRS Forms | Retirement Documents |
|---|---|---|---|
Yes | Edit | View Only | None |
Divisions and Assigned Companies
| Midwest Division | Northeast Division |
|---|---|
| Pottery Inc. | West Lake Marathon Association |
| Milwaukee Electric and Telephone LLC | Grappling Hook Design |
| Colorful Markers |
Permissions Example by Company and User
| Company/User | Select Company | View Retirement Documents | Edit Retirement Documents | View 5500 Forms | Edit 5500 Forms | View IRS Forms | Edit IRS Forms |
Pottery Inc. | |||||||
| John | ✅ | ❌ | ❌ | ✅ | ✅ | ✅ | ❌ |
| Jane | ✅ | ✅ | ❌ | ✅ | ❌ | ✅ | ❌ |
| Sam | ✅ | ✅ | ❌ | ❌ | ❌ | ✅ | ❌ |
| Mary | ✅ | ❌ | ❌ | ❌ | ❌ | ❌ | ❌ |
Milwaukee Electric & Telephone LLC | |||||||
| John | ✅ | ❌ | ❌ | ✅ | ✅ | ✅ | ❌ |
| Jane | ✅ | ✅ | ❌ | ✅ | ❌ | ✅ | ❌ |
| Sam | ✅ | ✅ | ❌ | ❌ | ❌ | ✅ | ❌ |
| Mary | ✅ | ❌ | ❌ | ❌ | ❌ | ❌ | ❌ |
| Colorful Markers | |||||||
| John | ✅ | ❌ | ❌ | ✅ | ✅ | ✅ | ❌ |
| Jane | ✅ | ✅ | ❌ | ✅ | ❌ | ✅ | ❌ |
| Sam | ✅ | ✅ | ❌ | ❌ | ❌ | ✅ | ❌ |
| Mary | ✅ | ❌ | ❌ | ❌ | ❌ | ❌ | ❌ |
| West Lake Marathon Association | |||||||
| John | ✅ | ❌ | ❌ | ✅ | ✅ | ✅ | ❌ |
| Jane | ❌ | ❌ | ❌ | ❌ | ❌ | ❌ | ❌ |
| Sam | ✅ | ✅ | ✅ | ❌ | ❌ | ✅ | ✅ |
| Mary | ✅ | ✅ | ❌ | ❌ | ❌ | ✅ | ✅ |
| Grappling Hook Design | |||||||
| John | ✅ | ❌ | ❌ | ✅ | ✅ | ✅ | ❌ |
| Jane | ❌ | ❌ | ❌ | ❌ | ❌ | ❌ | ❌ |
| Sam | ✅ | ✅ | ✅ | ❌ | ❌ | ✅ | ✅ |
| Mary | ✅ | ✅ | ❌ | ❌ | ❌ | ✅ | ✅ |
| Legend | |
|---|---|
| Allowed by Home or Guest Division | ✅ |
| Denied by Home or Guest Division | ❌ |
| Allowed by Default | ✅ |
| Denied by Default | ❌ |
If you've forgotten your password, follow these steps to reset it:
Step 1: Enter Company Code and Username
To begin the reset process:- Go to the login screen.
- Enter your Company Code and Username.
These fields are required to confirm your association with an FTW account. If either is missing, you'll receive an error message and cannot proceed.
Important: support@ftwilliam.com cannot provide your Company Code or Username. If you’re unsure of these fields, please contact an administrator for your account.Once entered, click the Forgot Password link to continue.

Step 2: Receive Verification Code
A 5 digit verification code will be sent to the phone number or email on file for your account. If both are listed, the code will default to your phone number.- The code is valid for 15 minutes.
You will be redirected to a page to enter the code. *If you don’t receive the code, click the 'Didn’t get a verification code?' hyperlink.

You’ll be given the option to resend the code. Choose one of the following:
- Resend the code to your email - Sends the verification code to the email address listed in your FTW account profile.
- Resend the code to your phone number - Sends the verification code to the phone number listed in your FTW account profile, if present. If your account does not have a phone number listed, a No phone number on record error message will appear.
If this option is selected and you do not receive either the validation code or error message, it’s possible that a landline is listed in your account profile. In that case, select Resend the code to my email instead.

Once you receive and enter the 5 digit verification code select OK.

NOTE: If neither an email address or phone number is listed in your account profile, you will receive the following error message.
It is suggested that you reach out to a manager or internal contact with administrative privileges in ftwilliam.com to review your account profile and make updates as support@ftwilliam.com will be unable to send a manual password reset if the e-mail address is missing.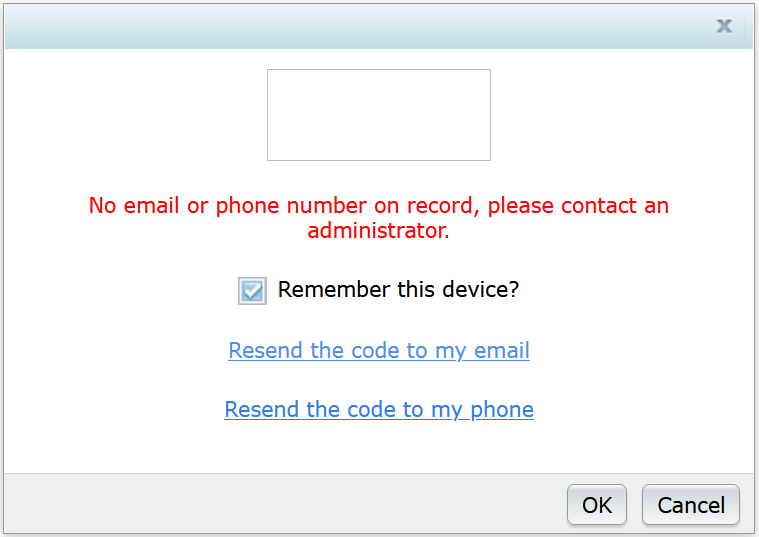

Step 3: Create a New Password
You’ll be prompted to enter a new password.
Unless otherwise specified, your password must meet the following criteria:
- At least 8 characters long
- Include at least 1 number
- Include at least 1 letter
- Include at least 1 special character
NOTE: If your company has set up alternative password restrictions, the password criteria will be listed on the screen instead of the default criteria.

After entering and confirming your new password, you’ll be redirected to the login screen where it indicates your password has been reset. Please enter your new password to access your account.

If you are having trouble receiving your password reset code or email, please follow the steps below based on the method you are using.
Text Message Troubleshooting
- SMS Compatible Device: Ensure your device can receive SMS messages and is not a business/landline.
- Check Signal Strength: Ensure your device has a strong cellular connection.
- Refresh Your Connection: Toggle Airplane Mode on and off to reset your network.
- Request a New Code: Sometimes there’s a delay—try requesting the code again.
- Restart Your Device: A quick restart can resolve minor issues.
- Disable VPN: If you’re using a VPN, turn it off as it may interfere with message delivery.
- Review Text Message Settings
- Turn off Do Not Disturb mode.
- Ensure Filter Unknown Senders is disabled or that the text are not going to a Spam & blocked text folder.
- Check your Blocked Numbers list to confirm 844-910-0193 isn’t blocked.
Email Troubleshooting
- Wait a few minutes: Sometimes there can be a slight delay in receiving the email.
- Check your spam or junk folder: The email may have been mistakenly filtered.
- Verify the email address: Double-check for typos in the email address in your account profile.
- Email forwarding: Forwarding can disrupt authentication protocols and cause issues with password reset emails.
- Add the sender to your safe list: Some email providers or corporate domains may block emails from certain senders.
- Add donotreply@ftwilliam.com to your trusted list.
Authenticator App Troubleshooting
- Open the Authenticator App: Locate your ftwilliam account entry and retrieve the current verification code.
- Verify Device Date & Time Settings: Ensure your device date and time are set to automatic, as incorrect settings can cause codes to fail.
- Ensure the Authentication App is Up to Date: If the application has available updates, ensure the application is up to date. You may need to uninstall and reinstall the application.
- Check Notification Settings (if applicable): Ensure notifications are enabled and Do Not Disturb or Focus modes are turned off.
- Restart Your Device: Restart your device to resolve temporary issues.
- Disable VPN: Turn off any VPN that may interfere with authentication.
Important
- Password reset emails come from donotreply@ftwilliam.com.
- Reset codes are sent via text from 844-910-0193.
- Authenticator apps generate codes directly on your device and do not rely on email or text delivery. If you do not see a code or cannot access the app, use another MFA method or contact your administrator for assistance.
Multi-Factor Authentication (MFA) FAQs
- Q1: Is the MFA a requirement?
- Q2: I do not see Account Profile under my login when I click on the Wolters Kluwer Logo > Administrative Tasks.
- Q3: Can we only add this for only our firm's users, or do Portal Users have to have this feature as well?
- Q4: Who is considered a "Standard User"? Who is considered a "Portal User"?
- Q5: Is it possible to request only specific Users/ Portal Users be required to use the MFA, or is it an "all on" or "all off" feature?
- Q6: Will our clients that use single sign on via PensionPro be affected by the MFA?
- Q7: Many of our Portal Users and FTW Users only have emails in their profiles, no cell phone numbers. Would that be a problem for MFA?
- Q8: Where are the phone numbers and email addresses for this purpose stored? Is this information that we can see, or is it stored internally?
- Q9: What if a user is not receiving a PIN to their cell phone or e-mail? How do we get him/her into the portal?
- Q10: What will our Clients see when they log in for the first time?
- Q11: Is there an authenticator app option available for MFA as the Primary Method?
- Q12: What will Users/Clients see when they log in for the first time when the Primary Method is Authenticator App?
- Q13: What happens if I can’t access my authenticator app and don’t have a backup method set up?
Note: While users may only use two factors during login, the system supports multiple authentication methods. For consistency, this feature is referred to as Multi‑Factor Authentication (MFA).
Q1: Is the MFA a requirement? Top
No. Enabling MFA is an optional feature for all user types.
Q2: I do not see Account Profile under my login when I click on the Wolters Kluwer Logo > Administrative Tasks. Top
Only the Master User on the account can access Account Profile and configure Multi‑Factor Authentication settings. If you do not see this option, please contact the Master User on the account for assistance.
Q3: Can we add this for only our firm's users, or do Portal Users have to have this feature as well? Top
You can choose how MFA is applied. It can be enabled for:
- Standard Users only
- Portal Users only
- DTS Participant Portal Users only
- Any combination of the above

Q4: Who is considered a "Standard User"? Who is considered a "Portal User"? Top
- Standard User: A member of your firm who logs directly into the ftwilliam.com software.
- Portal User: Your client who accesses the Portal to sign documents, e-file 5500s, upload files, etc.
- DTS Participant Portal User: A plan participant who logs into the DTS Participant Portal to view plan information or complete participant-related tasks.
Q5: Is it possible to request only specific Users/ Portal Users be required to use the MFA, or is it an "all on" or "all off" feature? Top
Currently, MFA is an all-or-nothing setting. You cannot enable it for individual users. We are exploring options for more granular control in the future, but there is no timeline yet.
Q6: Will our clients that use single sign-on via PensionPro be affected by the MFA? Top
No. MFA does not impact clients using PensionPro single sign-on. It only applies to those logging directly into the Portal.
Q7: Many of our Portal Users and FTW Users only have emails in their profiles, no cell phone numbers. Would that be a problem for MFA? Top
No problem. Users can verify using email if email backup is enabled on their account. Phone numbers are optional unless SMS is selected as the primary verification method. We strongly recommend all users have a valid email address on file.
Q8: Where are the phone numbers and email addresses for this purpose stored?
Is this information that we can see, or is it stored internally somehow? Top
Yes, you can view this information:
- By Standard Users:
- Users can view their own details from within the Edit Profile link (click your name in the upper-right corner).
- By Admins (Designated Admins or the Master User)
- Users with Administrative privileges can view all user details under WK Logo > Administrative Tasks > Users.
- To View Portal Users:
- Details are stored in the Edit Portal User Form under the User Info tab.
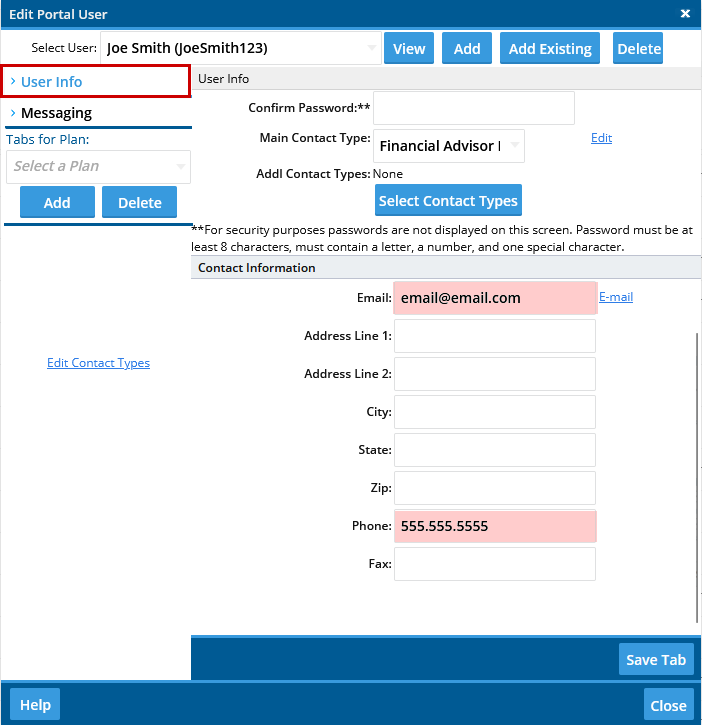
- Details are stored in the Edit Portal User Form under the User Info tab.

Q9: What if a user is not receiving a verification code to their cell phone or e‑mail? How do we get them into the portal? Top
Try the following steps:
- Confirm that an email address and/or phone number is listed in the user’s profile
- If one delivery method fails, use the other (for example, email instead of phone)
- Ensure contact information is up to date (see Q8)
If the user cannot receive a verification code and does not have a backup method configured, they must contact their plan administrator to regain access.
Q10: What will our Clients see when they log in for the first time when the Primary Method is SMS or Email? Top
When MFA is enabled, the first login looks like this:
- Log in and confirm details
Clients enter their username and password, then immediately verify their email and/or phone number on the next screen.

- Receive and enter the security code
A one-time code is sent by text or email.- The code is valid for 15 minutes.
- After entering the code, they proceed as normal.

Email details:
- Standard Users and 5500-only Portal Users: Emails come from donotreply@ftwilliam.com.
- Full Portal subscribers: Emails use the settings configured under Global Email Settings > Notifications.
Q11: Is there an authenticator app option available for MFA as the Primary Method? Top
Yes. When MFA is enabled, the Master User can configure the authenticator app in the Account Profile as the Primary Method for the entire company. This setting applies to all users included in the MFA configuration.

Q12: What will Users/Clients see when they log in for the first time when the Primary Method is Authenticator App? Top
When MFA is enabled and the Primary Method is Authenticator App, the first login looks like this:
Log in and begin verification
Users/Clients enter their username and password, then are prompted to verify their cell phone and/or email

Once 'OK' has been clicked, then they are prompted to set up and verify using the authenticator app on the next screen.

- Scan the QR code
- A QR code is displayed on the screen.
- Clients open their authenticator app and scan the QR code to add the account.
- Enter the security code
- Once the account is added, the authenticator app generates a time-based security code.
- The code refreshes automatically at regular intervals.
- After entering the code, users/clients proceed as normal.
Q13: What happens if I can’t access my authenticator app and don’t have a backup method set up? Top
If you cannot access your authenticator app and do not have email backup enabled, you will not be able to log in. In this situation, please contact your Master User on the account for assistance.
To help prevent this, all users are prompted to verify their contact information upon first login after MFA is enabled and should ensure an email address is on file.
