| Click on the name of the form you wish to edit and the form will open in a screen where you can enter and edit information (shown at right). There is no need to click 'Update' buttons. Once information is entered, it is saved in the system. Note that once a form is opened, you can navigate to other forms directly from the menu shown on the left-hand side of the page. You can also 'Run Edit Checks' for the form that is open on your screen. (See the Edit Checks section of this guide for more information.) |  |
- IRS Representatives.
A user with "Edit" privileges may add/modify/delete IRS representatives by clicking on the "Edit IRS Reps" link in the "IRS Forms" box (a screen should pop open to allow you to enter an IRS Rep). After an IRS representative has been added, you may select that representative to appear on the Form 2848 by clicking on that person's name in Item 2 of Part I of the Form 2848 and clicking your cursor to another place on the page. If the IRS representative will appear on the Form 5300/5307/5310 rather than the Form 2848, you should make sure the appropriate box on line 2a of the Form 5300/5307/5310 is not checked. When this box is not checked, you may select that representative to appear on the Form 5300/5307/5310 by clicking on that person's name in Item 2 and clicking your cursor to another place on the page.
Once a representative has been added using the "Edit IRS Reps" link, there is no need reenter his or her information on each new form. To clear a representative's name from the form, Choose the IRS Rep of "None" and click your cursor to another place on the page.
You may select the default IRS representative that will appear on all new forms by clicking on the "Admin Menu" link on the top of the page and selecting "Edit Company Profile".
- Attachments.
The following standard attachments are included and will be pre-populated to the extent possible based on data entered into the ftwilliam.com system:
- Other Qualified Plans
- Afil Serv Group
- Controlled Group
- Volume Submitter Modifications
- Additional Attachment
To select and include an attachment with your final filing, click in the box next to the attachment name. You can also print each attachment separately from this screen by clicking on 'Final' to the right of the applicable attachment on the 'IRS Attachments' page.
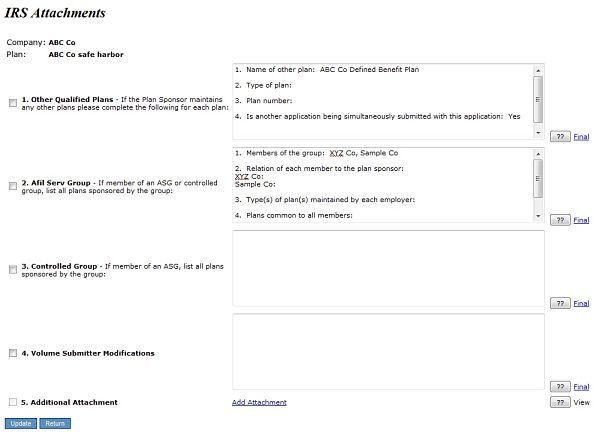
To include an additional attachment, click on the link 'Add Attachment'. You will be prompted to browse for a PDF file on your computer to upload.
Be sure to click the 'Update' button to save your changes to this page.
- Attachments.
- Replace IRS data with Plan data.
When you click the "Replace IRS data with Plan data" button much of the data currently in the IRS forms will be refreshed based on data from the document checklist. However, participant counts will be pulled from your most recent 5500EZ, last accepted 5500SF, or last accepted 5500 plus Sch. I or H.
This same process occurs automatically the first time you enter any IRS form for a particular plan. Use this button with caution if you have made significant changes to the document checklist after already starting work on an IRS form. Use this button only if you wish to start over.
This process may not be undone. We strongly suggest saving any forms to your desktop before clicking to replace IRS data with Plan data.
- Edit/Print - Selected IRS Forms.
The first step is to add individual forms to the filing package. This is done by clicking on the grey image (
 ) next to the form. Selected forms will turn green (
 ). To un-select, click on the green image and it will turn back to grey.
To edit-check the selected forms, click on the 'Edit Check All Selected IRS Forms' link under the 'IRS Forms' box (this will only appear if at least one form is selected).
To print a complete filing package, click on the 'Print All Selected IRS Forms' link under the 'IRS Forms' box. Clicking this link will generate a single pdf file with all selected forms included.
- Print Single IRS Form.
You may print a single form by clicking on the link 'Final' across from the applicable form. Clicking this link will generate a single pdf file. You may print the form and/or save it to your desktop.

 ) next to the form. Selected forms will turn green (
 ). To un-select, click on the green image and it will turn back to grey.
